Table of Contents
Overview
This module provides utilities for creating command-line Node.js apps. Features include automatic parsing of command-line args into simple key/value pairs, prompting the user for information, and displaying graphical info boxes and progress bars.
Usage
Use npm to install the module:
npm install pixl-cli
Then use require() to load it in your code:
var cli = require('pixl-cli');Basic Tools
Here are some of the more basic functions provided by the package.
Printing
A very simple cli.print() method is provided, which prints any string to STDOUT. This can be shortened to just print() if you import everything into the global namespace (see Importing Into Global below). Example:
var cli = require('pixl-cli');
cli.global();

print("Hello world!\n");
Unlike console.log() this does not add an EOL at the end of each string. It works just like the standard print() function from other languages. However, a println() method is also provided which does add an EOL.
Note that print() will be silent if --quiet mode is enabled. See Quiet Mode below.
An alternate function is provided for printing verbose output, called cli.verbose() (or just verbose() if imported into global). This function also prints a string to STDOUT, but only does so if --verbose mode is enabled. Example:
var cli = require('pixl-cli');
cli.global();

verbose("This will only be printed in verbose mode.\n");
See Verbose Mode below for details.
STDERR
To print something to STDERR you can use the cli.warn() method. This works similarly as cli.print() in that it honors Quiet Mode, does not include a trailing EOL, and gets imported to the global namespace if cli.global() is called. Example:
var cli = require('pixl-cli');
cli.global();

warn("This will be printed to STDERR.\n");
Dying
To print something to STDERR and exit immediately afterward, you can call cli.die() and pass in a message. This will exit with a non-zero code indicating that the process "failed". This method also gets imported to the global namespace if cli.global() is called. Example:
var cli = require('pixl-cli');
cli.global();

die("A fatal error occurred.\n");
Logging
To enable logging mode, so all calls to print(), verbose(), warn() and die() also get logged to a file, call cli.setLogFile() and pass in a path. The file need not exist, but the directory should. Example:
cli.setLogFile( "/var/log/myscript.log" );Note that once the log file is set, everything printed is logged, even if quiet mode is enabled. Additionally, all calls to cli.verbose() are also logged, even if --verbose mode is not enabled.
The log file format is simply a date/time surrounded by square brackets, followed by a single space, followed by the raw text printed. All color is automatically stripped. Example log snippet:
[2019/05/18 18:49:12] Hello there!
[2019/05/18 18:49:13] Good bye!
You can also call cli.log() to log something directly without also printing it to the console. If you pass an object to cli.log() it is serialized to JSON.
Loading and Saving Files
Simple methods are provided to load and save files to/from strings. These are both synchronous calls. They are loadFile() which accepts a file path and returns the contents as a string, and saveFile() which accepts a file path and contents as a string. saveFile() writes to the specified file, replacing any existing content, and creating the file if necessary. Example of both functions:
var cli = require('pixl-cli');

var contents = cli.loadFile( "my-file.txt" );
cli.print( "File contents: " + contents + "\n" );

contents = "Replacing with new content!";
cli.saveFile( "my-file.txt", contents );
If you want to append to a file instead of replacing its contents, use cli.appendFile(). It accepts the same arguments as cli.saveFile(). Example:
contents = "Appending a new line!\n";
cli.appendFile( "my-file.txt", contents );
Note: These functions may throw errors if the underlying filesystem operations fail, so it is advisable to wrap them in a try/catch block.
TTY Detection
To detect whether your script's output is attached to a TTY (meaning, it is attached to a user terminal and not being piped to a file or script), you can call cli.tty(). This will return a Boolean true or false. Example:
if (cli.tty()) {
	cli.print("Hello user terminal!\n");
}
Specifically, this queries the STDOUT TTY. Meaning, the script's output is connected to a terminal, but its input may still be a pipe of some kind.
To detect the width of the current TTY (user's terminal), you can call cli.width(). If a TTY is attached, this will return the current number of characters that will fit in one single line. Example:
var width = cli.width();
cli.print("Your terminal is " + width + " characters wide.\n");
Other Tools
The following utility functions from the pixl-tools module are also imported, so you can use them directly:
| Function Name | Description |
|---|---|
| cli.getTextFromBytes() | Convert a byte count into a human readable string, e.g. 5 MB. |
| cli.commify() | Apply commas to a positive integer using US-style formatting, e.g. 1,000,000. |
| cli.shortFloat() | Trim floating point decimal to 2-digit precision, unless digits are zeros. |
| cli.pct() | Return percentage string given arbitrary value and a maximum limit, e.g. '55%'. |
| cli.zeroPad() | Pad an integer with zeros on the left side, up to a specified max. |
| cli.getTextFromSeconds() | Convert a number of seconds into a human-readable string, e.g. 3 hours. |
| cli.getNiceRemainingTime() | Calculate estimated remaining time, given progress and start time. |
| cli.pluralize() | Apply English language pluralization to a word, based on a specified value. |
| cli.ucfirst() | Upper-case the first character of a string, lower-case the rest. |
In fact, the entire pixl-tools module is made available to you as cli.Tools, so you don't have to import it separately.
Command-Line Arguments
Any arguments passed to your script on the command-line are parsed using the pixl-args module, and provided as simple key/value pairs in cli.args. Example:
node my-script.js --name "Joseph Huckaby" --city San\ Mateo
Then cli.args will contain:
{
	"name": "Joseph Huckaby",
	"city": "San Mateo"
}
Several different kinds of arguments are available. You can use single or double-dashes, strings which appear to be integers or floats are parsed as such, any switch without a value is set to true, any repeated switches are converted to an array of values, and any values provided without a switch are appended to a special other array, which can come before or after all the switches. Here is an example of all these things:
node my-script.js file1.txt file2.txt --name "Joe" --amount 50 --freq 0.5 -z 1 --verbose --add thing1 --add thing2
Then cli.args will contain:
{
	"other": ["file1.txt", "file2.txt"],
	"name": "Joe",
	"amount": 50,
	"freq": 0.5,
	"z": 1,
	"verbose": true,
	"add": ["thing1", "thing2"]
}
Please see the pixl-args module documentation for more details.
Verbose Mode
The --verbose switch has a special meaning. It is used by the cli.verbose() function, and will control whether it outputs anything or not. cli.verbose() works just like cli.print() except that it only prints if the --verbose switch is present on the command-line. Example use:
var cli = require('pixl-cli');
cli.verbose("This will only be printed in verbose mode.\n");
Quiet Mode
The --quiet switch also has a special meaning. If passed on the command-line, it will mute all calls to cli.print() and of course cli.verbose(), meaning they will not output anything at all. This is useful for giving your script a special silent mode, possibly for running in a crontab.
Prompting The User
To prompt the user for input, you can call cli.prompt(). Pass in a string to prompt them with, a default answer, and a callback function which will be fired and passed their answer. This is an asynchronous operation, so beware of code flow. Example:
var cli = require('pixl-cli');

cli.prompt("What is your name?", "", function(name) {
	cli.print("Hello " + name + "!\n");
} );
If a default string is provided, it is displayed just after the question in square brackets, which is the typical way of hinting a default answer. If the user presses Enter without typing in a value, your default answer will be sent to your callback.
Note that if your script is running without a TTY (i.e. without an attached terminal, as in piped to a file or another script), no prompt is displayed, and your callback is fired immediately and passed your default answer.
Yes/No Questions
If you just need to ask the user a simple yes/no question, a convenience method is provided. Just call cli.yesno(), provide a string to prompt them with, a default answer (y or n), and a callback. This time your callback is passed Boolean true if the user answered yes (or y or any word that contains a y), or false for no or anything non-yes. Example:
cli.yesno("Do you like bacon?", "y", function(yes) {
	if (yes) cli.print("You can be my friend.\n");
	cli.print("You are dead to me.\n");
} );
Note that if your script is running without a TTY (i.e. without an attached terminal, as in piped to a file or another script), no prompt is displayed, and your callback is fired immediately and passed true or false based on your default answer.
Displaying Info Boxes
Call cli.box() to render a string (or paragraph) of text surrounded by an ASCII art border. Example:
var cli = require('pixl-cli');

cli.print(
	cli.box("The quick brown fox jumped over the lazy dog.") + "\n"
);
This would produce:
┌───────────────────────────────────────────────┐
│ The quick brown fox jumped over the lazy dog. │
└───────────────────────────────────────────────┘
Absent any options, the box will be sized to fit your text string, with exactly one space of horizontal space on either side. You can customize this and several other options by passing in an object as the 2nd argument to the cli.box() method. Here are all the possible properties:
| Property Name | Description |
|---|---|
width |
An optional fixed width. If specified and the string exceeds the width, it will be word-wrapped. |
styles |
An array of chalk styles or functions to apply to the box border graphics, defaults to ["gray"]. |
hspace |
An optional number of spaces to insert on the left and right sides of the text (defaults to 1). |
vspace |
An optional number of vertical lines to insert above and below the text (defaults to 0). |
indent |
Number of characters to indent the box by (defaults to 0). |
Example:
var text = "Lorem ipsum dolor sit amet, consectetur adipisicing elit, sed do eiusmod tempor incididunt ut labore et dolore magna aliqua. Ut enim ad minim veniam, quis nostrud exercitation ullamco laboris nisi ut aliquip ex ea commodo consequat. Duis aute irure dolor in reprehenderit in voluptate velit esse cillum dolore eu fugiat nulla pariatur. Excepteur sint occaecat cupidatat non proident, sunt in culpa qui officia deserunt mollit anim id est laborum.";

cli.print(
	cli.box( text, {
		width: 40,
		styles: ["magenta", function( text ) { return text.toUpperCase() }],
		hspace: 2,
		vspace: 1,
		indent: 4
	} ) + "\n"
);
This will produce:
	┌────────────────────────────────────────────┐
	│                                            │
	│  Lorem ipsum dolor sit amet, consectetur   │
	│  adipisicing elit, sed do eiusmod tempor   │
	│  incididunt ut labore et dolore magna      │
	│  aliqua. Ut enim ad minim veniam, quis     │
	│  nostrud exercitation ullamco laboris      │
	│  nisi ut aliquip ex ea commodo consequat.  │
	│  Duis aute irure dolor in reprehenderit    │
	│  in voluptate velit esse cillum dolore eu  │
	│  fugiat nulla pariatur. Excepteur sint     │
	│  occaecat cupidatat non proident, sunt in  │
	│  culpa qui officia deserunt mollit anim    │
	│  id est laborum.                           │
	│                                            │
	└────────────────────────────────────────────┘
Centering Text
To center align text within a fixed width, you can use the cli.center() method. This accepts a string which may be single or multiple lines, and an optional width in characters. If you omit the width, it uses the length of the longest line. Example:
cli.print(
	cli.center(
		"This Is A Title\n" +
		"The quick brown fox jumped over the lazy dog."
	) + "\n"
);
This would produce:
┌───────────────────────────────────────────────┐
│                This Is A Title                │
│ The quick brown fox jumped over the lazy dog. │
└───────────────────────────────────────────────┘
Of course, you can also just use cli.center() on its own, without wrapping it in a call to cli.box().
Word-Wrapping Text
To word-wrap text when using cli.box() simply specify a width property in your options object. Your string will be word-wrapped to fit into the specified width. However, there is also a low-level cli.wrap() function you can call directly, which simply wraps text at a specified width. Example use:
cli.print(
	cli.wrap( text, 40 ) + "\n"
);
This would produce:
Lorem ipsum dolor sit amet, consectetur
adipisicing elit, sed do eiusmod tempor
incididunt ut labore et dolore magna
aliqua. Ut enim ad minim veniam, quis
nostrud exercitation ullamco laboris
nisi ut aliquip ex ea commodo consequat.
Duis aute irure dolor in reprehenderit
in voluptate velit esse cillum dolore eu
fugiat nulla pariatur. Excepteur sint
occaecat cupidatat non proident, sunt in
culpa qui officia deserunt mollit anim
id est laborum.
Displaying Tables
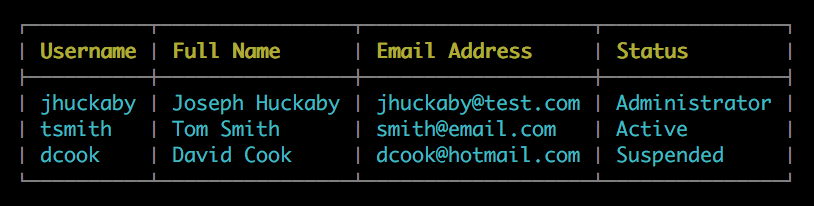
Calling cli.table() produces a nicely formatted ASCII table with a grid of data. It expects an array of rows, and each element should be an array of columns. The first row will be rendered as the "header" and use a different style. Example:
var cli = require('pixl-cli');

var rows = [
	[ "Username", "Full Name", "Email Address", "Status" ],
	[ "jhuckaby", "Joseph Huckaby", "jhuckaby@test.com", "Administrator" ],
	[ "tsmith", "Tom Smith", "smith@email.com", "Active" ],
	[ "dcook", "David Cook", "dcook@hotmail.com", "Suspended" ]
];

cli.print(
	cli.table(rows) + "\n"
);
This would produce the following output:
┌──────────┬────────────────┬───────────────────┬───────────────┐
│ Username │ Full Name      │ Email Address     │ Status        │
├──────────┼────────────────┼───────────────────┼───────────────┤
│ jhuckaby │ Joseph Huckaby │ jhuckaby@test.com │ Administrator │
│ tsmith   │ Tom Smith      │ smith@email.com   │ Active        │
│ dcook    │ David Cook     │ dcook@hotmail.com │ Suspended     │
└──────────┴────────────────┴───────────────────┴───────────────┘
Of course, if your Terminal supports ANSI color and font styles, the header would be bold and yellow, the text would be cyan, and the borders would be gray. You can customize the styles by passing an object as the second argument to cli.table() with the following keys:
| Property Name | Description |
|---|---|
headerStyles |
An array of chalk styles or functions to apply to the header cell text. |
textStyles |
An array of chalk styles or functions to apply to the table cell text. |
borderStyles |
An array of chalk styles or functions to apply to the border graphics. |
indent |
Number of characters to indent the table by (defaults to 0). |
autoFit |
Automatically "fit" table into the available terminal width, if it is too wide. This will add ellipsis to longer columns as required. |
Here is an example specifying all the possible options:
cli.print(
	cli.table(rows, {
		headerStyles: ["bold", "yellow"],
		textStyles: ["cyan", function( text ) { return text.toUpperCase() }],
		borderStyles: ["gray"],
		indent: 0,
		autoFit: true
	}) + "\n"
);
Each of the three style keys should be set to an array of style names supported by the chalk module or a custom function to support different text transformations. These are arrays because each component may contain multiple styles. For example, the headerStyles is rendered with both yellow and bold by default.
Note that each text cell must only be one line (multi-line is not supported).
Graphical Progress Bars

To display a graphical ASCII progress bar, first call cli.progress.start() to display the progress bar and begin animation. Then, as you make progress on your operation, call cli.progress.update() and pass in a number between 0.0 and 1.0 representing the total progress (the maximum is configurable, see below). When your operation is complete, call cli.progress.end(). That's it!
Here is a simple example:
var cli = require('pixl-cli');

var amount = 0;
cli.progress.start();

setInterval( function() {
	amount += 0.0005;
	cli.progress.update( amount );

	if (amount >= 1.0) {
		cli.progress.end();
		cli.print("\tThe end!\n\n");
		process.exit(0);
	}
}, 10 );
Note that the progress bar will redraw itself every 100ms (configurable), so you don't need to worry about calling cli.progress.update() constantly. You only really need to call it when the amount changes.
Note that if your script is running without a TTY (i.e. without an attached terminal, as in piped to a file or another script), the progress bar is completely no-op'ed. Meaning, it doesn't display anything, and all the API calls do nothing and don't throw any errors.
Configuration
Calls to cli.progress.start() and cli.progress.update() accept an object containing any of the following properties:
| Property Name | Description |
|---|---|
amount |
Initial amount to display in progress bar (between 0 and max). Defaults to 0.0. |
max |
Maximum amount which represents 100% of bar being filled. Defaults to 1.0. |
text |
Optional custom text string to display on right side of progress bar. |
width |
The width of the actual progress bar in characters (defaults to 30). |
indent |
Number of characters to indent the progress bar by (defaults to 0). |
freq |
The animation update frequency in milliseconds (defaults to 100). |
color |
Boolean (true), specifies whether to use chalk colors or not. |
unicode |
Boolean (true), specifies whether to use Unicode characters or basic ASCII. |
remain |
Boolean (true), specifies whether to show the estimated remaining time or not. |
spinner |
An array of characters to use as the spinning animation. |
braces |
An array of two characters to use as the left and right braces around the bar. |
filling |
An array of characters to use as the bar chunk filling progression. |
filled |
A single character representing one filled bar chunk, defaults to "⣿". |
styles |
A set of color styles to use (see Changing Color Styles below). |
If you call cli.progress.update() and pass in a number, the library assumes you are just updating the amount. However, if you pass in an object, all the specified properties are updated.
Temporarily Erasing The Bar
If you need to temporarily erase the progress bar, presumably to write some lines of output to the console, you can call the cli.progress.erase() method. Just note that after freq milliseconds (or less), the bar will be redrawn.
To reduce flickering, you can force a redraw just after outputting your lines by calling cli.progress.draw(). Example:
cli.progress.erase();
cli.print("We're now in phase 2 of 3: Updating DB indexes...\n\n");
cli.progress.draw();
Customizing the Look
The progress bar uses specific Unicode characters to achieve its look. You can customize these by passing in the following keys to your call to cli.progress.start():
cli.progress.start({
	spinner: ['⠋', '⠙', '⠹', '⠸', '⠼', '⠴', '⠦', '⠧', '⠇', '⠏'],
	braces: ['⟦', '⟧'],
	filling: [' ', '⡀', '⡄', '⡆', '⡇', '⣇', '⣧', '⣷'],
	filled: '⣿'
});
The spinner array contains all the characters used for the 1-character spinning animation at the left side of the bar. They are picked in sequence for each tick (freq milliseconds). To disable the spinner, set this to an array containing one empty space character.
The braces array should contain exactly two elements: one for the left side, and one for the right side of the bar. By default these are stylized Unicode brackets, but can be replaced with any characters you want.
The filling array contains progressive characters representing a partial bar chunk as it fills up, before it is replaced with the filled character. To disable the partial chunk blocks, set this to an array containing one empty space character.
Finally, the filled is a single character (not an array) which represents a filled chunk of the progress bar. This is what replaces the filling animation once it completes a block.
If you switch to plain ASCII mode by setting the unicode property to false, this is the same as passing the following:
cli.progress.start({
	spinner: ['|', '/', '-', "\\"],
	braces: ['[', ']'],
	filling: [' ', '.', ':'],
	filled: '#'
});
Changing Color Styles
The progress bar uses a set of color styles from the chalk module or a custom function for the spinner, braces, bar chunks, percentage display, remaining time, and your custom text (if applicable). To customize these, pass in a styles object with the following keys:
cli.progress.start({
	styles: {
		spinner: ['bold', 'green'],
		braces: ['gray'],
		bar: ['bold', 'cyan'],
		pct: ['bold', 'yellow'],
		remain: ['green'],
		text: [function( text ) { return text.toUpperCase() }]
	}
});
Each key should be set to an array of styles supported by the chalk module or a function. These are arrays because each component may contain multiple styles. For example, by default the spinner, bar and pct are styled with both a color and bold.
Automatic Width
To set the progress bar size automatically to take up the full width of your Terminal window, you can use the cli.width() function. Just subtract 27 characters from it (possibly more if you use indent or text) to account for the spinner, braces, percentage and remaining time:
cli.progress.start({
	width: cli.width() - 27
});
To handle dynamically resizing Terminal windows, just reset the width in each of your calls to cli.progress.update():
cli.progress.update({
	amount: MY_CURRENT_AMOUNT,
	width: cli.width() - 27
});
Keep progress bar visible
To keep the progress bar visible after it reaches 100%, just pass the value false to the
cli.progress.end() function. This will prevent it from being erased from the screen.
Unicode or ASCII
By default the progress bar is rendered using various Unicode characters:
⠼ ⟦⣿⣿⣿⣿⣿⣿⣿⣿⣿⣿⣿⣿⣿⣿⣿⣿ ⟧ 53% (11 sec remain)
However, if you set the unicode parameter to false, these will be replaced with standard ASCII equivalents:
/ [################: ] 55% (10 sec remain)
You can change the exact characters used as well. See the Customizing the Look section.
Hiding the Cursor
While the progress bar is active, your terminal cursor is hidden, and then restored when cli.progress.end() is called, or when your process exits. This is all handled automatically, except when your process dies unexpectedly, such as via an uncaught Ctrl-C (SIGINT), uncaught termination signal, or a hard crash. When these happen, the progress bar has no chance to restore the cursor, so it ends up remaining hidden until you close and reopen your terminal window.
To fix this, you have two options. You can either catch the signal or crash yourself, and call cli.progress.end(), or you can let the library handle it for you:
When calling cli.progress.start() there are some optional arguments which activate special behavior for the terminal cursor restoration. They are:
| Property Name | Description |
|---|---|
catchInt |
When set to true, this will hook SIGINT and call cli.progress.end() to restore the cursor. |
catchTerm |
When set to true, this will hook SIGTERM and call cli.progress.end() to restore the cursor. |
catchCrash |
When set to true, this will hook uncaughtException and call cli.progress.end() to restore the cursor. |
exitOnSig |
When set to true, this will also call process.exit() (with the appropriate status code) after handling the SIGINT or SIGTERM signal. |
Example:
cli.progress.start({
	catchInt: true,
	catchTerm: true,
	catchCrash: true,
	exitOnSig: true
});
Note: You should only need exitOnSig if you are not already handling the signal in your own code, and calling process.exit() yourself.
Chalk
All the style methods from the wonderful chalk module are automatically imported, so you can use them like this:
var cli = require('pixl-cli');
cli.print( cli.bold.red("This is bold and red!") + "\n" );
Importing Into Global
You can optionally import some of the most commonly used methods into the global namespace, so you can use them from anywhere without having to prefix them. The method list includes print(), verbose(), a bunch of others (see below), as well as all the chalk style methods. Example:
var cli = require('pixl-cli');
cli.global();

print( box( bold.red("This is bold, red and in a box!") ) + "\n" );
The full list of methods and objects that are imported are:
print()println()verbose()warn()die()loadFile()saveFile()appendFile()prompt()yesno()table()box()wrap()center()commify()shortFloat()pct()pluralize()ucfirst()progressargs
License
The MIT License
Copyright (c) 2016 - 2019 Joseph Huckaby.
Permission is hereby granted, free of charge, to any person obtaining a copy of this software and associated documentation files (the "Software"), to deal in the Software without restriction, including without limitation the rights to use, copy, modify, merge, publish, distribute, sublicense, and/or sell copies of the Software, and to permit persons to whom the Software is furnished to do so, subject to the following conditions:
The above copyright notice and this permission notice shall be included in all copies or substantial portions of the Software.
THE SOFTWARE IS PROVIDED "AS IS", WITHOUT WARRANTY OF ANY KIND, EXPRESS OR IMPLIED, INCLUDING BUT NOT LIMITED TO THE WARRANTIES OF MERCHANTABILITY, FITNESS FOR A PARTICULAR PURPOSE AND NONINFRINGEMENT. IN NO EVENT SHALL THE AUTHORS OR COPYRIGHT HOLDERS BE LIABLE FOR ANY CLAIM, DAMAGES OR OTHER LIABILITY, WHETHER IN AN ACTION OF CONTRACT, TORT OR OTHERWISE, ARISING FROM, OUT OF OR IN CONNECTION WITH THE SOFTWARE OR THE USE OR OTHER DEALINGS IN THE SOFTWARE.