nudged


![]()
Nudged is a JavaScript module to efficiently estimate translation, scale, and/or rotation between two sets of 2D points. It has already been applied to user interfaces, multi-touch recognition, geography, and eye tracker calibration.
Table of contents
- Installation
- Introduction
- Usage
- Example apps
- API docs
- For developers
- Acknowledgments
- Versioning
- Licence
Installation
Install nudged with npm or other compatible package manager. The package comes in two flavors: functional and object oriented.
Install the functional nudged 2.0.0-beta:
$ npm install nudged
Install the object-oriented nudged 1.x:
$ npm install nudged@1
Nudged is also available in Python.
Introduction
In general, you can apply Nudged in any situation where you want to capture a 2D transformation based on a movement of any number of control points. See the image below for the available transformations Nudged can estimate.

Image: Available transformation estimators. Each estimator has an abbreviated name, for example 'SR', according to the free parameters to estimate. The black-white dots and connecting arrows represent movement of two control points. Given the control points, Nudged estimates a transformation. The pairs of photos represent the effect of the resulting transformation. For easy visual comparison, the control points and the initial image positions are kept the same for each estimator.
Mathematically speaking, Nudged is a set of optimal least squares estimators for the group of nonreflective similarity transformation matrices, also called Helmert transformations. Such transformations are affine transformations with translation, rotation, and/or uniform scaling, and without reflection or shearing. The estimation has time complexity of O(n), where n is the cardinality (size) of the point sets. In other words, Nudged solves a 2D to 2D point set registration problem (alias Procrustes superimposition) in linear time. The algorithms and their efficiency are thoroughly described in a M.Sc. thesis Advanced algorithms for manipulating 2D objects on touch screens.
The development has been supported by Infant Cognition Laboratory at Tampere University where Nudged is used to correct eye tracking data. Yet, the main motivation for Nudged comes from Tapspace, a zoomable user interface library where smooth and fast scaling by touch is crucial.
Usage
Let domain be a set of points, [{ x, y }, ...]. Let range be the same points after an unknown transformation T as illustrated in the figure below.
const domain = [{ x: 0, y: 2 }, { x: 2, y: 2 }, { x: 1, y: 4 }]
const range  = [{ x: 4, y: 4 }, { x: 4, y: 2 }, { x: 6, y: 3 }]

Figure: The domain (circles o) and the range (crosses x). The + marks the point {x:0,y:0}.
We would like to find a simple 2D transformation tran that simulates T as closely as possible by combining translation, scaling, and rotation. We compute tran by calling nudged.estimate:
const tran = nudged.estimate({
  estimator: 'TSR',
  domain: domain,
  range: range
})
The result is a transform object:
> tran
{ a: 0, b: -1, x: 4, y: 4 }
You can apply tran to a point with point.transform:
> nudged.point.transform({ x: 0, y: 4 }, tran)
{ x: 6, y: 4 }

Figure: A point {x:0, y:4} is transformed by the estimated transform.
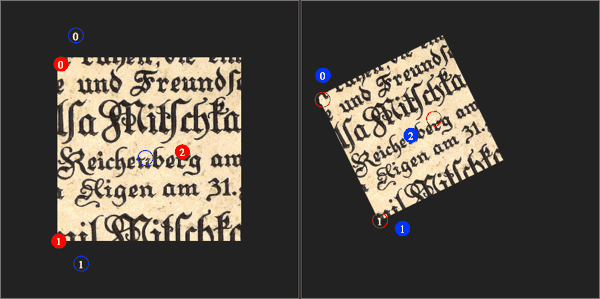
You can apply tran to other geometric shapes as well, for example to correct the orientation based on some sensor data. In the case of HTML image elements, just convert tran to a CSS transform string with transform.toString:
> img.style.transform = nudged.transform.toString(tran)

Figure: An HTML image before and after the transform we estimated from the points.
The nudged.transform module provides lots of tools to process transform objects. For example, to make a transformation that maps the range back to the domain instead of another way around, invert the transform with transform.inverse:
> const inv = nudged.transform.inverse(tran)
> nudged.point.transform({ x: 6, y: 4 }, inv)
{ x: 0, y: 4 }

Figure: A point is transformed by the inverse of the estimated transform.
See nudged.transform for more tools and details.
Set a center point
To estimate scalings and rotations around a fixed point, give an additional center parameter. Only the estimators S, R, and SR respect the center parameter.
const center = { x: 4 , y: 0 }
const rotateAround = nudged.estimate({
  estimator: 'R',
  domain: domain,
  range: range,
  center: center
})
You can think the center point as a nail that keeps an elastic sheet of rubber fixed onto a table. The nail retains its location regardless of how the rubber sheet is rotated or stretched around it.

Figure: Rotation around a center point (⊕) maps the domain (o) as close to the range (x) as possible. Here the mapped image (●) cannot match the range exactly due to the restriction set by the center point. The + denotes the point {x:0, y:0}.
To test the resulting transform, we can apply it to the center point and observe that the point stays the same.
> nudged.point.transform(center, rotateAround)
{ x: 4, y: 0 }
To estimate scalings in respect of a center point, as illustrated below, set estimators: 'S'. This scaling operation is also called a homothety.
const s = nudged.estimate({
  estimator: 'S',
  domain: domain,
  range: range,
  center: center
})

Figure: The domain (o) is scaled towards the center point (⊕) so that the resulting image (●) lies as close to the range (x) as possible.
See estimators.S, estimators.R, and estimators.SR for further details.
Analyse the transform
To examine properties of the resulting transformation matrix:
> nudged.transform.getRotation(tran)
-1.5707... = -π / 2
> nudged.transform.getScale(tran)
1.0
> nudged.transform.getTranslation(tran)
{ x: 2, y: 4 }
> nudged.transform.toMatrix(tran)
{ a:  0, c: 1, e: 2,
  b: -1, d: 0, f: 4 }
To compare how well the transform fits the domain to the range, you can compute the mean squared error, MSE. The smaller the error, the better the fit:
> nudged.analysis.mse(tran, domain, range)
0
The MSE of 0 means that the estimate maps domain on the range perfectly. We can demonstrate this by transforming the domain points and comparing the result to the range:
> nudged.point.transformMany(domain, tran)
[ { x: 4, y: 4 }, { x: 4, y: 2 }, { x: 6, y: 3 } ]
> range
[ { x: 4, y: 4 }, { x: 4, y: 2 }, { x: 6, y: 3 } ]

Figure: The domain (o) mapped with tran (→). The fit is perfect, the image (●) matches the range (x) exactly.
See nudged.analysis for more.
Build transforms
In addition to estimation, you can create transforms by other means. For example, let t be a 0.5x scaling towards { x: 6, y: 5 }:
> const t = nudged.transform.scaling({ x: 6, y: 5 }, 0.5)
> t
{ a: 0.5, b: 0, x: 3, y: 2.5 }
Let us apply t to domain. The result is illustrated below.
> nudged.point.transformMany(domain, t)
[ { x: 3, y: 3.5 }, { x: 4, y: 3.5 }, { x: 3.5, y: 4.5 } ]

Figure: Scaling the domain (o) by the factor of 0.5 about the center point (⊕). The resulting image (●) has all distances halved. The + denotes the point {x:0, y:0}.
Then let us modify the transform t further. Let tr be a transform that combines t
with a negative rotation of 45 degrees (π/4) around { x: 0, y: 0 }:
> const tr = nudged.transform.rotateBy(t, { x: 0, y: 0 }, -Math.PI / 4)
> tr
{ a: 0.353..., b: -0.353..., x: 3.889..., y: -0.353... }
Let us apply the resulting transform to the domain points. The result is illustrated below.
> nudged.point.transformMany(domain, tr)
[
  { x: 4.596..., y: 0.353... },
  { x: 5.303..., y: -0.353... },
  { x: 5.656..., y: 0.707... }
]

Figure: A scaling is combined with rotation so that the image of the scaling (grey ●) is further rotated by 90 degrees around a center point (⊕).
Not all transformation need to be built. You can find some prebuilt transforms under nudged.transform:
> const p = { x: 4, y: 2 }
> const X2 = nudged.transform.X2
> nudged.point.transform(p, X2)
{ x: 8, y: 4 }
> const ROT180 = nudged.transform.ROT180
> nudged.point.transform(p, ROT180)
{ x: -4, y: -2 }
> const I = nudged.transform.IDENTITY
> nudged.point.transform(p, I)
{ x: 4, y: 2 }
To discover more features and details, see API.
Example apps
The following demo applications give an example how nudged can be used in the web.
Multitouch transformation with N fingers

The touch gesture demo takes the common pinch-zoom and rotate gestures a step further. Many multitouch apps allow you to scale and rotate with two fingers. However, usually the additional fingers are ignored. But what if one wants to use, say, both hands and all the fingers on a huge touchscreen?
For reference, the typical gesture demo implements similar demo with the popular Hammer.js touch gesture library. As you can experience, only the first two pointers are regarded for scaling and rotation.
Point set editor
The editor demo allows you to add domain and range points on a surface and explore how the points affect the transformation.
Tokyo metro map viewer
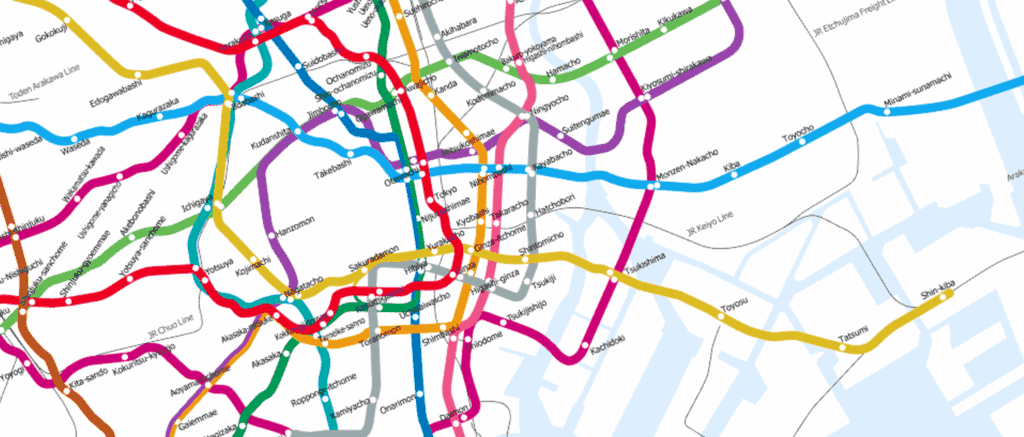
In this map viewer demo, nudged is used to recognize multi-touch gestures to scale, rotate, and translate a large image on HTML5 canvas.
API
The functional 2.x API documentation.
The object-oriented 1.x API documentation
For developers
Guidelines:
- ES6
-
Standard style
- 2 space indent
- max 80 chars per line
- spaces around operators
- Functional approach
- namespaces and functions instead of classes and methods
- immutable and stateless data handling; no in-place manipulation.
- Minimal run-time type checking
- Nudged is designed to be a low-level module with high performance.
- Instead of run-time checks, the geometries provide a dedicated .validate function.
- Write rich comments that answer the question why.
Run lint & unit tests:
$ npm run test
Build example apps:
$ npm run build:examples
Start local server to try out the examples:
$ npm start
Git workflow:
- Create a feature branch:
$ git branch feature-name - When feature finished, merge:
$ git checkout master$ git merge feature-name$ git push- Delete the feature branch.
- Bump version in package.json,
npm run gv, and run tests. - Build examples
npm run build:examples - Commit:
$ git commit -a -m "Release 7.7.7" - Create tag:
$ git tag -a 7.7.7 -m "v7.7.7 Superb Name"$ git push --tags
- Publish to npm:
$ npm publish
Acknowledgments
We want to thank:
- Tampere University of Technology and Adj. Prof. Ossi Nykänen for guidance on the M.Sc. thesis on Nudged.
- Infant Cognition Laboratory at University of Tampere and Adj. Prof. Jukka Leppänen for funding and support in research.
- 3D Media Group at Tampere University of Technology, M.Sc. Olli Suominen, and Prof. Atanas Gotchev for providing touch-screen devices for testing.
- Tanja for math photos.
- Vilkku, Xiao, and Krista for finger photos.