node-red-contrib-publishflows
PublishFlows allows developers to publish flows from their projects for use in other projects. Developers can publish flows specific to tabs, subflows, or arbitrary asset files that live in the project's folder. PublishFlows brings the concept found in other programming languages often referred to as a requirement, include, or dependency to Node-RED flows.
Combined with ActionFlows, PublishFlows can allow developers to create more modular, extendable, and versatile designs to otherwise bulky and complex flows.
Use the Publish option under project settings to define the parts of your
project that you wish to make available to other projects. A project that wishes
to use the published flows may simply list your project as a dependency. Use
PublishFlows to:
- Create templates and blueprints to jump start new projects
- Breakup complex projects into smaller sub-projects
- Lock project dependencies to a specific version
- Separate test flows from runtime flows
- Update projects independently
- Make re-usable components
How It Works
A project that lists another project as a dependency will automatically have its predefined components (tabs, subflows, arbitrary asset files) merged into the current project; overwriting/updating any existing nodes that share the same I.D.
Only the declared parts from the PublishFlows' project will be copied and merged. The declared parts are stored in the project folder within a file called manifest.js. The manifest file lists the components that are to be shared and used within other projects. Users of the dependent project should avoid editing the imported components as they will be overwritten with the dependency content.
Example Scenario
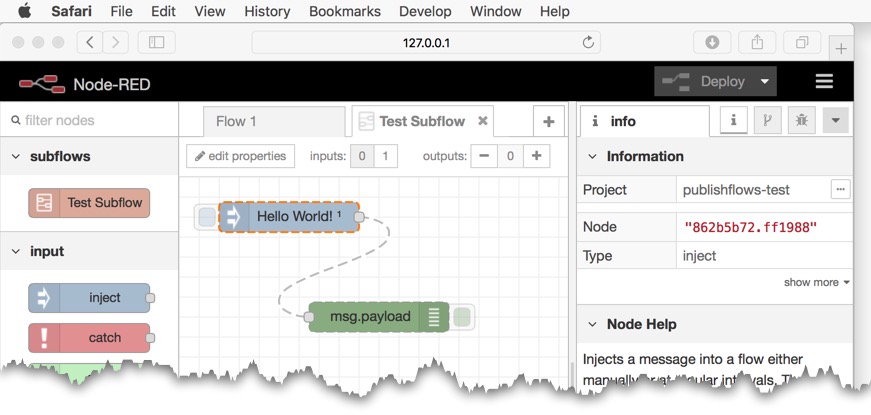
For example, say you have produced a subflow that you would like to reuse in other projects. Here we have created a subflow with an inject node and debug node that prints "Hello World!" in the debug window. This subflow is maintained within the project called pf-test.
Simply create a project that houses your subflow; perhaps include an example tab that uses the subflow to illustrate its use. We will only publish the subflow, not the example tab. Under Project Settings (1) from the right side menu or '...' Project info button, select the (2) Publish tab followed by (3) checkmarking the "Test Subflow".
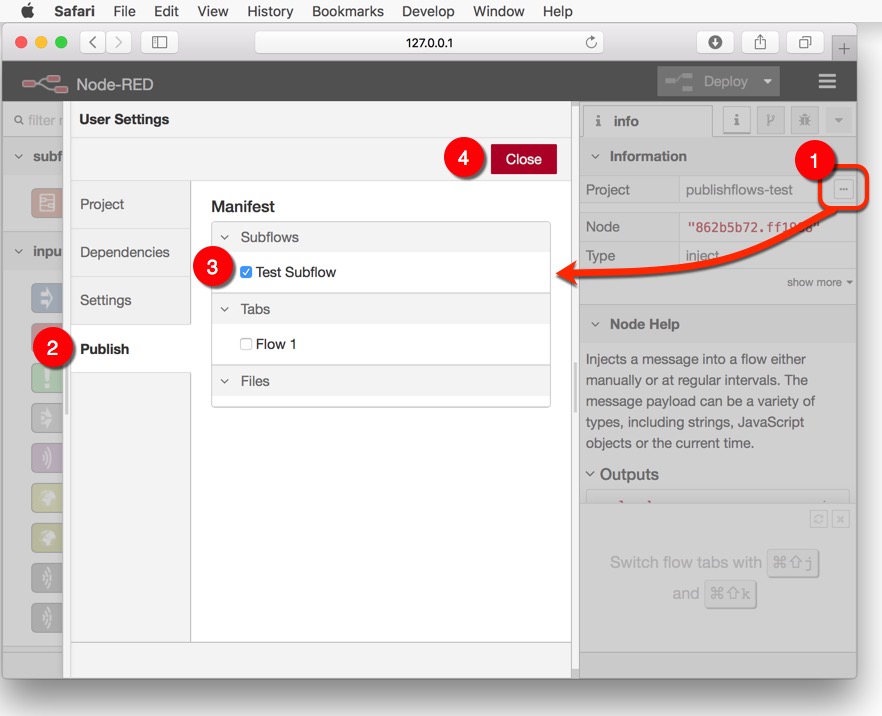
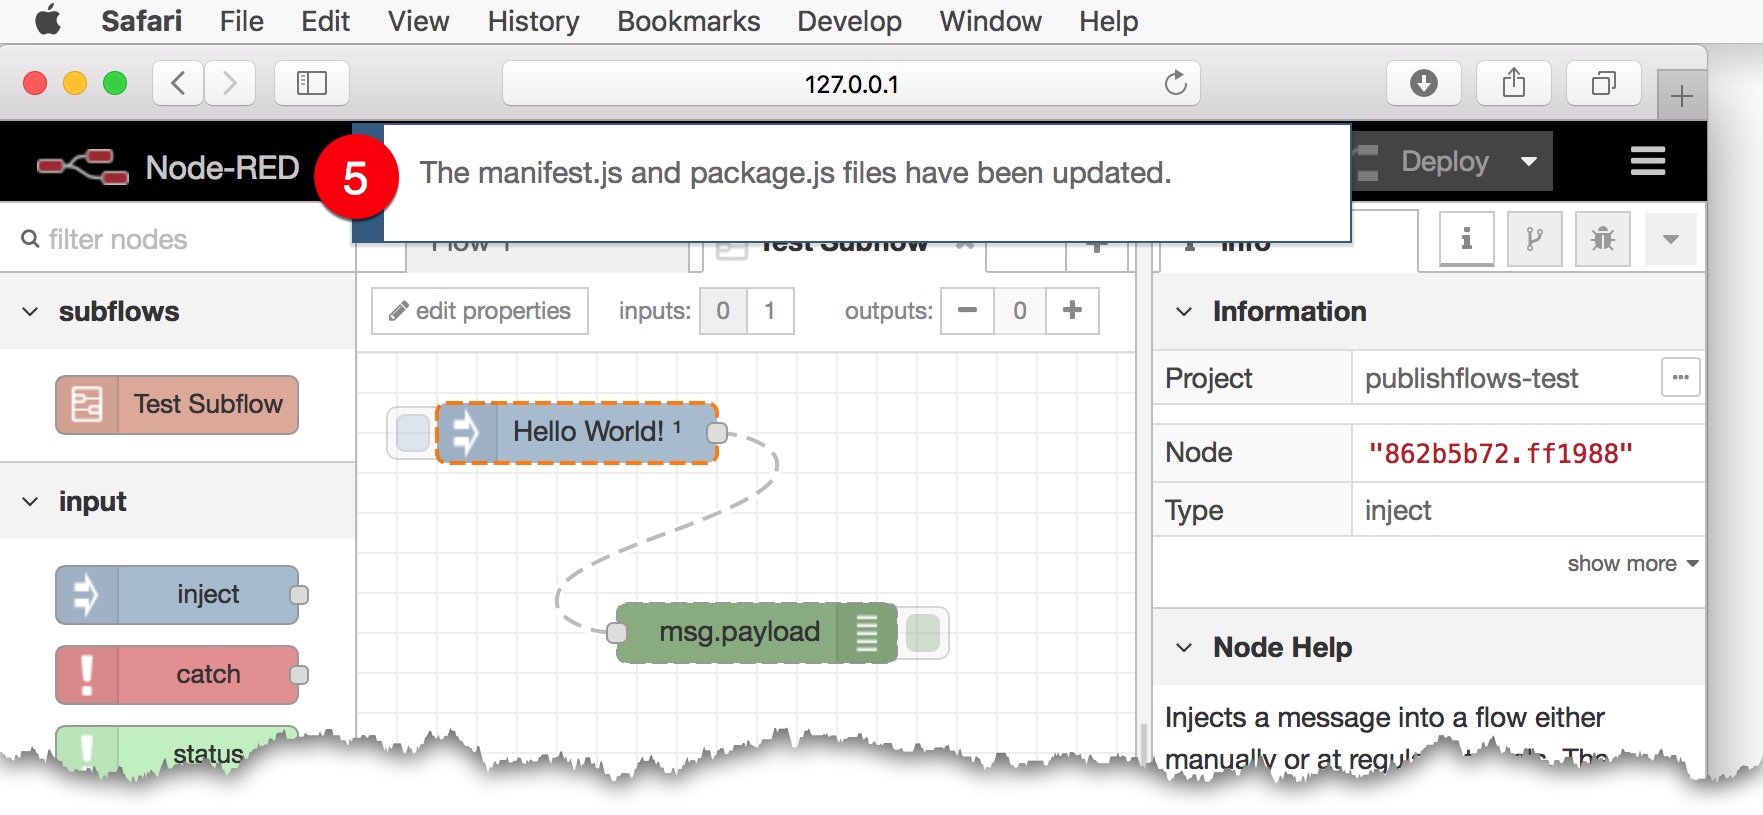
Clicking (4) close will cause PublishFlows to automatically generate a (5) manifest.js file listing the "Test Subflow" for others to use in their projects. Additional changes are made to your project's package.json so that your project can be included as a dependency within Node-RED's Dependencies panel.
Using the Example Scenario "Test Subflow" in Your Project
Now you can use the "Test Subflow" in your own/multiple other projects; maintaining the original "Test Subflow" separately within the project pf-test.
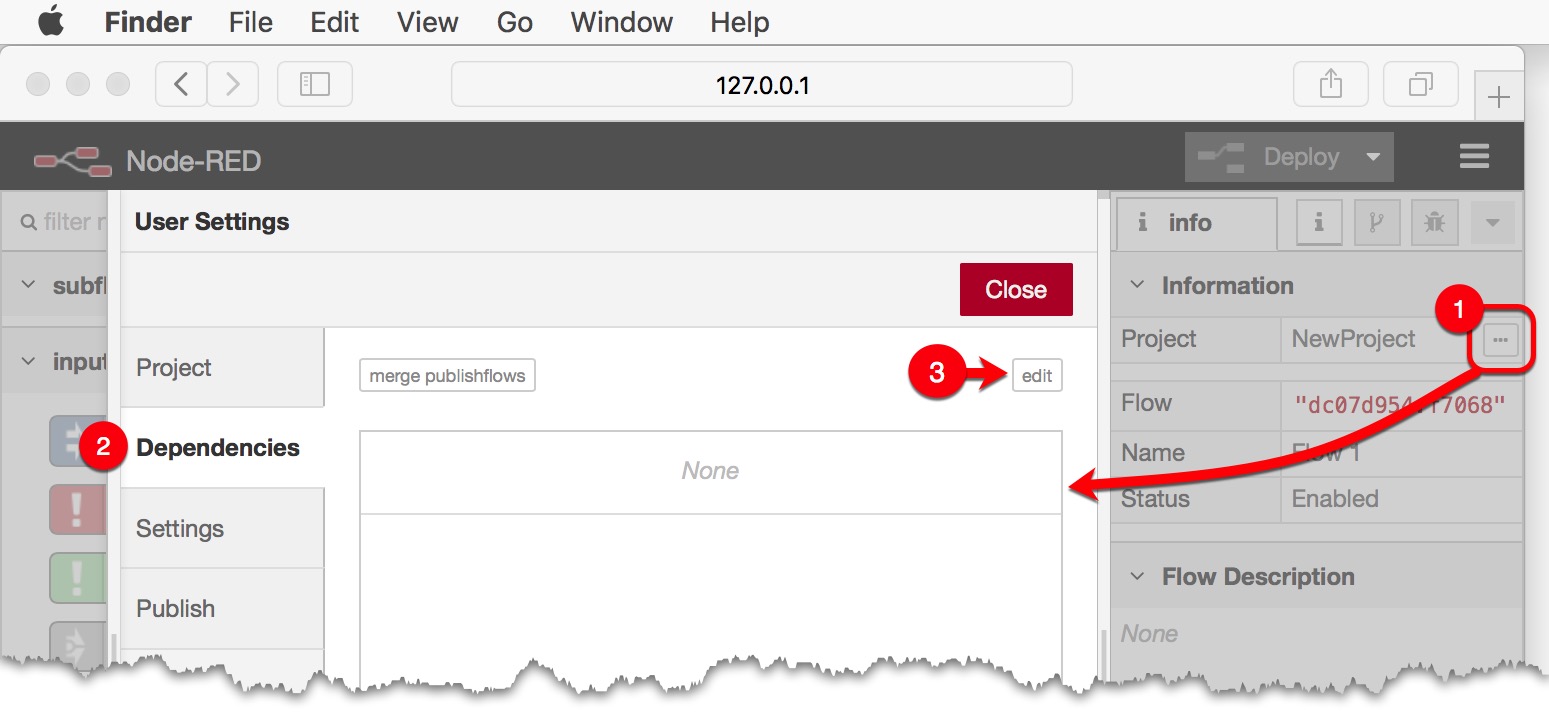
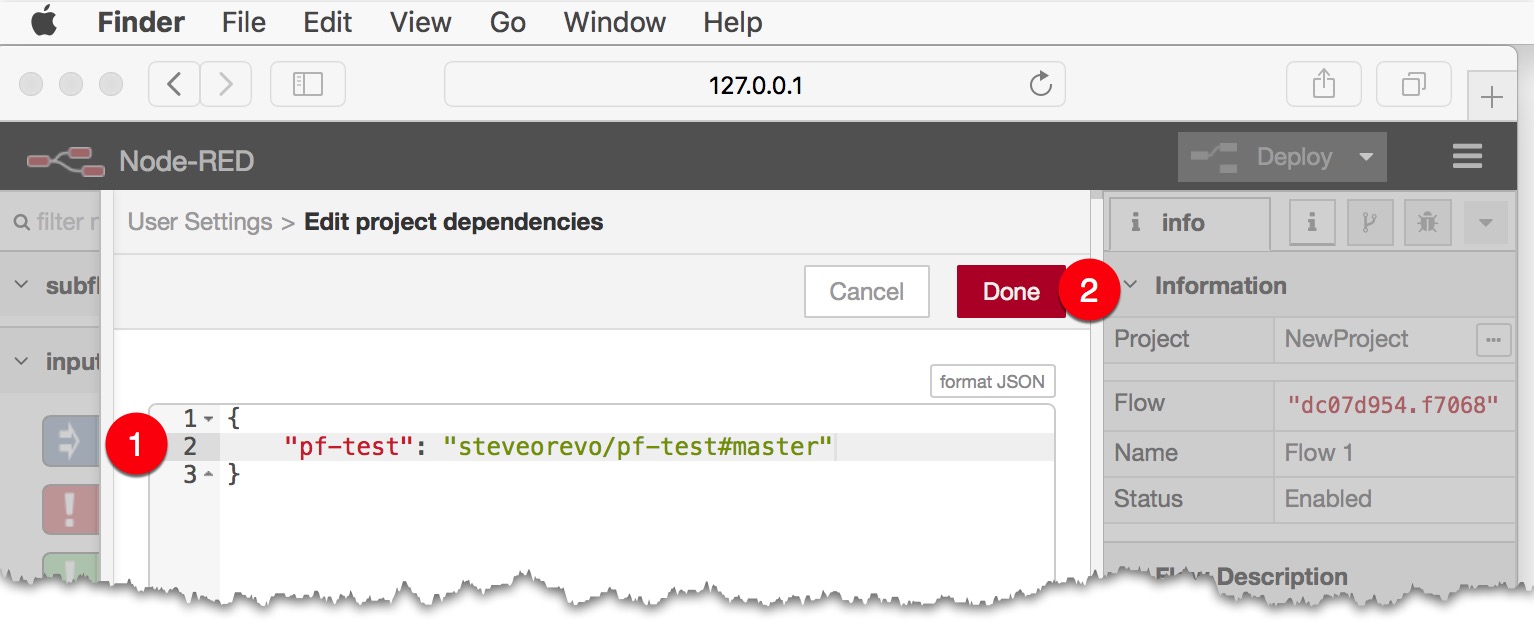
Create a new project. Use the Project Settings menu option from the right side menu or (1) click the '...' project info button and select the (2) Dependencies tab. Ensure you have PublishFlows installed, or add it as a dependency. From here, you may click the (3) "edit" button to edit the list of project dependencies. The example pf-test project containing the subflow "Test Subflow" can be used in our own project by listing it in the dependencies section.
Because the pf-test project is hosted on github.com, we can use NodeJS' abbreviated format to list the item as a dependency. Your own github based projects can be easily referred to by just typing your username, forward slash, the project name, hashtag, master. I.e. steveorevo/pf-test#master refers to our example dependency. Type the dependency definition in the (1) textarea followed by clicking the (2) Done button (see image below).
Master refers to the main development branch in the github repo. However, you can lock or refer to a specific compatible release version following NPM's documentation for the dependencies section.
Note: As of Node-RED version 0.19.4, you may encounter a bug whereby a newly listed dependency vanishes after clicking the install button. You can safely ignore this or close/re-open the Project Settings panel to refresh the list.
After listing all of your project's dependencies, you may click the (1) merge publishflows button as shown below; followed by clicking the (2) merge button in Node-RED's confirmation dialog. You can distinguish dependencies that use the PublishFlows node from other dependencies as they will appear with a different (3) green tinted and pyramid cubed icon. If all goes well, you should now see the "Test Subflow" node in your project's sidebar. You've just created a project that uses another project as a dependency.

Removing a PublishFlows Project Dependency
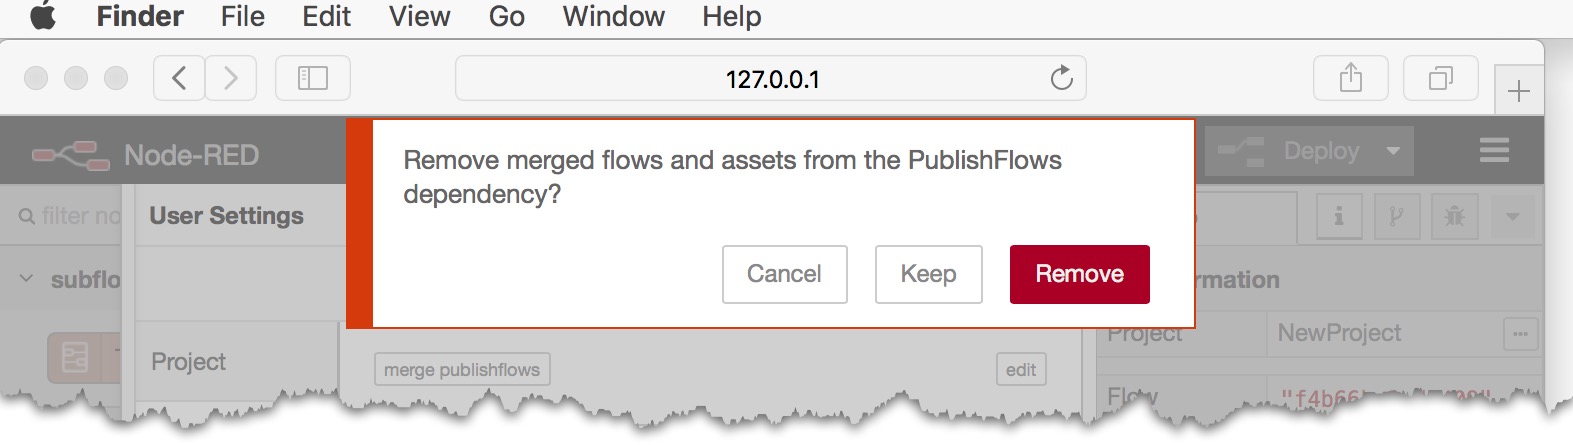
PublishFlows makes it easy to remove a PublishFlows based project dependency. Simply use Node-RED's native "remove from project" button under the dependencies panel of the project's settings. You will be prompted with a Node-RED confirmation dialog with three options: Cancel, Keep, and Remove. Cancel, simply ignores the operation. Keep allows you to keep the flows and/or files that were imported prior in the "merge publishflows" operation while removing the dependency listing in your package.json file. Lastly, Remove removes both the dependency from your project's package.json file and scans the dependency's manifest file to remove any assets (flows and/or files) from your current project.
What to Publish
A PublishFlows project should only publish elements that it wishes to furnish to other projects. A project should avoid publishing irrelevant items such as test flows, examples, etc. as excess components would persist during a merge, or may cause unnecessary bulk, and/or may inhibit code reuse for the referring project.
If components in a PublishFlows project are deemed optional; consider breaking down the dependency into multiple PublishFlow projects and dependencies. A dependency that requires elements from another project should re-list them as items to publish in their own "Publish" definition to avoid missing dependent elements.
Don't Publish
- Examples (if users want examples, they can always clone your project)
- Unused actionflows and nodes (keep the namespace clean and tidy)
Publish
- Flows from dependencies that are needed to make your published flows work
- Comment nodes giving credit to original authors
- Flows that can be re-used in other projects
Installation
Run the following command in your Node-RED user directory (typically ~/.node-red):
npm install node-red-contrib-publishflows
A new option will appear under the Projects panel titled, "Publish". The Publish tab will show a tree control to select subflows, tabs, and other asset files.