![]()
A native set of nodes for Hikvision (and compatible) Cameras, Alarms, Radars, NVR, Doorbells etc.


This is a set of nodes to handle ISAPI Hikvision messages. It works exclusively with HIKVISION and Hikvision based compatible devices.
Works with cameras, NVR, Security Systems, Doorbells and also with specialized devices, like Radar (for example DS-PR1-60, DS-PR1-100 and DS-PR1-120).
Digest authentication: it should work with all devices.
All nodes are capable of auto reconnect if the connection is lost and are able to actively monitor the connection.
Be sure to have installed Node.js v12.3.0 or newer (issue a node -v command in a console, to check it out).
Due to the many models and firmware versions out there, not all cams/NVR/Door Intercoms does work. For example, many intercoms does not really support all APIs, that the official ISAPI documentation says it supports, thus, they don't work, not only with this node, but also with any software using the public ISAPI documentation. Please don't blame the developer, as it can do nothing to workaround such problems.
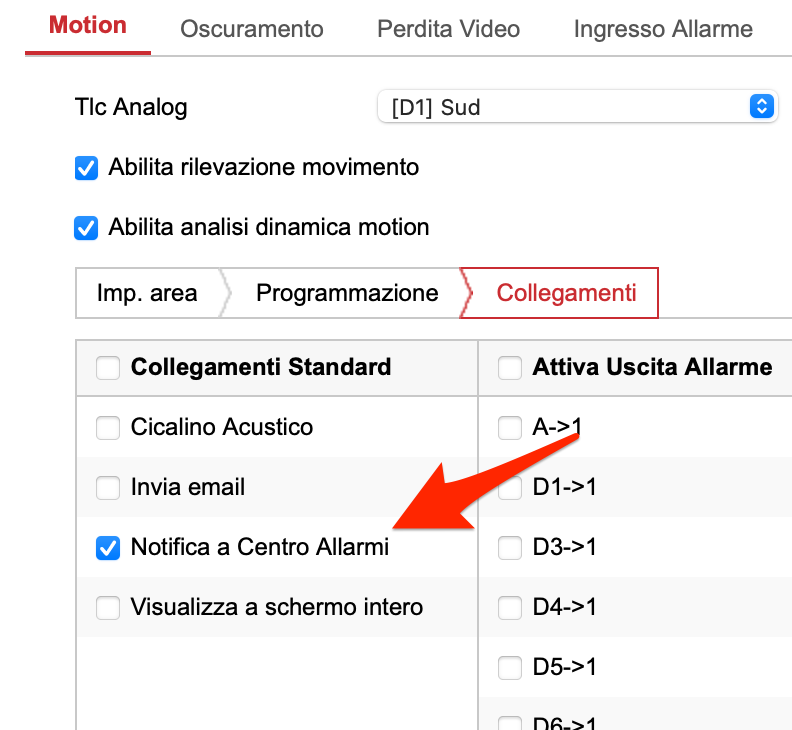
For NVR/DVR, pleas remember to select "Notify Alarm Center" in the event window, otherwise the NVR won't emit any alarm event.
I'm looking for collaborators to develop these nodes. I'm alone. I have other nodes to mantain, and too many help to give to the users. Very little time is remaining for me and my family, so i need someone joining this project and starting active development! Thanks!
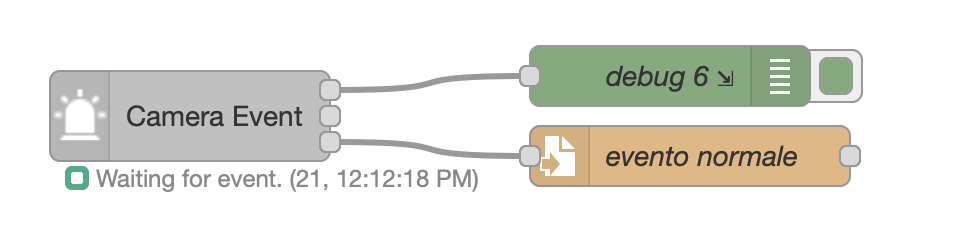
The Camera Event node connects to NVR, Camera, Radars, etc.. and outputs true/false in case of an alarm.
The node can be configured as Camera/NVR (with standard and smart events) or as Old Security System and Radar (with specific CID events, designed for these type of security devices)
You can optionally filter the alarms by CHANNEL, EVENT and ZONE.
For NVR/DVR, the Channel property is the CAMERA number, while for Cameras, is the image sensor number (normally 1).
The Zone property is the alarm zone (RADARS), or the alert region number (CAMERAS AND NVR/DVR).
For RADAR device types, you can filter improper/false alams as well.
You can choose from many different alarms, including:
- Video Motion Alarm (When motion is detected)
- Local alarm input (it's the device's IO pigtail connector)
- Line crossing (when someone crosses a line)
- CID alarms
- Many more.....
Flow Messages
The node outputs a payload on PIN 1 (TRUE on alarm start, FALSE on alarm end). Some alarm types only support the alarm start event. The node outputs a payload on PIN 2, representing a connection error. TRUE if error, otherwise FALSE This below is an example of msg output:
Output PIN 1
// Example of an event from NVR/Camera
msg = {
  "payload": true,
  "topic": "",
  "channelid": "13", // This is the camera number for NVR, or the channel ID for cameras
  "zone": 0, // Zone or Region, see above, the explained difference
  "description": "Motion alarm",
  "_msgid": "386a613.89f259e"
}
// Example of an event from Radar
msg = {
{
"zone": 1, // This is the zone number that fired the alarm
"payload": true, // true if alarm, otherwise false if alarm ended.
"alarm": {
"ipAddress": "192.168.1.25",
"ipv6Address": "",
"portNo": 80,
"protocol": "HTTP",
"macAddress": "BananaRama",
"channelID": 1,
"dateTime": "2012-01-13T03:58:19+01:00",
"activePostCount": 1,
"eventType": "cidEvent",
"eventState": "active",
"eventDescription": "CID event",
"CIDEvent": {
"code": 3103,
"standardCIDcode": 3130,
"type": "zoneAlarm",
"trigger": "2012-01-13T03:58:19+01:00",
"upload": "2012-01-13T03:58:19+01:00",
"CameraList": [],
"NVRList": [
{
"id": 1,
"ip": "192.168.1.32",
"port": 8000,
"channel": 1
}
],
"zone": 1
}
}
"_msgid": "b07e50f6.86a72"
}Output PIN 2 (connection error)
msg = {
    "topic": "",
    "errorDescription": "", // This will contain the error rescription, in case of errors.
    "payload": false, // Or TRUE if error
    "_msgid": "dd5b3622.884a78"
}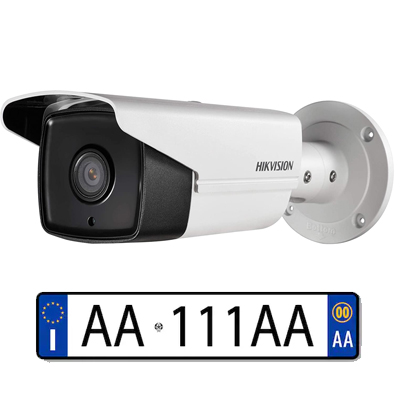
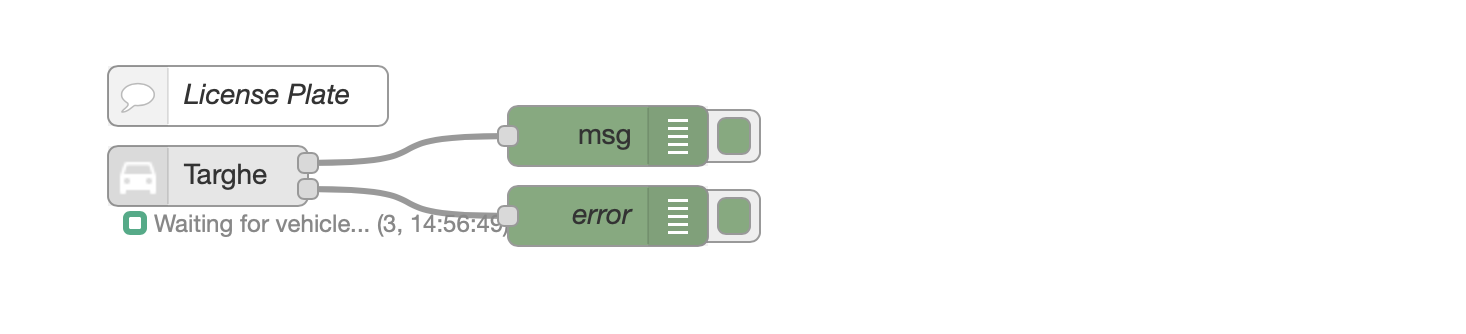
This node works with Hikvision ANPR cameras.
Flow Messages
The payload contains the license plate number and the property plate contains other useful informations.
Output PIN 1
msg = {
    "topic":"",
    "payload":"AB123CD", // This is the license plate
    "plate":{
        "captureTime":"20201130T114200+0100",
        "plateNumber":"AB123CD",
        "picName":"202011301142008600", // This is the picture's name of the license plate.
        "country":"ITA",
        "laneNo":"1",
        "direction":"forward",
        "matchingResult":"otherlist"
        }
    }
Output PIN 2 (connection error)
msg = {
    "topic": "",
    "errorDescription": "", // This will contain the error rescription, in case of errors.
    "payload": false, // Or TRUE if error
    "_msgid": "dd5b3622.884a78"
}
Recalls a PTZ pre-recorded preset.
Just select the preset in the configuration window and recall it by passing true as payload.
You can also set the Camera Number and PTZ preset number by msg.payload.channelID (optional) and msg.payload.PTZPreset. See below.

Flow Messages
The node outputs true on PIN 1 if the command is executed, otherwise an error on PIN 2.
Input
// Recall the preset set in the configuration window
msg.payload = true; // Recalls the preset
return msg;
// Pass the Camera Number and PTZ preset by message
msg.payload.channelID = 1; // OPTIONAL, pass the Camera number
msg.payload.PTZPreset = 2; // OPTIONAL, pass the PTZ preset number
return msg;Output PIN 1
msg = {
{
    "payload": true, // true after the camera has reached the PTZ preset position
    "_msgid": "b07e50f6.86a72"
}
Output PIN 2 (connection error)
msg = {
    "topic": "",
    "errorDescription": "", // This will contain the error rescription, in case of errors.
    "payload": false, // Or TRUE if error
    "_msgid": "dd5b3622.884a78"
}
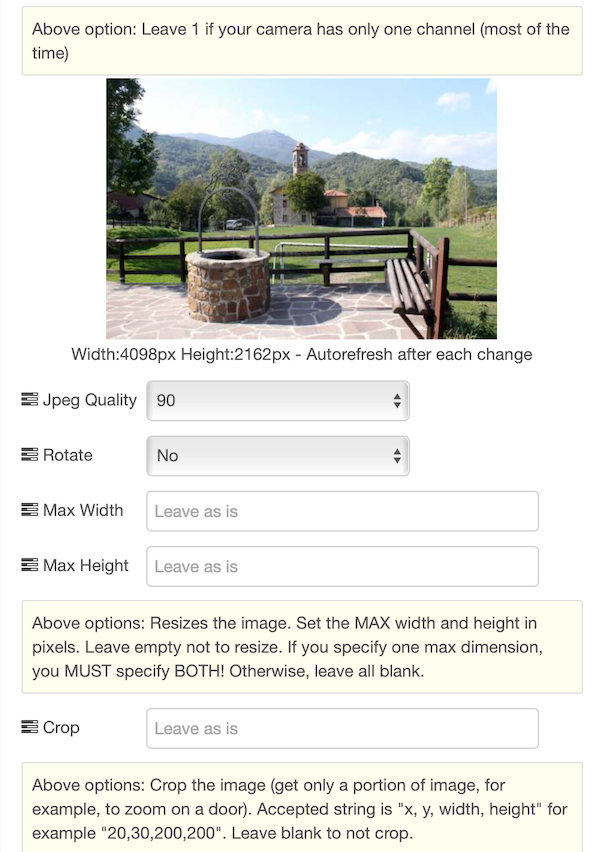
This node gets a picture from the camera/NVR, ready to be shown in the dashboard UI.
You can rotate, resize, crop, overlay with text, zoom the image.
The overlay text is applied directly after the picture's manipulation. This behaves differently than the text overlay node (that uses the overlay functionality onboard the camera).
Pass true as payload to obtain the image.
You can, for example, link the Camera Event node to the Picture node to get an image whenever an alarm occurs.
CAUTION: image handling is a very CPU/GPU consuming job. Use only if you have enough computational resources.

For the picture to show up directly into the flow, you can use this node developed by @riku
Copy this code and paste it into your flow
View code
Adjust the nodes according to your setup
[{"id":"bd6acbb81c4f9eaf","type":"change","z":"48095c5671f0ab16","name":"Setup msg","rules":[{"t":"set","p":"cid","pt":"msg","to":"","tot":"date"},{"t":"set","p":"attachments","pt":"msg","to":"[{\t \"filename\": 'image_' & $replace($now(),\":\",\"_\") & '.jpg', \t \"content\": $$.forEmail,\t \"cid\": \"\" & cid & \"\"\t}]","tot":"jsonata"},{"t":"set","p":"topic","pt":"msg","to":"See attached image","tot":"str"},{"t":"set","p":"payload","pt":"msg","to":"''","tot":"jsonata"},{"t":"set","p":"from","pt":"msg","to":"info@mysupersmarthome.it","tot":"str"}],"action":"","property":"","from":"","to":"","reg":false,"x":410,"y":200,"wires":[["3e0ca3cc7c0d2e22"]]},{"id":"0b82f010bd682a0d","type":"hikvisionUltimatePicture","z":"48095c5671f0ab16","name":"Ovest","topic":"","server":"eb73371b.af5208","channelID":"7","rotateimage":"0","heightimage":"","widthimage":"","qualityimage":"100","cropimage":"","textoverlay":"","textoverlayXY":"","textoverlayWH":"","textoverlayFont":"FONT_SANS_64_WHITE","x":230,"y":200,"wires":[["bd6acbb81c4f9eaf","7ff4f0c75ef4d486"],[]]},{"id":"478fee35ffd435b5","type":"inject","z":"48095c5671f0ab16","name":"","props":[{"p":"payload"},{"p":"topic","vt":"str"}],"repeat":"","crontab":"","once":false,"onceDelay":0.1,"topic":"","payload":"true","payloadType":"bool","x":110,"y":200,"wires":[["0b82f010bd682a0d"]]},{"id":"facefd92c70af183","type":"comment","z":"48095c5671f0ab16","name":"Send an Email with image attachment and show it in the web UI","info":"","x":290,"y":160,"wires":[]},{"id":"7ff4f0c75ef4d486","type":"template","z":"48095c5671f0ab16","name":"","field":"payload","fieldType":"msg","format":"handlebars","syntax":"mustache","template":"<img width=\"320px\" height=\"240px\" src=\"{{{payload}}}\">","output":"str","x":400,"y":260,"wires":[["121759fa66219f53"]]},{"id":"121759fa66219f53","type":"ui_template","z":"48095c5671f0ab16","group":"e2be830cd2d143a0","name":"","order":0,"width":"6","height":"4","format":"<div ng-bind-html=\"msg.payload\"></div>","storeOutMessages":true,"fwdInMessages":true,"resendOnRefresh":true,"templateScope":"local","x":560,"y":260,"wires":[[]]},{"id":"3e0ca3cc7c0d2e22","type":"function","z":"48095c5671f0ab16","name":"Email","func":"// Replace this function node with an email node","outputs":1,"noerr":0,"initialize":"","finalize":"","libs":[],"x":550,"y":200,"wires":[[]]},{"id":"eb73371b.af5208","type":"Hikvision-config","host":"192.168.1.32","port":"80","name":"NVR","authentication":"digest","protocol":"http","heartbeattimerdisconnectionlimit":"1","deviceinfo":"[object Object]"},{"id":"e2be830cd2d143a0","type":"ui_group","name":"Default","tab":"e0f42233.22428","order":2,"disp":true,"width":"6","collapse":false},{"id":"e0f42233.22428","type":"ui_tab","name":"NVR","icon":"dashboard","order":13}]
PROPERTY WINDOW
Flow Messages
The node outputs the image in in mamy formats on PIN 1, otherwise an error on PIN 2. On PIN 1 you'll have:
base64 JPG string format, ready for the UI Dashboard.
JPG Buffer, ready to be sent as email attachment.
pure base64 format, for many other uses.
The Picture Node now passes through the input message, in the property msg.previousInputMessage
Input
// To get the image
msg.payload = true;
return msg;
// Dinamically set the overlay text
node.textoverlay = "Hello new overlay";
msg.payload = true;
return msg;Output PIN 1
msg = {
{
    "previousInputMessage" : {topic : "banana"}, // this is the original passedthrough message
    "payload": "data:image/jpg;base64,/9j/4AAQSk...", // FOR THE DASHBOARD UI: Image as string in base64 format with JPG DATA header already there.
    "forEmail": "<buffer>", // FOR EMAIL: Image as buffer format, ready to be attached to an email as JPG attachment.
    "base64": "/9j/4AAQSk...", // FOR FURTHER MANIPULATION: Image as pure base64 string.
    "_msgid": "b07e50f6.86a72"
}
return msg;
Output PIN 2 (connection error)
msg = {
    "topic": "",
    "errorDescription": "", // This will contain the error rescription, in case of errors.
    "payload": false, // Or TRUE if error
    "_msgid": "dd5b3622.884a78"
}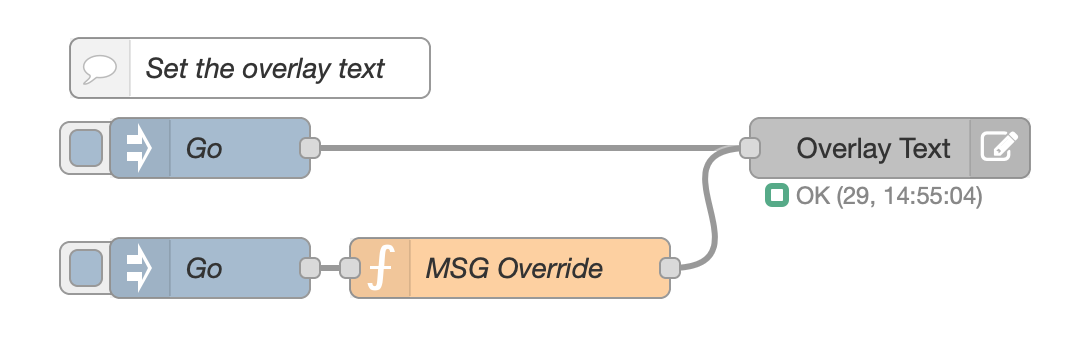
return msg;You can set the camera's text overlay. This node uses the camera's onboard text overlaying capabilities.
There are 4 rows avaiable, to be set from the configuration window or dinamically via msg input from flow.
Please note that not all cameras nor NVR/DVR (especially with old firmware) suppor setting the overlay text.
Copy this code and paste it into your flow
View code
Adjust the nodes according to your setup
[{"id":"7e79800b.afb8a8","type":"hikvisionUltimateText","z":"3f22f0c6.ff1328","name":"Overlay Text","server":"eb73371b.af5208","row1":"","row1XY":"","row2":"","row2XY":"","row3":"","row3XY":"","row4":"","row5XY":"","channelID":"1","x":510,"y":120,"wires":[]},{"id":"3aa8a40f.9a0964","type":"inject","z":"3f22f0c6.ff1328","name":"Go","props":[{"p":"payload"},{"p":"topic","vt":"str"}],"repeat":"","crontab":"","once":false,"onceDelay":0.1,"topic":"","payload":"","payloadType":"date","x":170,"y":120,"wires":[["7e79800b.afb8a8"]]},{"id":"2b4d9297.75ee46","type":"comment","z":"3f22f0c6.ff1328","name":"Set the overlay text","info":"","x":190,"y":80,"wires":[]},{"id":"22dc37f9.b3b86","type":"function","z":"3f22f0c6.ff1328","name":"MSG Override","func":"// Override one or more rows\n// You can use from row1 to row4 to set the text\n// and from row1XY to row4XY to set the position in the format x,y (for example: 100,200)\n\n// Optionally set the channel. On NVR, this indicates the camera number\nmsg.channelid = 1;\n\n// Row 1\nmsg.row1 = \"Temperature: \" + msg.payload;\nmsg.row1XY = \"100,200\"; // Optionallly set the position\n\n// Row 2 (here we leave the position previosly set via the camera menu)\nmsg.row2 = \"Sun\";\n\nreturn msg;","outputs":1,"noerr":0,"initialize":"","finalize":"","x":320,"y":180,"wires":[["7e79800b.afb8a8"]]},{"id":"a91e43a0.ccbb2","type":"inject","z":"3f22f0c6.ff1328","name":"Go","props":[{"p":"payload"},{"p":"topic","vt":"str"}],"repeat":"","crontab":"","once":false,"onceDelay":0.1,"topic":"","payload":"22°c","payloadType":"str","x":170,"y":180,"wires":[["22dc37f9.b3b86"]]},{"id":"eb73371b.af5208","type":"Hikvision-config","host":"192.168.1.32","port":"80","name":"Server","authentication":"digest","protocol":"http","heartbeattimerdisconnectionlimit":"1","deviceinfo":"[object Object]"}]
Flow Messages
Pass anything you like as input msg, to set the text overlay. You can override texts by passing some msg inputs. See samples below
Input
// Simply overlay the text set in the config window
msg.payload = true;
return msg;
// Override one or more rows
// You can use from row1 to row4 to set the text
// and from row1XY to row4XY to set the position in the format x,y (for example: 100,200)
// Optionally set the channel. On NVR, this indicates the camera number
msg.channelid = 1;
// Row 1
msg.row1 = "Temperature: " + msg.payload;
msg.row1XY = "100,200"; // Optionallly set the position
// Row 2 (here we leave the position previosly set via the camera menu)
msg.row2 = "Sun";
return msg;// Delete all 4 rows
msg.row1 = "";
msg.row2 = "";
msg.row3 = "";
msg.row4 = "";
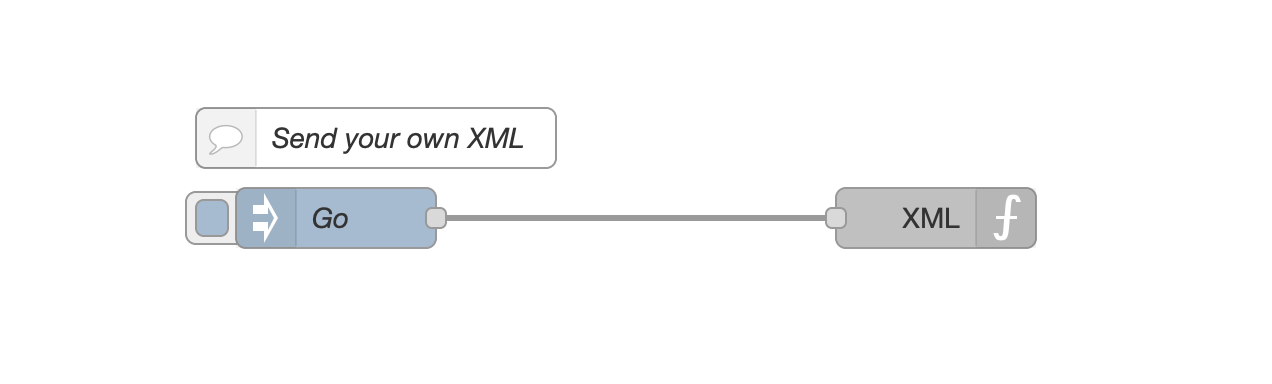
return msg;This node allow you to send any XML you want to your devices.
Every device has own firmware, capabilities etc. so i decided to allow you to cover all your needs by adding this universal node.
Please read the ISAPI Hikvision documentation or dig into the Internet to learn what XML you can send. The limit is only your fantasy.
Flow Messages
You can override all properties configured in the node, by passing some msg inputs. See samples below
Input
// Send your own XML to the device
// You can override the default config, with all these optional properties
// msg.method must be PUT, POST or GET (all uppercase)

msg.XML = ``; // Here goes your XML. These strange chars after the = allow you to do multiline text
msg.path = ""; // For example /ISAPI/System/Video/inputs/channels/1/overlays
msg.method = "PUT"; // This must be PUT, POST or GET (uppercase)

return msg;
As an example, you can set a text overlay via XML
// Set an overlay text (if the camera supports overlaying text)

msg.XML = `<?xml version="1.0" encoding="UTF-8" ?>
<VideoOverlay version="1.0" xmlns="http://www.hikvision.com/ver20/XMLSchema\">
<fontSize>1</fontSize>
<TextOverlayList size="6">
    <TextOverlay version="1.0" xmlns="http://www.hikvision.com/ver20/XMLSchema\">
    <id>1</id>
    <enabled>true</enabled>
    <positionX>464</positionX>
    <positionY>96</positionY>
    <displayText>HELLO WORLD</displayText>
    </TextOverlay>
</TextOverlayList>
</VideoOverlay>`; // Here goes your XML. These strange chars after the = allow you to do multiline text
msg.path = "/ISAPI/System/Video/inputs/channels/1/overlays/text"; // For example /ISAPI/System/Video/inputs/channels/1/overlays
msg.method = "PUT"; // This must be PUT, POST or GET (uppercase)

return msg;
Output
The node will return the response from the camera.
For example, if you wish to know if your camera has motion detect enable, just pass this to the node
// Ask the camera if it supports motion detect
msg.path = "/ISAPI/System/Video/inputs/channels/1/motionDetection";
msg.method ="GET";
return msg;
The response will be something like this
{
   "topic":"Camera Sud",
   "payload":{
      "MotionDetection":{
         "$":{
            "version":"2.0",
            "xmlns":"http://www.hikvision.com/ver20/XMLSchema"
         },
         "enabled":"false",
         "enableHighlight":"true",
         "samplingInterval":"2",
         "startTriggerTime":"500",
         "endTriggerTime":"500",
         "regionType":"grid",
         "Grid":{
            "rowGranularity":"18",
            "columnGranularity":"22"
         },
         "MotionDetectionLayout":{
            "$":{
               "version":"2.0",
               "xmlns":"http://www.hikvision.com/ver20/XMLSchema"
            },
            "sensitivityLevel":"80",
            "layout":{
               "gridMap":"000000000000000000000000000000000000000000000000000000000000000000000000000000000000000000000000000000000000"
            }
         },
         "enableWithMoving":"false"
      }
   },
   "_msgid":"fa45ddc3240240cf"
}
If an error occurs, the XML node will output a msg with the error
{
   "topic":"XML Node",
   "errorDescription":"network timeout at: http://192.168.1.211:80/ISAPI/System/Video/inputs/channels/1/motionDetection",
   "_msgid":"8289d3fbf2919d2b"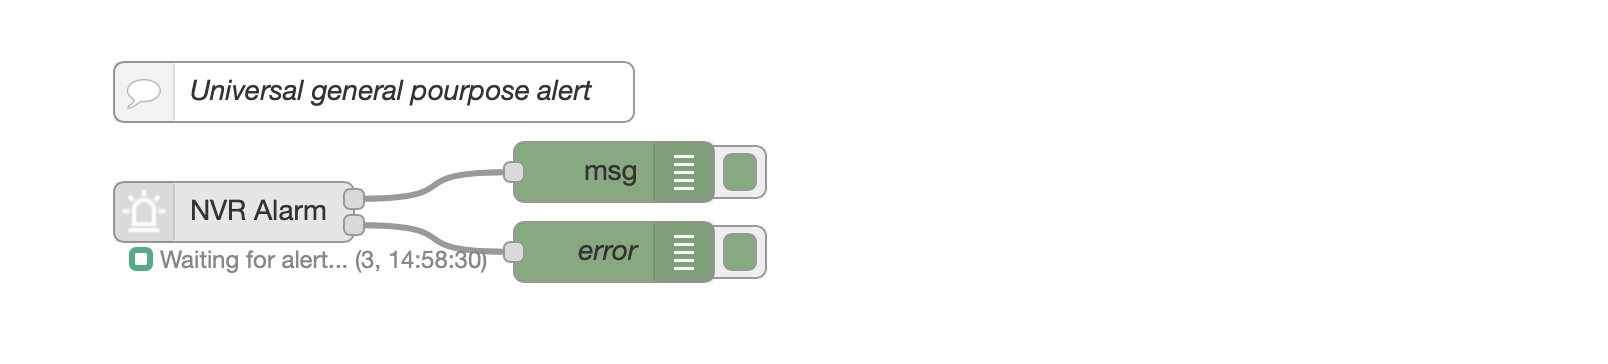
}The RAW CAMERA Event node reacts to every message sent by the device. You can use this node when the other nodes doesn't fit your needs. It connects to NVR, Camera, Radars etc... and outputs the event received.
Flow Messages
The node outputs a payload on PIN 1 that can vary, depending on the alarm type sent by the connected device. The node outputs a payload on PIN 2, representing a connection error. TRUE if error, otherwise FALSE This below is an example of msg output (in this case, a movement detected from a radar)
Output PIN 1
msg = {
    "topic": "",
    "payload": {
        "ipAddress": "192.168.1.25",
        "ipv6Address": "",
        "portNo": 80,
        "protocol": "HTTP",
        "macAddress": "banana",
        "channelID": 1,
        "dateTime": "2012-01-13T04:32:47+01:00",
        "activePostCount": 1,
        "eventType": "MultiRadarTargetEvent",
        "eventState": "active",
        "eventDescription": "MultiRadar Target Event",
        "MultiRadarTargetEventList": [
            {
                "targetID": 25,
                "isTargetDisappear": false,
                "targetType": "people",
                "Coordinate": {
                    "angle": 101.49,
                    "distance": 24.59
                },
                "speed": -0.2,
                "signalStrength": "strong",
                "TrackedInfoList": [],
                "trackedByIPC": false
            }
        ]
    },
    "_msgid": "dba1850a.2dc5e8"
}
Output PIN 2 (connection error)
msg = {
    "topic": "",
    "errorDescription": "", // This will contain the error rescription, in case of errors.
    "payload": false, // Or TRUE if error
    "_msgid": "dd5b3622.884a78"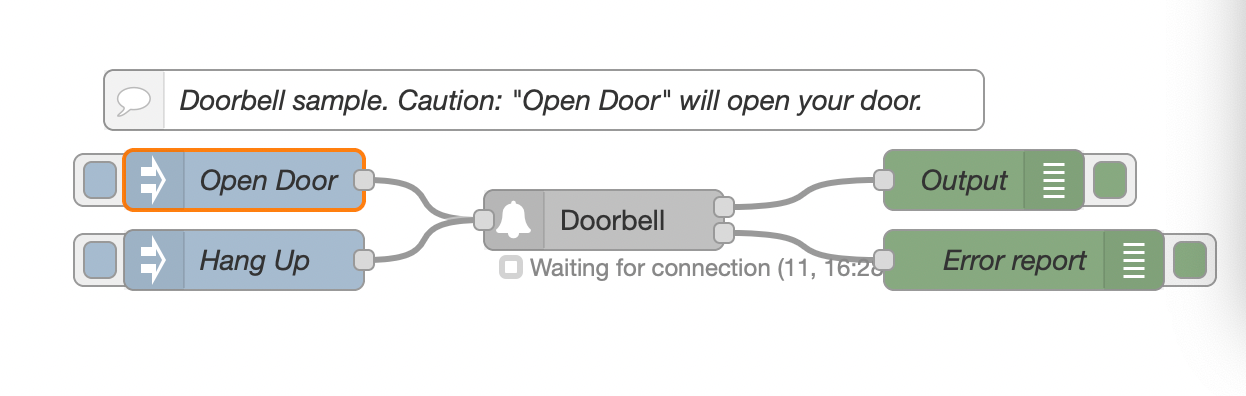
}The doorbell node allow you to receive ring/call progress events, open the doors, hangup calls and other things from hikvision and hik compatible doorbells.
Everytime ad intercom sends a message to the node, this message is validated using the filters you selected in the configuration window. In case of a match, it emits a msg to the flow.
There are many filters you can apply (ringStatus (ring or on call), floor number, unit number, building number and so on.).
Copy this code and paste it into your flow
View code
Adjust the nodes according to your setup
[{"id":"22420ca523840eef","type":"hikvisionUltimateDoorbell","z":"48095c5671f0ab16","name":"","topic":"","server":"085ef798e6c04064","ringStatus":"all","floorNo":"all","unitNo":"all","zoneNo":"all","buildingNo":"all","x":360,"y":180,"wires":[["5d1eddc07a46bd2c"],["7b5813c6cd794885"]]},{"id":"5d1eddc07a46bd2c","type":"debug","z":"48095c5671f0ab16","name":"Output","active":true,"tosidebar":true,"console":false,"tostatus":false,"complete":"true","targetType":"full","statusVal":"","statusType":"auto","x":550,"y":160,"wires":[]},{"id":"7b5813c6cd794885","type":"debug","z":"48095c5671f0ab16","name":"Error report","active":true,"tosidebar":true,"console":false,"tostatus":false,"complete":"payload","targetType":"msg","statusVal":"","statusType":"auto","x":570,"y":200,"wires":[]},{"id":"a1032b3b72cf9db6","type":"inject","z":"48095c5671f0ab16","name":"Open Door","props":[{"p":"openDoor","v":"1","vt":"num"},{"p":"topic","vt":"str"}],"repeat":"","crontab":"","once":false,"onceDelay":0.1,"topic":"","x":180,"y":160,"wires":[["22420ca523840eef"]]},{"id":"54590a36f409ce0f","type":"inject","z":"48095c5671f0ab16","name":"Hang Up","props":[{"p":"hangUp","v":"true","vt":"bool"},{"p":"topic","vt":"str"}],"repeat":"","crontab":"","once":false,"onceDelay":"8","topic":"","x":180,"y":200,"wires":[["22420ca523840eef"]]},{"id":"2388a3941360bd3c","type":"comment","z":"48095c5671f0ab16","name":"Doorbell sample. Caution: \"Open Door\" will open your door.","info":"","x":330,"y":120,"wires":[]},{"id":"085ef798e6c04064","type":"Doorbell-config","host":"192.168.1.5","port":"80","name":"OUTDOOR STATION","authentication":"digest","protocol":"http","heartbeattimerdisconnectionlimit":"1","deviceinfo":"{\"DeviceInfo\":{\"$\":{\"version\":\"2.0\",\"xmlns\":\"http://www.isapi.org/ver20/XMLSchema\"},\"deviceName\":\"OUTDOOR STATION\",\"deviceID\":\"7d49925b-4fc7-406b-a0ec-2ca59cc25838\",\"deviceDescription\":\"\\tVis\",\"deviceLocation\":\"STD-CGI\",\"systemContact\":\"STD-CGI\",\"model\":\"DS-KV6113-WPE1(B)\",\"serialNumber\":\"DS-KV6113-WPE1(B)0120210416RRF86332026\",\"macAddress\":\"24:18:c6:39:42:29\",\"firmwareVersion\":\"V2.2.50\",\"firmwareReleasedDate\":\"build 210630\",\"bootVersion\":\"33685554\",\"bootReleasedDate\":\"1377822\",\"hardwareVersion\":\"0x0\",\"encoderVersion\":\"V4.0\",\"encoderReleasedDate\":\"build 181206\",\"deviceType\":\"\\tVis\",\"telecontrolID\":\"88\",\"supportBeep\":\"true\",\"supportVideoLoss\":\"true\",\"alarmOutNum\":\"2\",\"alarmInNum\":\"4\",\"RS485Num\":\"1\",\"customizedInfo\":\"\"}}"}]
Flow Messages
Input
The node accepts messages from the flow.
See these messages you can pass to it:
OPEN THE DOOR LATCHES
// Open the door.
msg.openDoor = 1; // Pass the door number to open as value, in this case, 1.
return msg;
HANG UP THE CURRENT CALL AND STOP RINGING
// Hangup the current call and stop ringing
msg.hangUp = true;
return msg;
Output
The node outputs a payload on PIN 1 that can vary, depending on the event type sent by the connected intercom.
Anyway, it emits always a payload = *true as soon as an intercom message matching filters you configured in the configuration window, arrives. You can use that payload to trigger events.
The node outputs a payload on PIN 2, representing a connection error. TRUE if error, otherwise FALSE
This below is an example of msg output
Output PIN 1
msg = {
   "CallerInfo":{
      "buildingNo":1,
      "floorNo":1,
      "zoneNo":1,
      "unitNo":1,
      "devNo":88,
      "devType":1,
      "lockNum":1,
      "status":"idle"
   },
   "topic":"",
   "payload":true
}
Output PIN 2 (connection error)
msg = {
    "topic": "",
    "errorDescription": "", // This will contain the error rescription, in case of errors.
    "payload": false // Or TRUE if error
}
This node receives all events sent by your AX Pro alarm.
You will receive not only Alarms etc, but also zone status, even if the AX Pro is disarmed.
You can also arm, disarm, silence alarm etc...
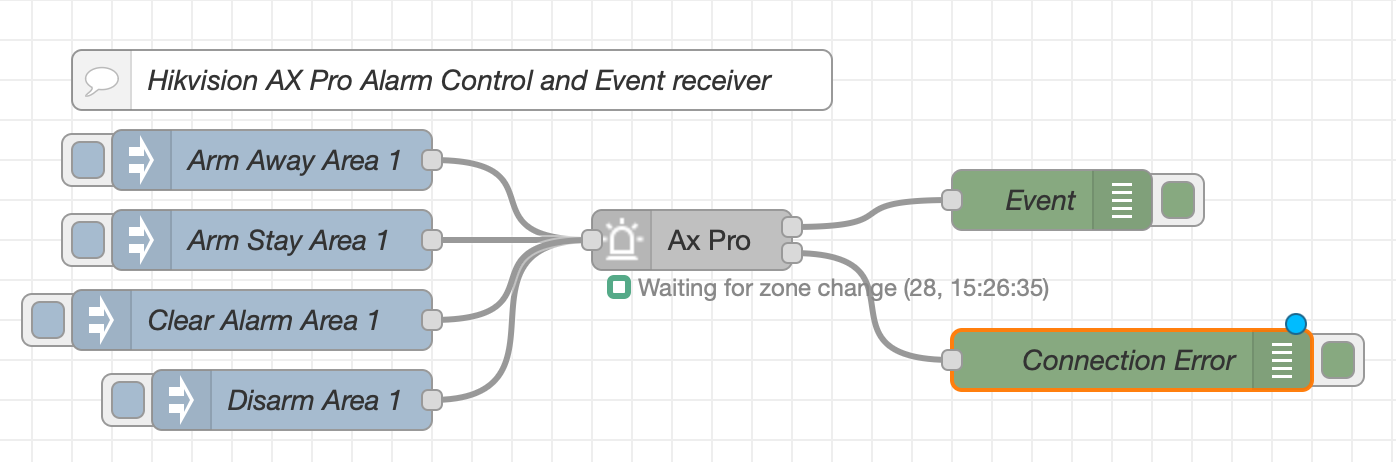
Copy this code and paste it into your flow
View code
Adjust the nodes according to your setup
[{"id":"7c370c1cabe6fd89","type":"hikvisionUltimateAxPro","z":"e9a7cd97842ffa10","name":"Ax Pro","topic":"","server":"2dfc48091d46ead3","outputtype":"0","x":350,"y":200,"wires":[["893818dce1fc2c20"],["01e634bd9098e528"]]},{"id":"893818dce1fc2c20","type":"debug","z":"e9a7cd97842ffa10","name":"Event","active":true,"tosidebar":true,"console":false,"tostatus":false,"complete":"payload","targetType":"msg","statusVal":"","statusType":"auto","x":530,"y":180,"wires":[]},{"id":"01e634bd9098e528","type":"debug","z":"e9a7cd97842ffa10","name":"Connection Error","active":true,"tosidebar":true,"console":false,"tostatus":false,"complete":"true","targetType":"full","statusVal":"","statusType":"auto","x":570,"y":260,"wires":[]},{"id":"ddc2d752e0c13937","type":"inject","z":"e9a7cd97842ffa10","name":"Disarm Area 1","props":[{"p":"disarmArea","v":"1","vt":"num"}],"repeat":"","crontab":"","once":false,"onceDelay":0.1,"topic":"","x":150,"y":280,"wires":[["7c370c1cabe6fd89"]]},{"id":"b33ec376180a53bc","type":"inject","z":"e9a7cd97842ffa10","name":"Arm Away Area 1","props":[{"p":"armAwayArea","v":"1","vt":"num"}],"repeat":"","crontab":"","once":false,"onceDelay":0.1,"topic":"","x":140,"y":160,"wires":[["7c370c1cabe6fd89"]]},{"id":"6145bfa8991c1831","type":"inject","z":"e9a7cd97842ffa10","name":"Arm Stay Area 1","props":[{"p":"armStayArea","v":"1","vt":"num"}],"repeat":"","crontab":"","once":false,"onceDelay":0.1,"topic":"","x":140,"y":200,"wires":[["7c370c1cabe6fd89"]]},{"id":"189b2eb17cb67a52","type":"inject","z":"e9a7cd97842ffa10","name":"Clear Alarm Area 1","props":[{"p":"clearAlarmArea","v":"1","vt":"num"}],"repeat":"","crontab":"","once":false,"onceDelay":0.1,"topic":"","x":130,"y":240,"wires":[["7c370c1cabe6fd89"]]},{"id":"40ce4b0d34bedf21","type":"comment","z":"e9a7cd97842ffa10","name":"Hikvision AX Pro Alarm Control and Event receiver","info":"","x":230,"y":120,"wires":[]},{"id":"2dfc48091d46ead3","type":"AXPro-config","host":"192.168.1.10","port":"80","name":"AX Pro","authentication":"sha256-salted","protocol":"http","heartbeattimerdisconnectionlimit":"2","deviceinfo":"[object Object]"}]Flow Messages
You can control your AX Pro alarm panel by passing messages to the node.
Input
| Property | Parameter |
|---|---|
| msg.armAwayArea | Area number (for example 1) |
| msg.armStayArea | Area number (for example 1) |
| msg.disarmArea | Area number (for example 1) |
Examples:
// To Arm Away Area 1
msg.armAwayArea = 1
return msg;
// To Arm Stay Area 1
msg.armStayArea = 1
return msg;// To Disarm Area 1
msg.disarmArea = 1
return msg;// To clear alarm on Area 1
msg.clearAlarmArea = 1
return msg;Output
On PIN1, the node will output the msg
On PIN2 it will output connection error messages
Example PIN 1:
// FOR CID EVENTS
CIDEvent: {
   "code":1401, // This is the reference code of the event. Please see the ISAPI docs or try by yourself, by watching the output while playing with your alarm
   "name":"Supergiovane",
   "type":"armAndDisarm",
   "trigger":"2022-12-22T17:33:56+01:00",
   "upload":"2022-12-22T17:33:56+01:00",
   "system":1,
   "subSystemName":"Casa"
}
// FOR ZONE UPDATE EVENT
zoneStatus: {
"id":1,
"name":"Zona cablata 2",
"status":"trigger",
"sensorStatus":"normal",
"magnetOpenStatus":true,
"tamperEvident":false,
"shielded":false,
"bypassed":false,
"armed":false,
"isArming":false,
"alarm":false,
"reason":"break",
"subSystemNo":1,
"linkageSubSystem":[
1
],
"detectorType":"magneticContact",
"stayAway":false,
"zoneType":"Instant",
"accessModuleType":"localTransmitter",
"moduleChannel":2,
"zoneAttrib":"wired",
"deviceNo":3,
"abnormalOrNot":false
}CID Events refers to a field "code" in the Alarm event output
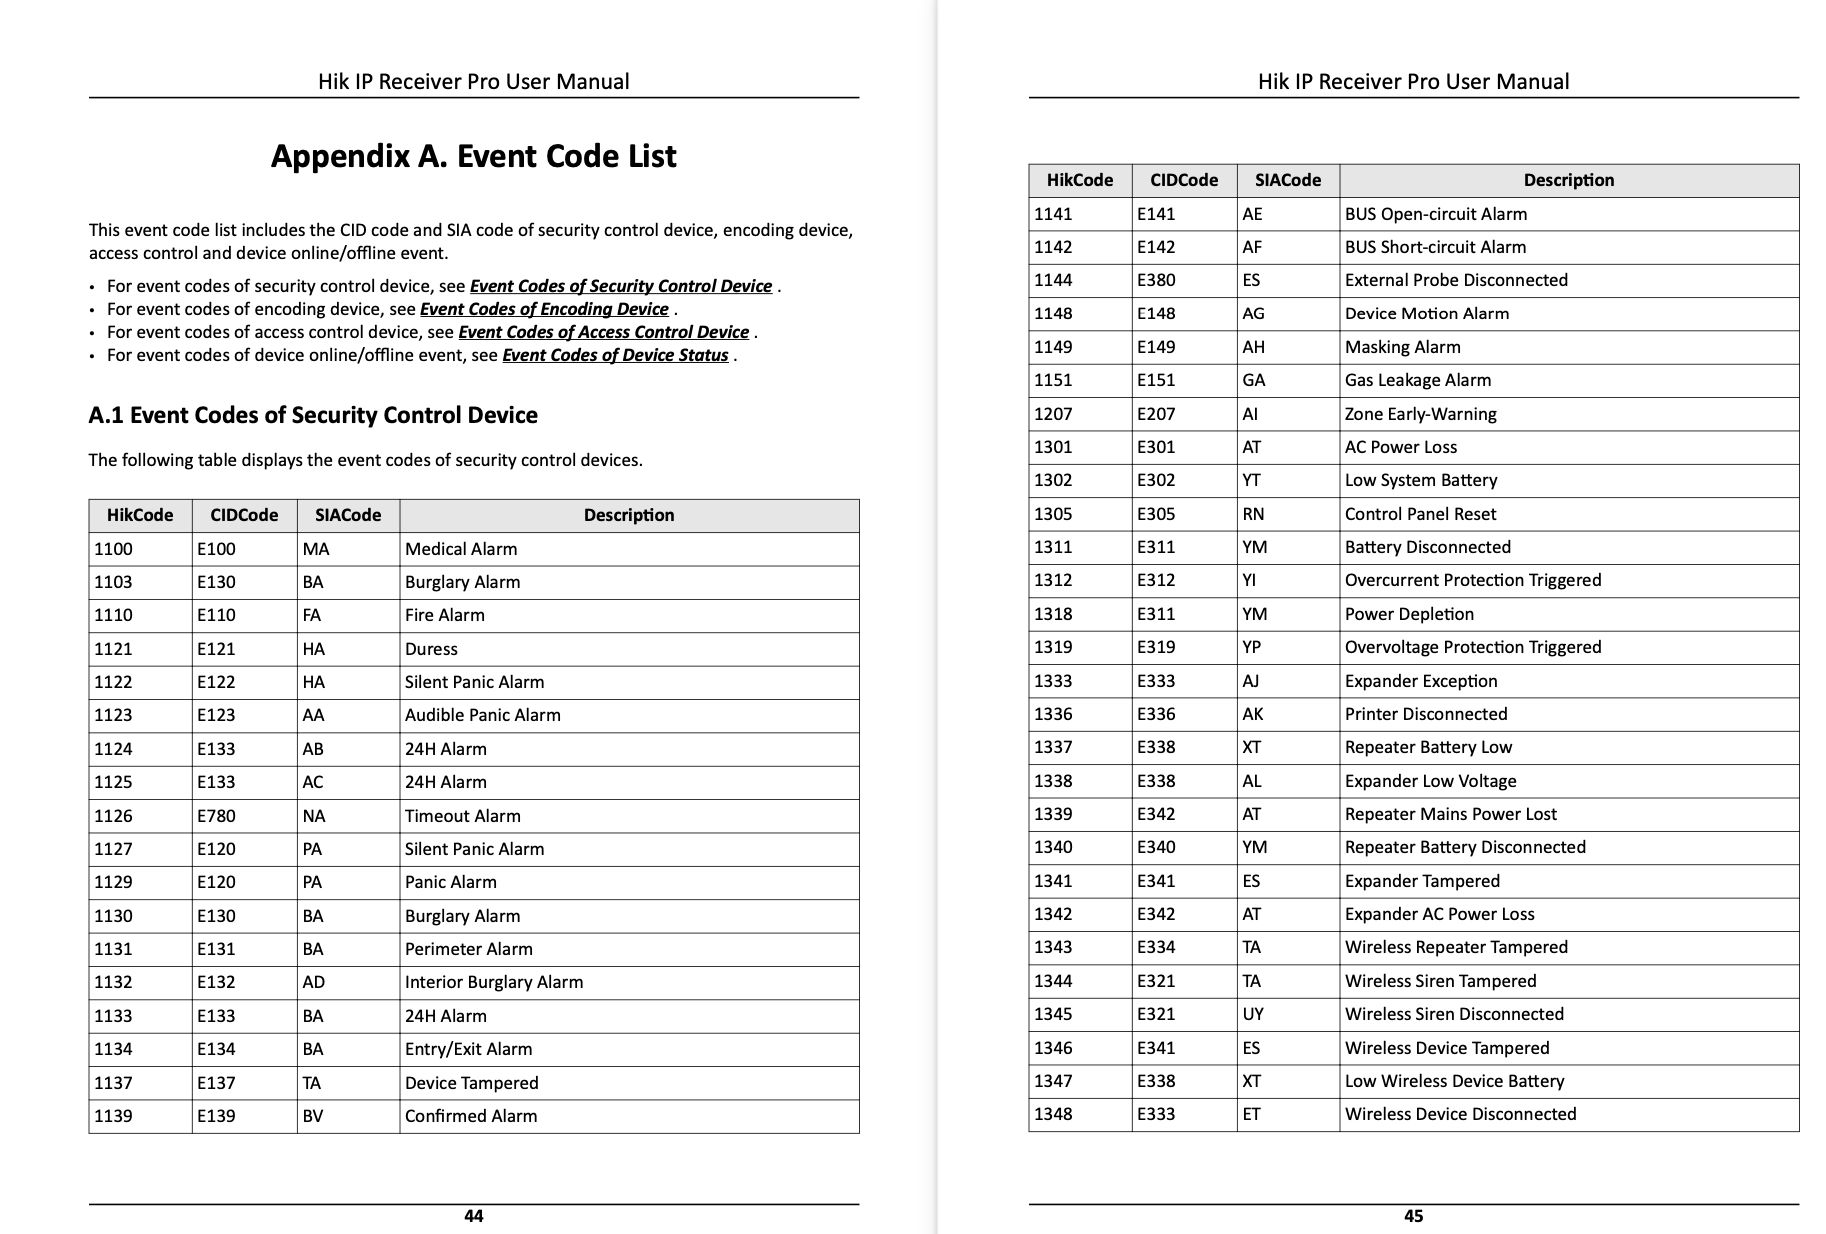
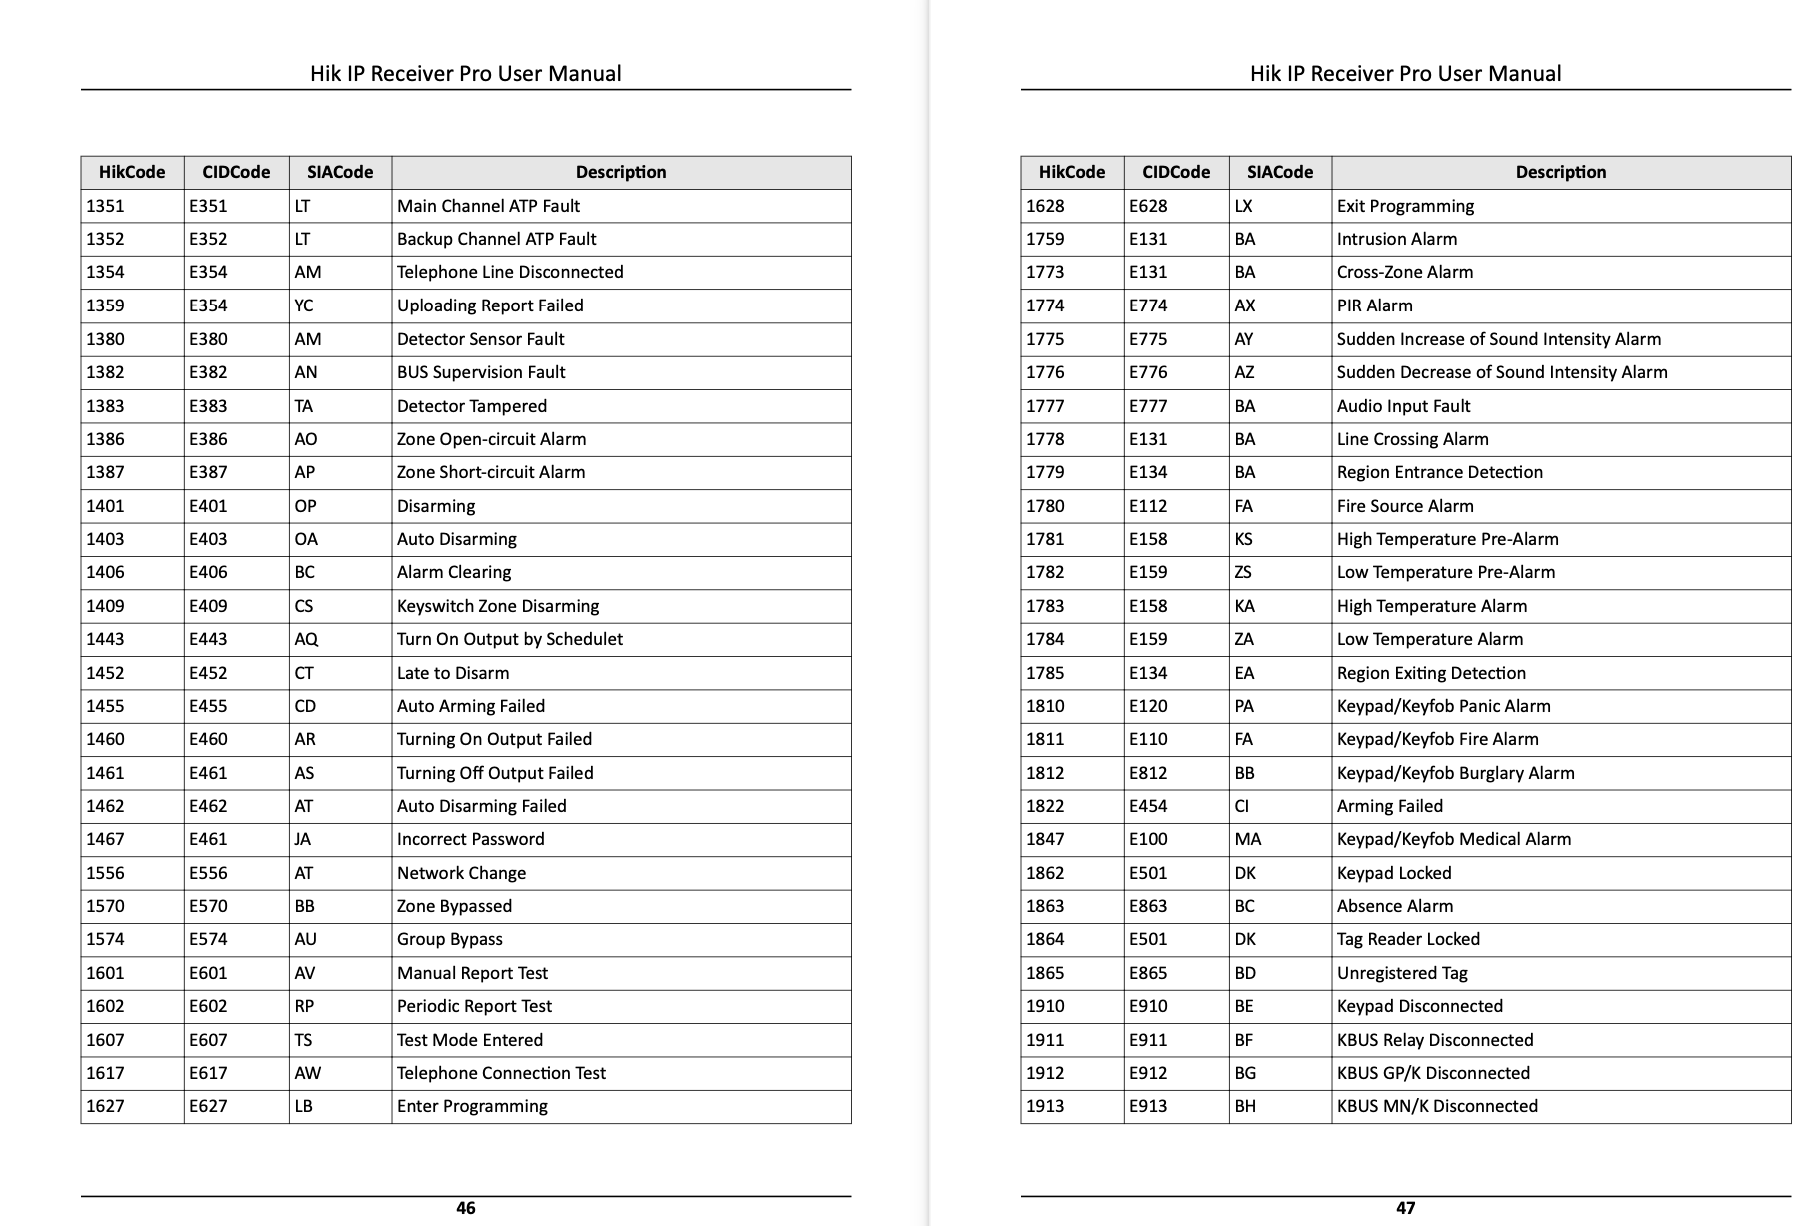
The most common event codes are: 3401 (Arm Away), 3441 (Arm Stay), 1401 (Disarmed), 1759 (Intrusion Alarm)
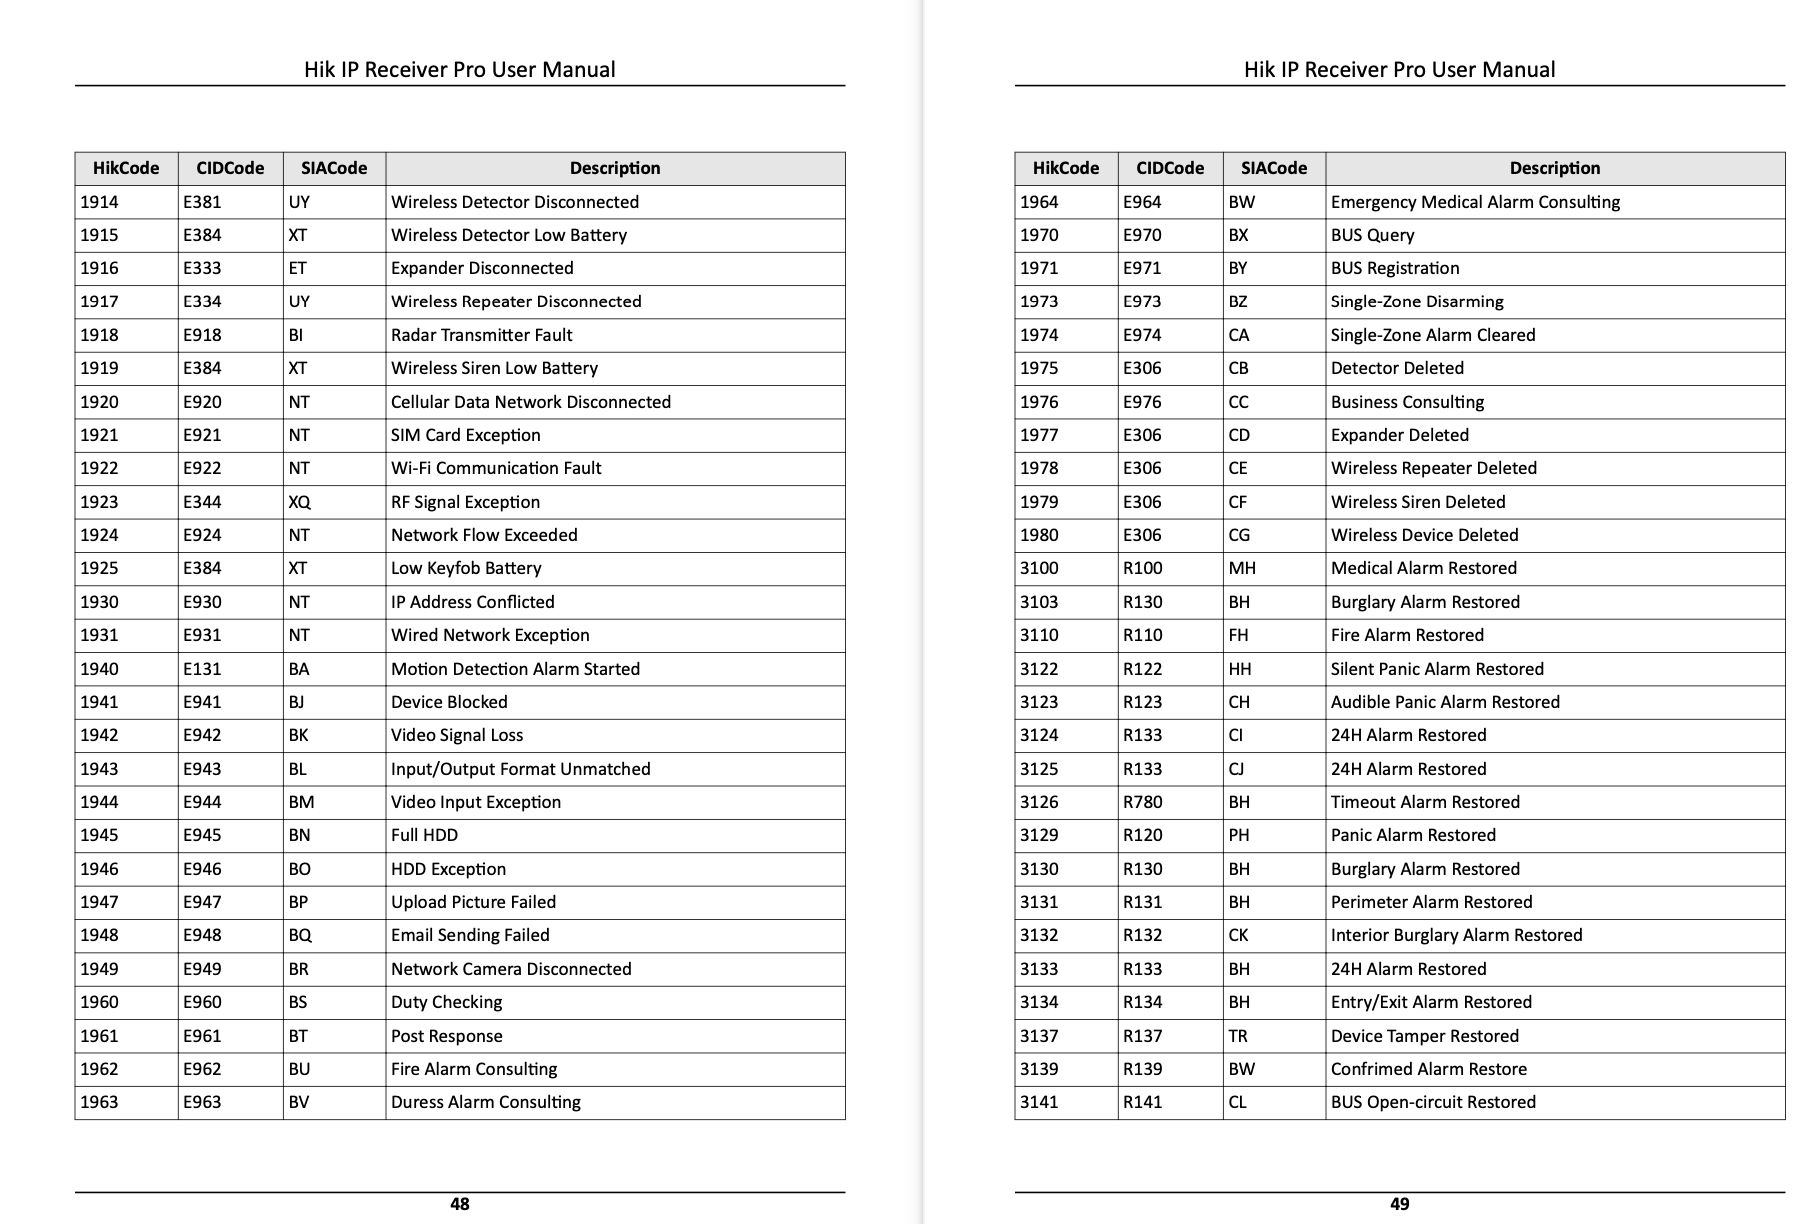
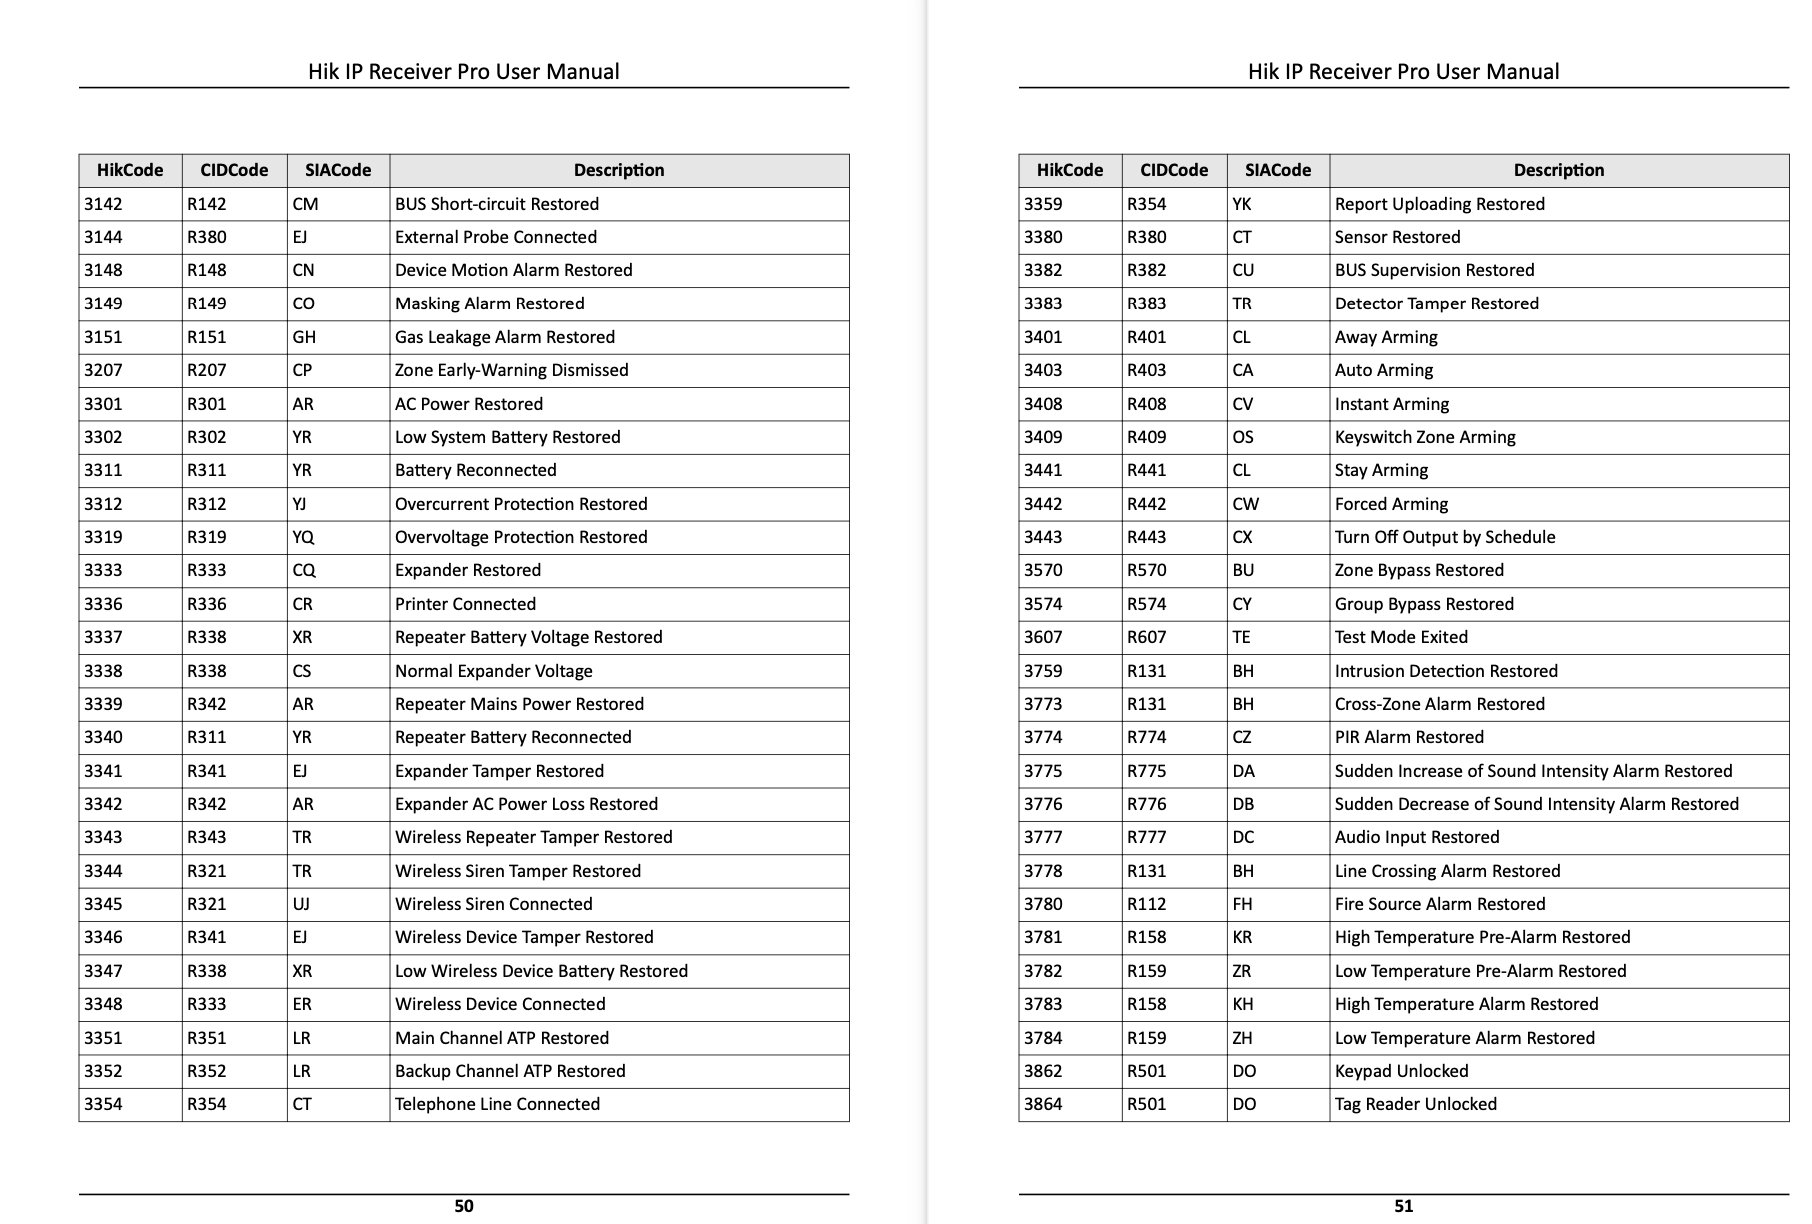
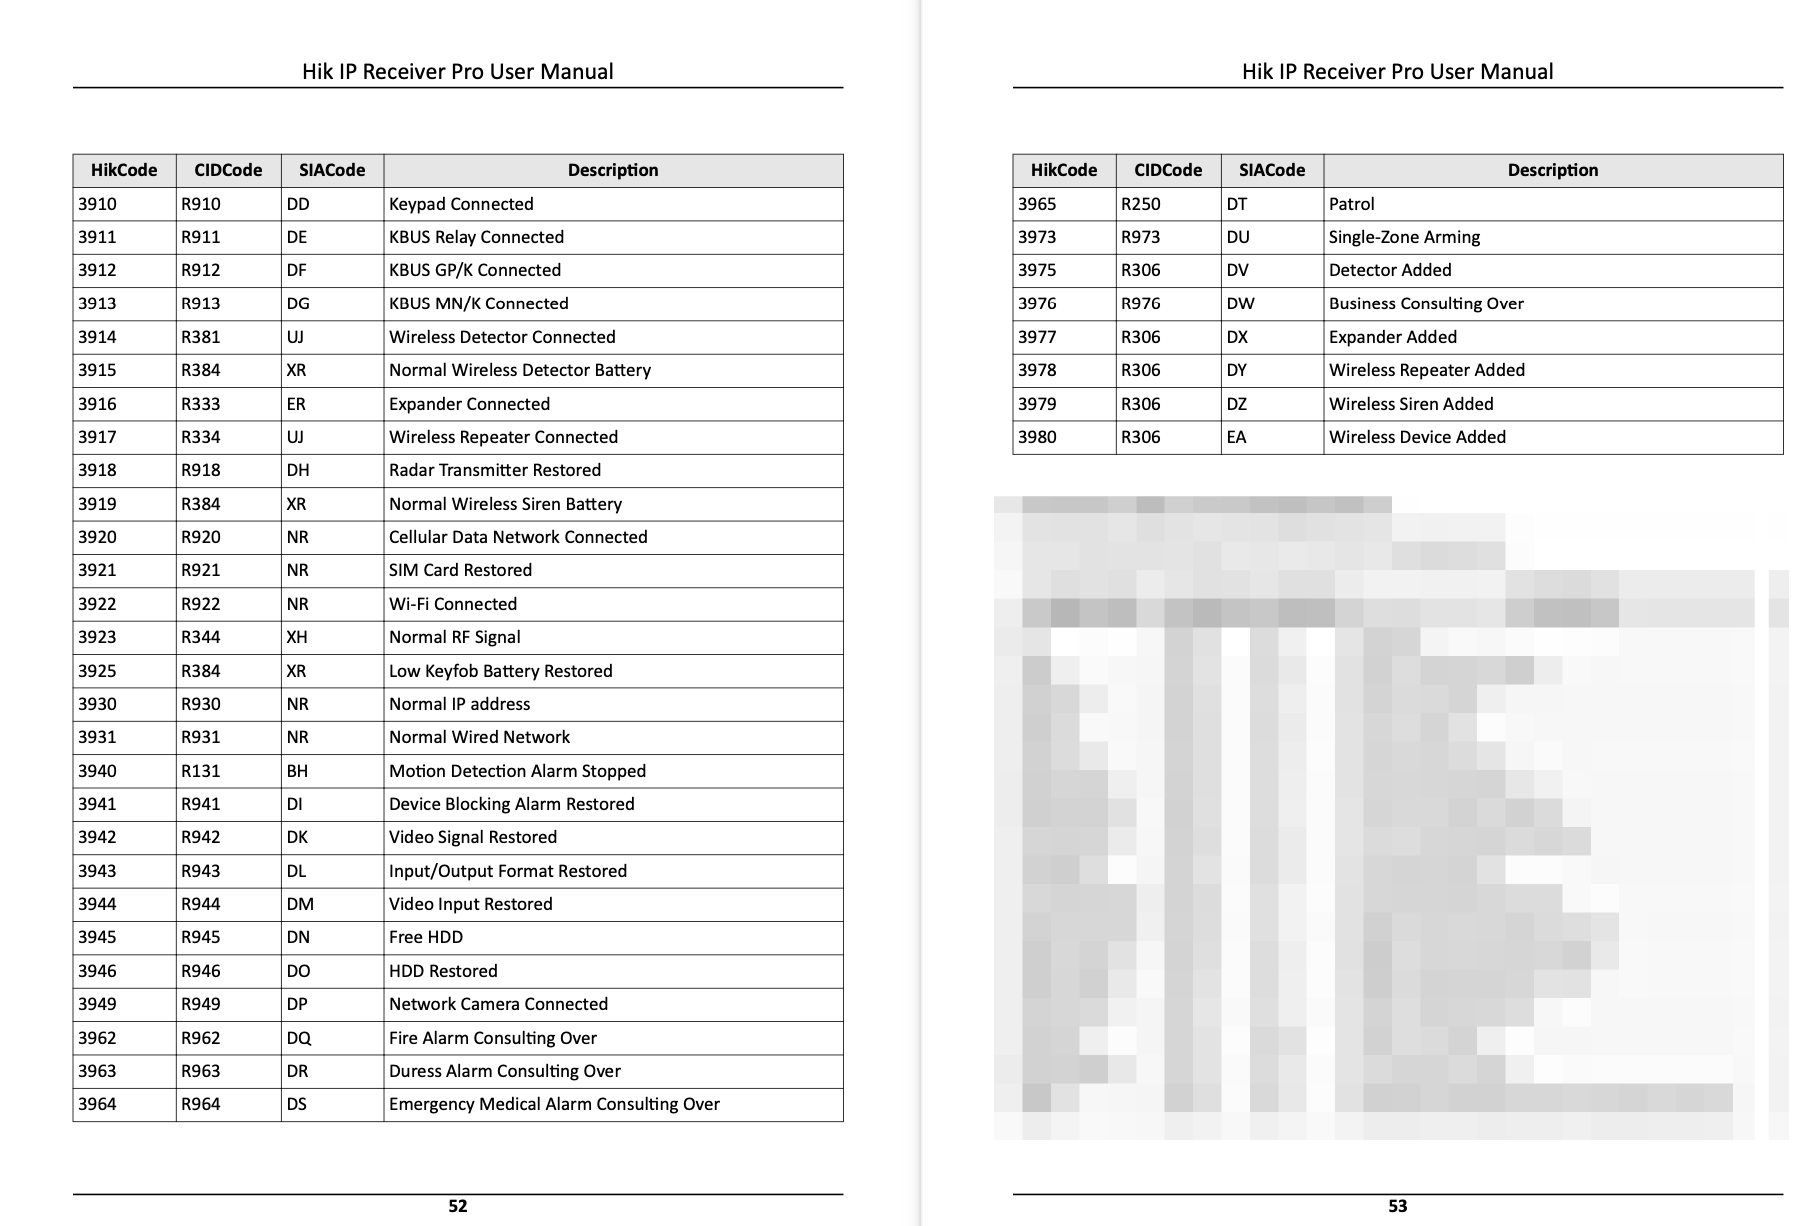
For other codes, please see the list below. You can find it here as well
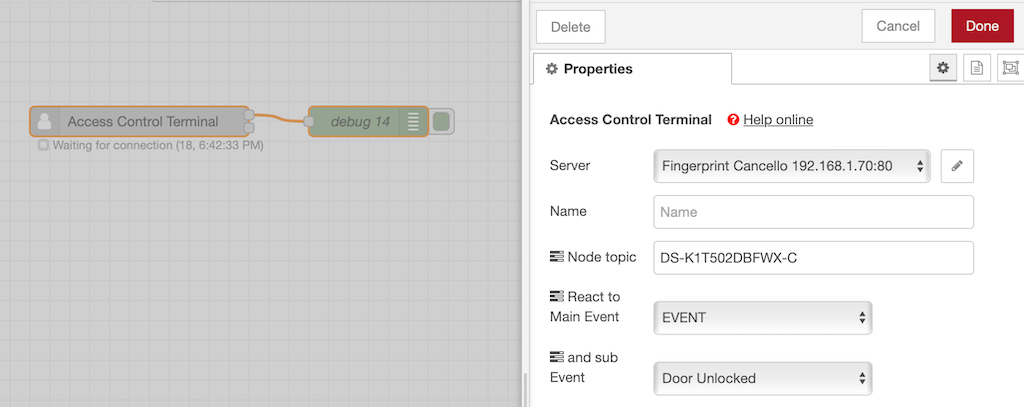
This node receives all events sent by your access control terminal, like, for example the DS-K1T502DBFWX-C.
The node emits the payload as soon as it receives the event.
You can filter by any type of event, alarm, exception, etc, or you can accept all incoming events
Flow Messages
This is an example of payload.
Output
{
   "topic":"",
   "payload":{
      "major":5,
      "minor":21,
      "time":"2023-03-18T18:37:54+01:00",
      "netUser":"",
      "doorNo":1,
      "type":0,
      "serialNo":735,
      "eventDescription":"(EVENT) Door Ulock",
      "currentVerifyMode":"faceOrFpOrCardOrPw"
   },
   "connected":true
}