node-red-contrib-blockly
A Node Red node that offers a visual programming interface, to make programming a function node easier. Just drag and drop blocks to build your program logic, without having to write the Javascript code yourself. By building your code in a visual way, you don't have to learn the Javascript syntax, which makes programming very difficult for beginners.
Moreover the generated Javascript code can be displayed, so you can learn Javascript coding step by step...
Thanks to lots of people, for their assistance during the development of this node:
- A lot of folks on the Google Blockly forum ...
- Simon Walters as analyst and righteous judge of this repository.
- Jeff for contributing to features like full-screen mode.
- All the translator folks that translate our block texts in multiple languages.
Install
Run the following npm command in your Node-RED user directory (typically ~/.node-red):
npm install node-red-contrib-blockly
Support my Node-RED developments
Please buy my wife a coffee to keep her happy, while I am busy developing Node-RED stuff for you ...

Performance
The performance of this node is identical to the standard Function-node!
Indeed the Javascript code will be generated once, when the content of the Blockly workspace has been edited. From then on that generated code will run on the Node-RED server side, using exactly the "same" sandbox mechanism as used by the Function-node.
Where used
When implementing your custom logic into a Node-Red flow, sometimes the available nodes won't be sufficient. In those cases the standard function node can be used, to implement your logic by entering custom Javascript coding. However to avoid having to write Javascript code yourself, you can draw your logic by dragging and dropping blocks into the Blockly editor.
As soon as the the Node-Red flow is deployed, the generated Javascript code will run on the Node-Red flow (similar to a standard function node):
- Draw the blocks on your editor, according to your business logic.
- When deploying the flow, the corresponding Javascript code will be generated and send to the server.
- Create an input message (called 'msg'), which can contain an arbitrary number of fields (e.g. payload, topic, ...) and their corresponding values.
- The msg arrives at the Blockly node, which will execute the generated Javascript code.
- The generated Javascript code can send an output message on one of it's output ports.
- The output message will be handled by the next nodes in the flow.
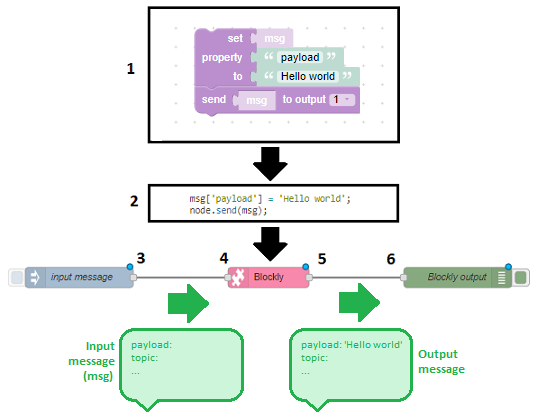
Hello world example
As soon as an input message arrives, we will set the 'payload' property of that input message to 'Hello world'. And afterwards that updated input message will be send to the output port:
The following animation shows how this example flow can be constructed using the Blockly node:
Lots of other examples can be found in the wiki pages ...
Blockly basics
Blockly is a visual block programming language (and editor), maintained by Google. A lot of documentation (tutorials, videos, ...) can be found on the internet, but here are some bascis to get you started:
-
A block can have a value input at the right side. Or a value output at the left side. Or both:

-
A statement is created by connecting value inputs and value outputs together horizontally, to pass data from the outputs to the inputs:

In this example the Node-Red input message is cloned, and then the cloned message is send to output 1 of your Blockly node. This means you have to read the chain of blocks from the right to the left ...
Caution: the data type requested by a value input should be equal to the data type offered by the value output. Otherwise you cannot connect the value output to the value input!
-
A value input can be inline or external:
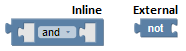
For an inline value input, the next block will be inside the previous block. For an external value input, the next block will be after the previous block:

When right-clicking on top of a block, a context menu appears where you can switch between inline and external inputs.
-
A block input can be connected automatically to a shadow block:
A shadow block is like a default value for that input, which is automatically attached to it (already in the toolbox). You cannot delete the shadow block, but you can drop another block on top of it. In that case the shadow block will be ignored an the new block will be used as input value.
-
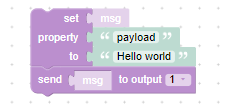
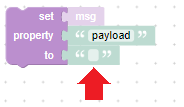
A block can have properties to change the behaviour of the block:
-
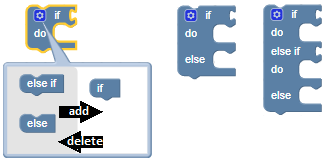
A block can have a statement input at the top side. Or a statement output at the bottom side. Or both:
Remark: a block can have multiple inputs.
-
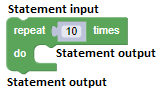
A program (or statement stack) is created by connecting statement inputs and statement outputs together vertically, to specify the order in which the statements needs to be executed:
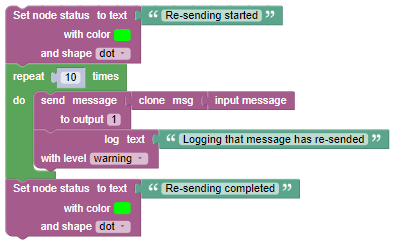
In this example we start by showing a green node status "Re-sending started". Afterwards the input message is cloned 10 times and sended to the output port, and every time a log is written to the console "Logging that the message has been resended". And we end by showing a green node status "Re-sending completed". This means you have to read the blocks from the top to the bottom ...
!!! CAUTION !!! Blockly always starts counting from 1, while Javascript starts counting from 0! This might be confusing for users that are already familiar with programming in Javascript...
Config screen
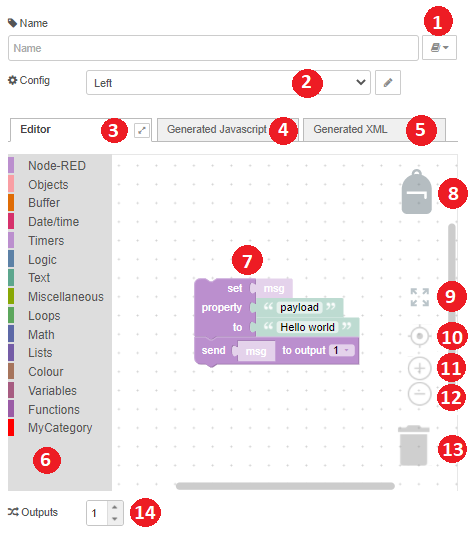
The node's config screen consists out of a series of elements:
-
The library button is similar to the standard function node: the code from this Blockly node can be made globally available by adding it to a libary. That library will be stored withing the 'libs' directory in your node-red user directory.
-
The config node that contains the settings used in this Blockly node. If no config node has been selected, then the default settings will be used.
-
The editor tabsheet displays a Blockly workspace editor. Here blocks can be added, which will be converted afterwards to Javascript code. Note the fullscreen icon beside the toolbar label: see wiki.
-
The generated Javascript tabsheet will display the Javascript code, which is generated based on the blocks in the Blockly editor. This code is readonly, which means you cannot change it! Reason is that it is not possible to generate Blockly blocks, starting from Javascript code ...
-
The generated XML tabsheet will display the XML, that represents the blocks in the Blockly editor.
-
The Blockly toolbox shows all available blocks, grouped by category.
-
The Blockly editable area shows all the blocks representing your custom logic. Blocks can be dragged from the toolbox into the editable area. A lot of user interaction is offered in this area:
- When pressing the delete button, the selected blocks will be removed.
- When pressing ctrl-f, a search field will be displayed (containing a next and previous button). See wiki.
- By clicking and dragging with the mouse, the user can start panning to alter which part of the area is being visualised.
- By clicking on a block and dragging with the mouse, the block (and all of its's chained next blocks) will be moved.
- By rotating the mouse wheel, you can zoom in/out.
- By using ctrl-c and ctrl-v the selected block will be copied. When the block is connected to next blocks, the entire block chain will be copied. Note that you can also paste the selected block in another blockly node!
- By using ctrl-z the last action will be undone.
- By right-clicking a context menu appears. That context menu will be different if the grid is clicked, or if a block is clicked.
- ...
Remark: the toolbox and the editable area together are called a *'workspace'.
-
The backpack button allows to create a custom list of your favorite blocks. See wiki.
-
The zoom to fit button will automatically zoom the workspace, so all the blocks will become visible at once.
-
The *center button allows the available blocks to be centered in the middle of visible workspace area.
-
The zoom in button.
-
The zoom out button.
-
The thrash can button. Click on the bin to show the removed blocks, and optionally restore them.
-
The number of output ports for the Blockly node in the Node-Red flow editor. Make sure that this number doesn't exceed the output port number of the 'send' block (see below).
Node-Red blocks
When writing Javascript code in a standard function node, some Node-Red functionality can be called from within that code (see function node API). To offer the same functionality in the Blockly editor, a series of extra blocks have been added. These blocks are availble in the 'Node-Red' category in the toolbox:
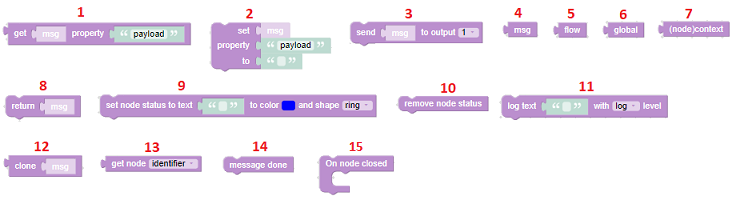
- Get the value of some property in an object.
- Set some property in an object to a specified value.
- Send to the specified output port the message, which is specified on the block input. Make sure that the specified output number doesn't exceed the number of outputs on the Blockly node!
- The input message (msg) exposes the input message that arrive's in the Node-Red flow, on the Blockly node input port.
- The Node-Red flow memory can be used to store data that needs to be shared by all nodes in a flow.
- The Node-Red global memory can be used to store data that needs to be shared by all nodes.
- The Node-Red (node)context memory can be used to store data that needs to be shared by all blockly nodes.
- Return the specified message. This means that we stop processing (i.e. the next blocks will not be executed), and the message will be send on the output port.
- Show the specified text in the node status. Both the status icon shape and color can be specified.
- Remove the node status from the node.
- Log the specified text in the console. Multiple log levels are available (log, error, warning, trace, debug). The warnings and errors will also be displayed in the flow editor debug tab. The trace and debug levels are only used to display details, and are not visible if no logger for those levels is specified in Node-Red.
- Clone message can be used to create a new separate copy of the specified message.
- Get the specified node property. The node identifier, node name and node output count can be get.
- Specify that the processing of the message has been completed, so it can be handled by the Complete-node in the flow. See wiki.
- Some things can be don when the node is closed, most of the time to cleanup stuff.
Config node settings
The Blocky workspace can be configured via the settings in the selected config node:
These settings will be applied to every Blockly node where this config node has been selected:
-
Specify whether a trash can icon needs to be displayed in the workspace.
-
Specify whether comments can be added to blocks in the workspace.
-
Specify whether the 4 zoom icons needs to to be displayed in the workspace.
-
Specify whether a mini map needs to be displayed in the expanded (i.e. full screen) workspace:
-
Specify whether a backpack icon needs to be be displayed in the workspace.
-
Customize the toolbox categories to fit your needs. CAUTION: this is only for advanced users and need to be done with care!! When this checkbox is activated, the "Categories" tabsheet will become enabled. See wiki.
-
Specify the language that needs to be used in the blocks in the workspace.
-
Specify the location of the toolbox, relative to the workspace.
-
Specify the renderer, which determines how the blocks need to be drawn.
-
Specify the theme, which determines the look and feel of Blockly (block colours, category colours, ...)
Need a change ...
When you need a change in this node, you can create a new Github issue. A couple of remarks about this:
- Check in advance whether that change hasn't been requested yet (as a Github issue).
- Take into account that the function node offers much more functionality, since we cannot create blocks for all Javascript statements.
- Keep in mind that we won't create blocks for functionality, whcih is already available in other Node-RED nodes (e.g. send mail, ...).
Need blockly in your own language ...
Google has already provided translations for all their basic blocks. However for our own blocks, there are currently only translations available in a few languages. If you want to translate the blocks in your own language, please follow these steps:
- Clone the en.js to a xx.js file (with xx being your country code like 'nl', 'en', 'fr', 'jp', ...).
- Translate all the texts from the xx.js file in your own language. Blockly will automatically replace the placeholders (%1 %2 ...) by widgets (dropdowns, input fields, ...). You are allowed to rearrange the placeholders, because blockly will automatically rearrange the corresponding widgets also. For example 'convert date %1 to format %2' could be 'xxx %2 xxxx %1 xxx' in a language that is being read from right to left.
- Test whether the blocks look good and correct in your language.
- Deliver us the xx.js file (preferrable by pull request, or otherwise e.g. via a new issue).
Thanks in advance !