node-image-farmer
"node-image-farmer...because it crops images"
- Original connect-thumbs code by Irakli Nadareishvili, modified by Allan Bogh
Image thumbnailing middleware for Connect.js/Express.js that integrates with content-aware cropping provided by Smartcrop.js
node-image-farmer implements the boilerplate code for creating thumbnails of large images in a standard, Connect.js-complient way, allowing sensible defaults and high degree of customization.
Installation
Dependencies
C++11 compiler - g++ 4.8 or clang 3.2 Why? Canvas doesn't install using node-gyp without C++11 features. Sometimes the root user can't perform the npm install, however a normal user account can without installing g++ 4.8.
Using your own API
See app/app.js for an example API.
$ # dependencies need to be installed first$ npm install node-image-farmer --saveUsing the provided API
$ git clone git@github.com:ajbogh/node-image-farmer.git$ cd node-image-farmer$ npm run install-ubuntu-deps$ # npm run install-redhat-deps$ # npm run install-mac-deps (untested)$ npm installChecking out specific version
$ git fetch --tags$ git checkout v1.2.1$ # npm installInstalling Dependencies Manually (if "npm run install-XYZ-deps" doesn't work)
Note: there are also APT and YUM repositories you can use for Ubuntu/Debian and RedHat/Centos/Fedora respectively.
On OS-X you can easily install dependencies with:
> brew install graphicsmagick> xcode-select --install> brew install pkgconfig> brew install pixman> brew install libjpeg> brew install giflib > brew install cairoOn OS-X, if an canvas error appears try these commands:
- Find the directory which contains the Cairo installation:
$ sudo find / -name cairo.pcYou should see one like /usr/local/lib/pkgconfig/.
- Add the pkgconfig path to your .bash_profile
$ echo `export PKG_CONFIG_PATH=/usr/local/lib/pkgconfig/` >> ~/.bash_profile- Close and reopen your terminal or type
source ~/.bash_profileto reload the profile. - Now you can run npm install again.
$ npm installServing local images
You can serve images from your own server by creating a symlink under app/images
$ cd app
$ ln -s images /path/to/your/images/folder
You can navigate your images folder similar to how you normally would with a URL:
http://localhost:3000/content/smart/small/my/subfolder/myImage.jpg
API
- preset: [full, small, medium, hero, irakli] (default, configurable)
- width: w or width (query string, optional)
- height: h or height (query string, optional)
- quality: q or quality (query string, optional, 1-100 default 95)
- minScale: minScale (query string, optional, between 0.1 and 1) - Allows the system to zoom in on a portion of the image to find the best crop setting. Lower numbers may take an extremely long time, we recommend not using numbers below 0.5.
All images by default are served from port 3000 (configurable) and reside in the /content/smart subfolder
http://localhost:3000/content/smart/[preset]/[path/to/image]/[image.jpg or ?base64=ab123]?w=123&h=456&q=95&minScale=1.0
Presets are defined in the configuration, but default presets are 'irakli', 'small', 'medium', and 'hero'. If no preset matches or you would like the full image, you may use 'full' and optionally define width and height parameters.
http://localhost:3000/content/smart/small/myImage.jpg
http://localhost:3000/content/smart/medium/myImage.jpg
http://localhost:3000/content/smart/full/myImage.jpg
You may override preset crops with the w, width, h, or height parameters. You may also override the quality with the 'q' or 'quality' parameter.
http://localhost:3000/content/smart/small/myImage.jpg?w=150&h=100
http://localhost:3000/content/smart/medium/myImage.jpg?width=150&height=100
http://localhost:3000/content/smart/full/myImage.jpg?w=150&height=100&quality=50
http://localhost:3000/content/smart/full/myImage.jpg?q=2
Running an Example
If you have all the prerequisites installed you can launch a demo with:
$ npm run app
$ # or
$ ./nodeImageServer
And then open your browser at the following URL:
http://localhost:3000/content/smart/full/?base64=aHR0cDovL3d3dy5wdWJsaWNkb21haW5waWN0dXJlcy5uZXQvcGljdHVyZXMvMTAwMDAvdmVsa2EvMTA4MS0xMjQwMzI3MzE3cGMzcS5qcGc=
You can see on the following diagram what simple (on the left), and smart (on the right) crops produce compared to the original (center)
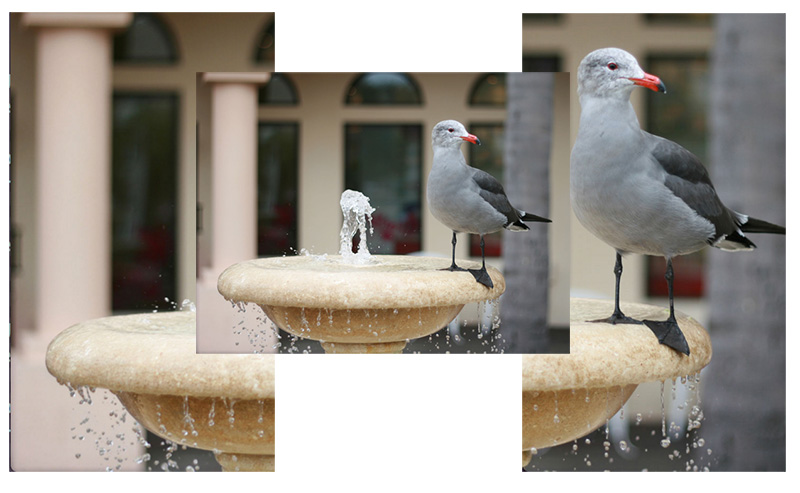
Photo Credit: Andrew Schmidt (Public Domain)
Smart Cropping
200x400 remote image
http://localhost:3000/content/smart/full/?w=200&h=400&base64=aHR0cDovL3d3dy5wdWJsaWNkb21haW5waWN0dXJlcy5uZXQvcGljdHVyZXMvMTAwMDAvdmVsa2EvMTA4MS0xMjQwMzI3MzE3cGMzcS5qcGc=
200x400 local image
http://localhost:3000/content/smart/full/myImage.jpg?w=200&h=400
Connect.js/Express.js Usage (Creating your own API)
See app/app.js for an example. You may add/modify or remove any code within this file to obtain your own API.
when configured with defaults, and if you have your node process running at yourdomain.com, a request such as:
http://yourdomain.com/content/smart/medium/?base64=aHR0cDovL3VwbG9hZC53aWtpbWVkaWEub3JnL3dpa2lwZWRpYS9jb21tb25zLzYvNjYvRWluc3RlaW5fMTkyMV9ieV9GX1NjaG11dHplci5qcGc=
will display Einstein's photo from Wikipedia as a width: 300 (and proportionally resized height) thumbnail.
Another example uses the file system to resize a file within the app/images folder. In a production environment this folder would be a symlink to wherever the images are located.
http://localhost:3000/content/smart/irakli/crops-smart.jpg
You may also override a preset by supplying a width, height, and quality in the query strings. Each of these are optional and distinct properties. For instance, by specifying the width you can override the preset's width without affecting the height or quality properties.
http://localhost:3000/content/smart/medium/crops-smart.jpg?height=300&width=200&quality=85
http://localhost:3000/content/smart/medium/crops-smart.jpg?h=300&w=200&q=85
This is because:
/content/smart/mediumin the beginning of the URL instructs the middleware to use default resizing preset named "medium" which corresponds to proportional resizing to width: 300px.- the long, somewhat cryptic code is base64-encoded version of the URL of Einstein's photo on Wikipedia
Configuration
Edit the config/appConfig.json file for your setup. (comments added below are for informational purposes, not to be included in JSON)
where:
- baseDirectory - The directory in your URL to load the files from. Use '/someDirectory' to render images from http://localhost:3000/someDirectory for example.
- port - The port to use. Default is 3000, you might want port 80 or 443 in production.
- allowedExtensions - An array of allowed extensions (without dots!)
- allowedMimeTypes - An array of allowed mime types.
- tmpDir - The directory to store copied images. Defaults to:
/tmp/node-image-farmer. - browserTTL - The cache length in seconds to keep images in cache on the client browsers (24 hours by default).
- tmpCacheTTL - The cache length in seconds to keep the cropped images from re-processing the original image. Defaults to 30 minutes.
- fullFileTTL - The cache length in seconds to keep a copy of the original image. Defaults to 24 hours.
- useMultipleProcesses - Set true to use multiple cores for image requests (recommended), false will block requests until previous requests have finished.
- presets - json object describing various image presets. You can indicate width, height and quality level for each. Quality adjusts image compression level and its value ranges from 0 to 100 (best).
Serving Behind a Web Server
ATTENTION: in typical web setups, static content such as images is often served by a web-server, never allowing requests to *.jpg, *.png etc. to reach Node process. If you want to use node-image-farmer, obviously you must allow paths to thumbnailed images to pass through to Node. Please add appropriate exception to you web server configuration. For Nginx, your configuration may look something like the following:
  # Thumbnail processing
  location ^~ /content/smart {
    auth_basic off;

    proxy_pass         http://127.0.0.1:3000;
    proxy_set_header   Host                   $http_host;
    proxy_redirect off;
  }

  #  static content
  location ~* ^.+.(jpg|jpeg|gif|css|png|js|ico|xml)$ {
    # access_log        off;
    expires           15d;
  }
Alternatively, sometimes connect-static is used to serve static content. If you do that, please make sure that connect-static fires after node-image-farmer does.
Performance and Scalability
Node.js is very fast, but GraphicsMagick and over-the-HTTP fetching of the original image most certainly are not. In any production setup it is highly recommended to put thumbnailing of images behind some sort of proxy/cache/CDN.
The tmp file storage will prevent the system from needing to crop the image if it has already done it once before (within the time limit). The full file cache will reduce the need to download the file from a website or copy the file from a disk.
When useMultipleProcesses is enabled, the system can crop as many images at a time as there are cores on the server. It's best to use more than 2 cores, preferably 4. If there is only 1 core then the system will still create 1 new process per request, but the OS will handle multithreading.
If useMultipleProcesses is disabled then the process will block new requests until the previous image is cropped and served.
Viable options include:
- Enabling the integrated disk-based cache provided by node-image-farmer. You can do this by passing custom
tmpCacheTTLconfiguration variable when initializing Thumbs. This variable is set in seconds and is 0 by default. Setting it to values greater than 0 enables caching. - Put Varnish in front of the thumbnail URLs
- Use a robust CDN such as Amazon's CloudFront
- Pick your own poison.