
NativeScript NFC plugin


Installation
From the command prompt go to your app's root folder and execute:
NativeScript Version 7+:
ns plugin add nativescript-nfcNativeScript Version 6 and below:
tns plugin add nativescript-nfc@4.1.0iOS Setup
iOS requires you to enable 'NFC Tag Reading' for your App ID here.
Also, add this to your App_Resources/iOS/app.entitlements (mind the name!) file:
com.apple.developer.nfc.readersession.formats NDEFThe demo app has this:
com.apple.developer.nfc.readersession.formats NDEF Android Setup
⚠️ Since plugin version 4.0.0 this section is no longer needed, but you'll HAVE to run NativeScript 5.4.0 or newer. If you're using an older NativeScript, please stick to a plugin version < 4.0.0.
Update the activity entry in your App_Resources/Android/AndroidManifest.xml file:
So replace com.tns.NativeScriptActivity with com.tns.NativeScriptNfcActivity.
Webpack (again, no longer needed from plugin version 4.0.0)
If you're using Webpack to bundle your app you'll need to add 1 line of configuration in case you're targeting Android.
- Open
webpack.config.js(it's in the root of your project). - Look for an Array named
appComponents, which likely contains stuff like"tns-core-modules/ui/frame". - Add
resolve(__dirname, "node_modules/nativescript-nfc/nfc-activity.android.js")as shown here.
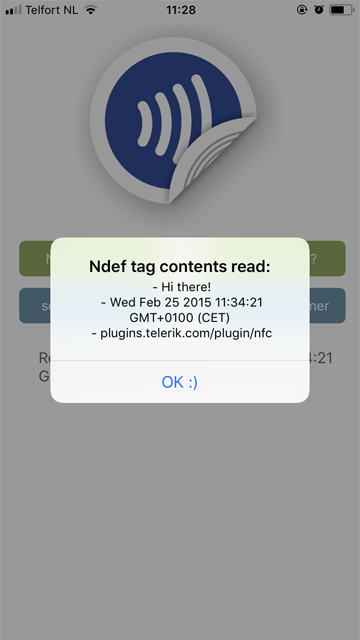
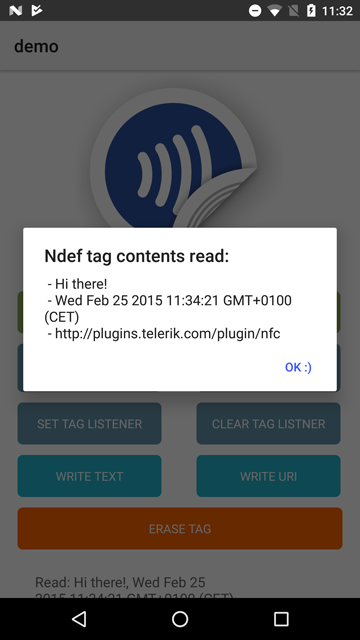
Demo app (those screenshots above)
Want to dive in quickly? Check out the demo!
You can run the demo app from the root of the project by typing npm run demo.ios.device or npm run demo.android.
API
available
Not all devices have an NFC chip we can tap in to (and on iOS you need to build with Xcode 9+), so check this beforehand:
JavaScript
// require the pluginvar Nfc = Nfc; // instantiate the pluginvar nfc = ; nfc;TypeScript
// require the plugin; // instantiate the plugin; nfc.available.then;enabled
A device may have an NFC chip, but it needs to be turned on ✅ in order to be available for this plugin. So if available returns true and enabled returns false you should prompt the user to turn NFC on in the device settings.
JavaScript
nfc;TypeScript
nfc.enabled.then;setOnNdefDiscoveredListener
You may want to get notified when an Ndef tag was discovered. You can pass in a callback function that gets invoked when that is the case.
Note that blank/erased NFC tags are not returned here, but through setOnTagDiscoveredListener instead.
See the definition of NfcNdefData to learn what is returned to the callback function.
For iOS you can pass in these options (see the TypeScript example below):
stopAfterFirstRead: boolean(defaultfalse): don't continue scanning after a tag was read.scanHint: string(defaultundefined): Show a little hint in the scan UI.
JavaScript
nfc ;TypeScript
; nfc .setOnNdefDiscoveredListener, .then;You can pass in null instead of a callback function if you want to remove the listener.
TypeScript
nfc.setOnNdefDiscoveredListenernull.then;setOnTagDiscoveredListener (Android only)
You may want to get notified when an NFC tag was discovered. You can pass in a callback function that gets invoked when that is the case.
Note that Ndef tags (which you may have previously written data to) are not returned here,
but through setOnNdefDiscoveredListener instead.
See the definition of NfcTagData to learn what is returned to the callback function.
JavaScript
nfc ;TypeScript
; nfc .setOnTagDiscoveredListener .then;You can pass in null instead of a callback function if you want to remove the listener.
TypeScript
nfc.setOnTagDiscoveredListenernull.then;writeTag (Android only)
You can write to a tag as well with this plugin. At the moment you can write either plain text or a Uri. The latter will launch the browser on an Android device if the tag is scanned (unless an app handling Ndef tags itself is active at that moment, like an app with this plugin - so just close the app to test this feature).
Note that you can write multiple items to an NFC tag so the input is an object with Arrays of various types (textRecord and uriRecord are currently supported). See the TypeScript definition for details, but these examples should get you going:
Writing 2 textRecords in JavaScript
nfc ;Writing a uriRecord in TypeScript
nfc .writeTag .then, ;eraseTag (Android only)
And finally, you can erase all content from a tag if you like.
JavaScript
nfc;TypeScript
nfc.eraseTag.then;Tips
Writing to an empty tag
You first need to "discover" it with setOnTagDiscoveredListener (see below). While you're still "near" the tag you can call writeTag.
Writing to a non-empty tag
Same as above, but discovery is done through setOnNdefDiscoveredListener.
Future work
- Peer to peer communication between two NFC-enabled devices.
- Support for writing other types in addition to 'text' and 'uri'.