mxunit-watch
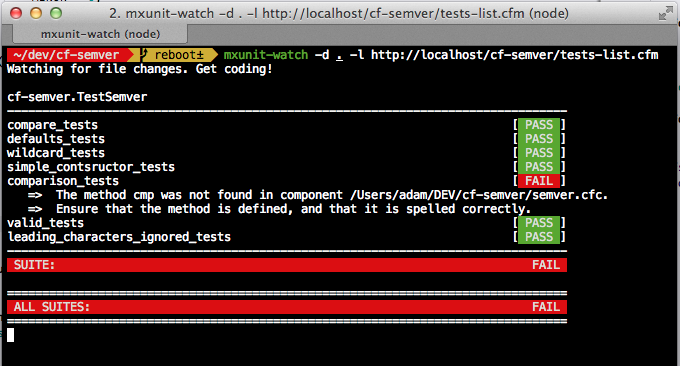
Watch a directory for file changes. When a (.cfc, .cfm, .xml) file is changed, trigger an mxunit test suite run. Results displayed neatly in the console:
Pre-requisites
Requires NodeJS
The guts of this tool are powered by Node, and you'll be installing it from NPM.
npm install -g mxunit-watchRequires MXUnit Bleeding-Edge Release
Adam Tuttle had to submit a small change to MXUnit to get it to offer up the list of tests, but they accepted my pull request, so it's now available in their Bleeding Edge Release. When another official release is published I'll update this readme with the minimum version number, but for now you should know that version 2.1.3 (the latest stable release) is not recent enough. You'll have to download the latest master branch of mxunit.
Add a CFM file to your project
mxunit-watch uses this file to get a listing of all of your test suites and the tests they contain:
<cfscript>
	testsDir = expandPath('/your/project/tests');
	componentPath = 'your.project.tests';

	files = createObject('mxunit.runner.DirectoryTestSuite').getTests(
		  directory=testsDir
		, componentPath=componentPath
		, recurse=true
		, excludes="/Test.*$,^_assets/"
		, precompile=false
	);

	// apply the filter string to restrict the test suites we run
	if( structKeyExists(url, "filter") && len(url.filter) ){
		files = arrayFilter(files, function (file, index, files){
			return reFindNoCase(url.filter, arguments.file, 0) > 0 ? true : false;
		});
	}

	// the results to return (we use a hashed map, so the tests are run in order)
	results = createObject("java", "java.util.LinkedHashMap").init();


	/*
	 * When generating results in batch, we only need the test suites, not the individual
	 * tests. For large code bases, this will speed up the request.
	 */
	if( structKeyExists(url, "batch") && isBoolean(url.batch) && url.batch ){
		arrayEach(files, function (file, idx){
			results[file] = [];
		});

	/*
	 * Since we are running each test individually, we need to return all the tests
	 * inside each test suite.
	 */
	} else {
		suite = createObject('mxunit.framework.TestSuite');
		// add each suite to the output
		for (i = 1; i <= arrayLen(files); i++){
			suite.addAll(files[i]);
		}

		tests = suite.suites();

		// loop through the tests and get the test methods
		iterator = tests.keySet().iterator();
		while( iterator.hasNext() ){
			suiteName = iterator.next();
			suiteMethods = tests.get(suiteName).methods;

			// sort methods alphabetically
			arraySort(suiteMethods, 'textnocase', 'asc');
			results[suiteName] = suiteMethods;
		}
	}
</cfscript>
<cfsetting showdebugoutput="false" />
<cfcontent reset="true" type="application/json; charset=UTF-8" /><cfoutput>#serializeJson(results)#</cfoutput><cfabort/>
This file is provided in the mxunit-watch repository (test-list.cfm), or you can just copy it from above. Save it to a web-accessible location in your project and note its URL, you'll need that later.
Let's go!
Now that you've installed mxunit-watch and saved your tests-list file. Let's auto-run some tests!
The CLI requires 2 arguments in order to run your tests:
-
-lor--listshould be set to the URL of the test-list file you created -
-dor--dirshould be set to the directory that you want to watch
or
-ror--runto just do a single run of the unit tests and not watch for file changes
$ mxunit-watch -d /my/project -l http://localhost/my/project/tests/test-list.cfm
Watching for file changes. Get coding!
As the output says, it's now watching for changes. Any time you save a change to a .cfm, .cfc, or .xml file, your entire test suite will run.
Alternatively, you can just run the test suites once and return to a command prompt.
$ mxunit-watch -r -l http://localhost/my/project/tests/test-list.cfm
Other options
-
-H, --host [hostname]to set the hostname used to run tests -
-e, --extensions [list]to set the list of extensions to watch. by default this is cfm,cfc,xml. Specify as a comma separated list of extensions. Example:cfm,xml,cfc,js -
-w, --linewidth [width]the line width to use for the output (default: 80) -
-x, --timeout [timeout]the maximum timeout (in seconds) for the HTTP connection (default: 30) -
-b, --batchforces test suites to run in a single HTTP operation which will improve performance. -
-f, --filter [string]appends a "filter" argument to the "list" endpoint to limit which test suites are run (your list endpoint must apply the logic for this filter) -
-t, --testRuns all the tests are startup (only valid with the-dor--dirarguments). -
-h, --helpfor help -
-Vfor version -
--debugwill print out some debug information at startup -
--savewill save your hostname, list and debug settings to a .mxunit-watch file in your watch directory (see below for more information)
.mxunit-watch
You can create an .mxunit-watch file in your watch directory (the -d or --dir option). This can hold your list, host and debug settings.
Simply create a JSON file in the watch directory using the following format:
{
	"host": "localhost",
	"list": "http://localhost/my/project/tests/test-list.cfm",
	"linewidth": 120,
	"timeout": 90,
	"batch": false,
	"debug": true,
	"extensions": [
		"cfm",
		"cfc",
		"xml"
	]
}-
hostshould be the hostname parameter -
listshould be the URL to the list of tests -
linewidthshould be the line width to use for the output -
timeoutshould be the maximum timeout (in seconds) for the HTTP connection -
batchshould be whether or not to run test suite operations in a single HTTP operation -
debugcan betrueorfalseand indicates whether or not debugging output should appear in the console -
extensionsis an array of extensions to watch
Grunt Task
You can also use this as a Grunt task. Read the Grunt docs if you are unfamiliar with Grunt.
To setup your task, in your Gruntfile.js file add:
grunt.loadNpmTasks('mxunit-watch');and within your grunt.initConfig({...}); block add:
mxunit: {
	options: {
		host: "localhost",
		list: "http://localhost/list-tests.cfm"
	}
}
You can then run your tests with grunt mxunit
This is compatible with grunt-contrib-watch as well.
Example:
watch: {
	mxunit: {
		files: [
			'**/*.cfm',
			'**/*.cfc'
		],
		tasks: [ "mxunit" ]
	}
}
That tells the watch task to watch all *.cfm and *.cfc files for changes, and will run the mxunit task whenever one of those files changes.