🐚 local-repl


Project-specific REPLs for Node.js. local-repl allows you to automatically import modules and values into your REPL sessions with simple configuration in your project's package.json and/or .replrc.js.
Features!
- Automatically import modules into your REPL sessions
- Use
awaitin the REPL without having to wrap your code in async functions - Configure the banner and prompt
Add local-repl to your project
$ npm install local-repl --save-dev
# OR
$ yarn add local-repl --dev
Add the following to package.json. Note: lodash is used as an example
here; it is not required to use local-repl.
Run it
$ npm run repl
This will start a REPL session with lodash already imported.
Specifying aliases
You can pass an array of objects containing the keys "name" (required), "module" (for imports), or "value" (for values).
Importing local modules
Local modules can be imported, too.
Using .replrc.js
Instead of defining configuration in "package.json", you may define your configuration in a .replrc.js file. This is useful if you want to dynamically compute modules and values for your REPLs.
// .replrc.jsconst User = ; moduleexports = context: 'lodash' 'myapp/utils' name: 'me' value: User Note: Configuration defined in .replrc.js takes precedence over configuration defined in package.json.
Defining context as an object
Context can be defined as an object rather than an array.
// .replrc.jsconst User = ; moduleexports = context: l: utils: me: User Promises as context values
Context values that are promises will be resolved before the REPL starts.
// .replrc.jsconst promise = { ;}; moduleexports = // REPL will have meaningOfLife with value 42 in context context: meaningOfLife: promise ;await support
You can use await in your REPL sessions without having to
create async functions.
Just add the following to your package.json:
Or in .replrc.js
// .replrc.jsmoduleexports = enableAwait: true More configuration
Configuring the prompt
In package.json:
In .replrc.js:
// .replrc.jsmoduleexports = prompt: 'myproject $'You can also define prompt as a function in .replrc.js. The function will receive the REPL context and the parsed package.json object.
// .replrc.jsmoduleexports = { return ` $` }Configuring the banner
In package.json:
You can also define banner as a function in .replrc.js. The function will receive the REPL context and the parsed package.json object.
// .replrc.jsconst _ = ;const chalk = ; moduleexports = context: name: 'l' value: _ name: 'meaningOfLife' value: 42 { console; console; console; }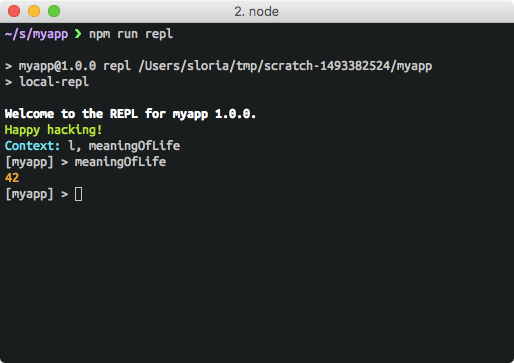
Programmatic usage
local-repl can be used programatically. The .start(options) function takes the same options as Node's built-in repl.start(options) and returns a Promise that resolves to a REPLServer instance.
const repl = ; replstart prompt: '< -_- > ' ;Inspiration
local-repl is inspired a number of other great projects:
License
MIT licensed. See LICENSE for more details.