jscow-node-editor
jsCow application for a independend process editor.
Intro
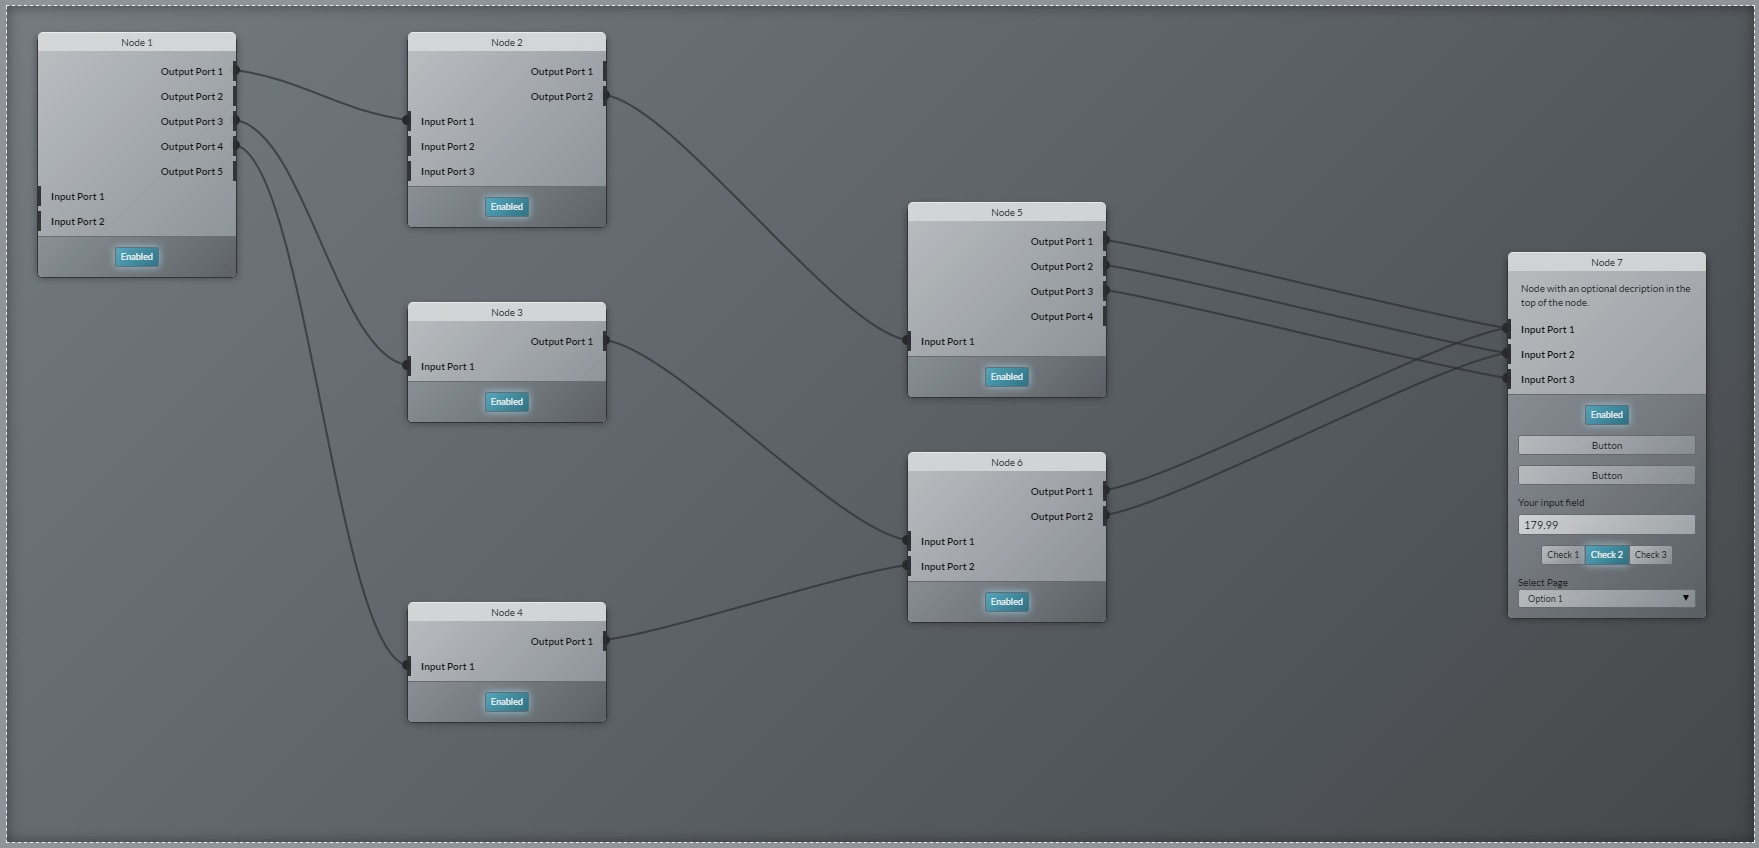
This project provides a jscow application for a independend process editor. Independend means the editor is not dependend to any server side languages. The runtime environment of the editor is just the browser. The complete editor is an interface to edit or manipulate processes with help of nodes.
Table of Contents
- Technical Backgrounds
- Create an editor instance
- Describe a node
- Define a node port with only a title
- Using a dropdown as a configuration field
- Using a button as a configuration field
- Using a checkbox as a configuration field
- Using a textfield as a configuration field
- Add one or more nodes per javascript
- Add a set of connections
- Add a group of node definitions that you can add within the editor
Technical Backgrounds
A complete process will be describe through a json object.
By changes on a process the editor will update the process configuration within the editor and triggers anthe event editor.options.changed to out of the editor.
The editor do not know the context where is is used for.
Used frameworks:
- Technical base is only HTML / CSS and Javascript
- LESS CSS to generate all CSS classes for the complete UI
- jsPlumb framework is used for rendering the connector lines based on SVG
- jsCow component framework is used for developing all javascript components which are neccessary for the editor.
Install
If you implement your own wishes you have to install all npm packages and call the grunt task to generate the dist/ directory.
$ npm install$ gruntTo use only the editor in your project please look at the demo application into the dist/ directory.
Watch
You can the grunt-contrib-watch plugin to call all grunt tasks automatically by change a js file or less file within the src/ directory. To refresh your page automatically after calling the watch task you have to install the browser plugin LiveReload.
To using the watcher run the follow command in your nodejs command client:
grunt watchCreate an editor instance
For using an editor you need to create an instance of the node editor. You can use the following code snippet to create a new instance.
var editor = jsCowtarget"#node-editor-1";Describe a node
To use a node in your jscow-node-editor you needs the following json.
"id": "node1" "title": "Node Title" "class": "customized-node" "pos": "left": 300 "top": 50 "config": "inputs": "outputs": Define a node port with only a title
Use this json snippet within node configurations for config, inputs or outputs. If you need you can set a specific id and value for these node port. The properties id and value are optional values for a simple port with only a title.
"title": "Port Title" "id": "in1" "value": 1Using a dropdown as a configuration field
Use this json snippet within node configurations for config, inputs or outputs.
"type": "jsCow.res.components.nodedropdown" "title": "Select Option" "value": "title": "Option 1" "value": 1 "title": "Option 2" "value": 2 "selected": true "title": "Option 3" "value": 3 "title": "Option 4" "value": 4 Using a button as a configuration field
Use this json snippet within node configurations for config, inputs or outputs.
"type": "jsCow.res.components.nodebutton" "title": "Button" "events": { console; // ... this; } Using a checkbox as a configuration field
Use this json snippet within node configurations for config, inputs or outputs.
"type": "jsCow.res.components.nodecheckbox" "title": "Your field label" "value": "title": "Checkbox 1" "value": 1 "title": "Checkbox 2" "value": 2 "title": "Checkbox 3" "value": 3 "selected": true Using a textfield as a configuration field
Use this json snippet within node configurations for config, inputs or outputs.
"type": "jsCow.res.components.nodeinput" "title": "Value" "value": "19.95"Add one or more nodes per javascript
To add one or more nodes at runtime you can use the editor method: addNode(<object|array>)
After creating the new node the editor will update the configuration and triggers the event node.config.changed. The event data will be the current editor config.
editor;Add a set of connections
It is possible to set node connections in a seperate step. Additional you can define a color for any connections that you like to set. For a connection color you can use the color property.
editor;Add a group of node definitions that you can add within the editor.
To have a list of available nodes to add within the editor you can add a group of node definitions. Here you can use the following method: addNodesRepository(<object>);
To add available nodes in your editor instance just make a double click in the editor area. A menu with all node repositories will open. Here can choose a available node definitions.
editor;