dathttpd
A Web server for Dat and HTTPS.
Dat sites are hosted at public keys, which are the equivalent of IP addresses in the P2P network. The pubkeys are ugly, though! Wouldn't it be nice if your dats could have nice DNS shortnames, and also rehost over HTTPS for people still on legacy browsers?
dathttpd is for you!
- Serve sites over Dat at
dat://{subdomain}.{yourdomain.com}. - Rehost those sites over
https://{subdomain}.{yourdomain.com}. - Get TLS certs automatically with Let's Encrypt.
- (Optionally) Auto-redirect from https -> dat.
- Metrics dashboard
Getting started
Start hosting your website with Dat
You can use the Dat CLI or the Beaker Browser.
After uploading your site to a Dat archive, identify the archive's URL. You'll need this for your dathttpd config.
Update your DNS records
Create an A record that points to your server's IP address.
Usage
On your server, create a config file at ~/.dathttpd.yml:
letsencrypt: email: 'bob@foo.com' agreeTos: truesites: dat.local: url: dat://1f968afe867f06b0d344c11efc23591c7f8c5fb3b4ac938d6000f330f6ee2a03/ datOnly: false datprotocol.dat.local: url: dat://ff34725120b2f3c5bd5028e4f61d14a45a22af48a7b12126d5d588becde88a93/ datOnly: trueThen run
# install build dependencies
sudo apt-get install libtool m4 automake

# install dathttpd (https://docs.npmjs.com/getting-started/fixing-npm-permissions)
npm install -g dathttpd

# give node perms to use ports 80 and 443
sudo setcap cap_net_bind_service=+ep `readlink -f \`which node\``

# start dathttpd
dathttpd
To daemonify the server in Debian-based systems, stop the dathttpd process and then run:
# install a helper tool
npm install -g add-to-systemd

# create a systemd entry for dathttpd
sudo add-to-systemd dathttpd --user $(whoami) $(which dathttpd)

# start the dathttpd service
sudo systemctl start dathttpd
Config
Here's an example ~/.dathttpd.yml:
ports: http: 80 https: 443 metric: 8089directory: ~/.dathttpdletsencrypt: email: 'bob@foo.com' agreeTos: truesites: dat.local: url: dat://1f968afe867f06b0d344c11efc23591c7f8c5fb3b4ac938d6000f330f6ee2a03/ datOnly: false datprotocol.dat.local: url: dat://ff34725120b2f3c5bd5028e4f61d14a45a22af48a7b12126d5d588becde88a93/ datOnly: true proxy.local: proxy: http://localhost:8080ports.http
The port to serve the HTTP sites. Defaults to 80. (Optional)
HTTP automatically redirects to HTTPS.
ports.https
The port to serve the HTTPS sites. Defaults to 443. (Optional)
ports.metric
The port to serve the prometheus metrics. Defaults to 8089. (Optional)
directory
The directory where dathttpd will store your Dat archive's files. Defaults to ~/.dathttpd. (Optional)
letsencrypt
Settings for LetsEncrypt. If false or unset, HTTPS will be disabled.
letsencrypt.email
The email to send Lets Encrypt? notices to. (Required)
letsencrypt.agreeTos
Do you agree to the terms of service of Lets Encrypt? (Required, must be true)
sites
A listing of the sites to host. Each site is labeled (keyed) by the hostname you want the site to serve at.
Sites can either host dat archives or proxy to a URL. To make a dat-site, set the url attribute. To make a proxy, set the proxy attribute.
You'll need to configure the DNS entry for the hostname to point to the server. For instance, if using site.myhostname.com, you'll need a DNS entry pointing site.myhostname.com to the server.
sites.{hostname}.url
The Dat URL of the site to host.
sites.{hostname}.proxy
The HTTP URL of the site to proxy.
sites.{hostname}.datOnly
If true, rather than serve the assets over HTTPS, dathttpd will serve a redirect to the dat:// location. Defaults to false. (Optional)
Env Vars
DATHTTPD_CONFIG=cfg_file_pathspecify an alternative path to the config than~/.dathttpd.ymlNODE_ENV=debug|staging|productionset todebugorstagingto use the lets-encrypt testing servers.
Metrics Dashboard
DatHTTPD has built-in support for Prometheus, which can be visualized by Grafana.
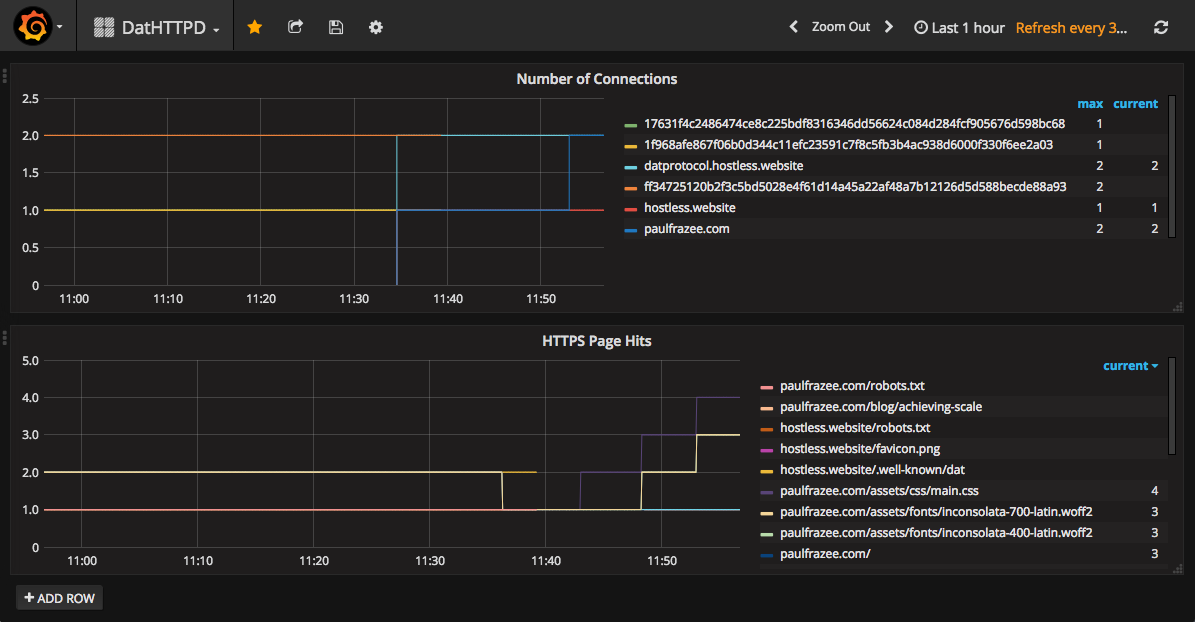
DatHTTPD exposes its metrics at port 8089. Prometheus periodically scrapes the metrics, and stores them in a database. Grafana provides a nice dashboard. It's a little daunting at first, but setup should be relatively painless.
Follow these steps:
- Install Prometheus on your server.
- Install Grafana on your server.
- Update the
prometheus.ymlconfig. - Start prometheus and grafana.
- Login to grafana.
- Add prometheus as a data source to grafana. (It should be running at localhost:9090.)
- Import this grafana dashboard.
Your prometheus.yml config should include have the scrape_configs set like this:
scrape_configs: - job_name: 'prometheus' static_configs: - targets: ['localhost:9090'] - job_name: 'dathttpd' static_configs: - targets: ['localhost:8089']Report any issues you have along the way!