Hypernova
A service for server-side rendering your JavaScript views

![]()


Why?
First and foremost, server-side rendering is a better user experience compared to just client-side rendering. The user gets the content faster, the webpage is more accessible when JS fails or is disabled, and search engines have an easier time indexing it.
Secondly, it provides a better developer experience. Writing the same markup twice both on the server in your preferred templating library and in JavaScript can be tedious and hard to maintain. Hypernova lets you write all of your view code in a single place without having to sacrifice the user’s experience.
How?
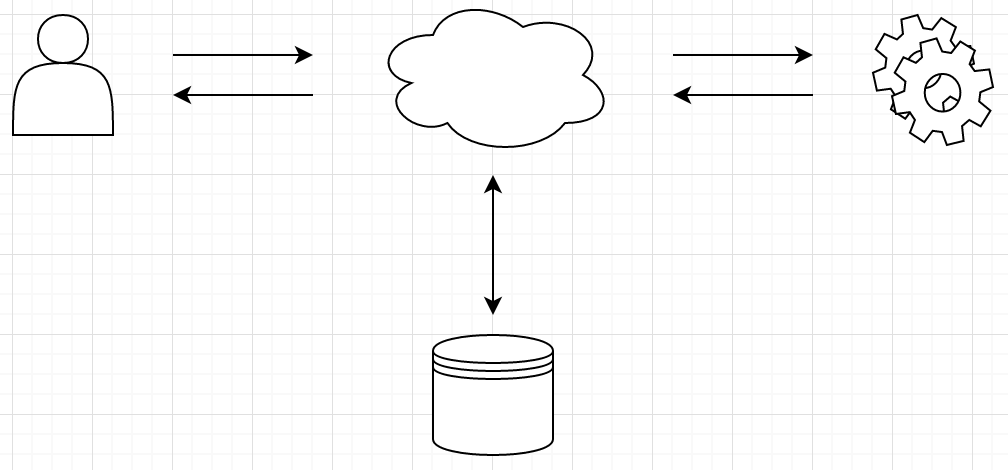
- A user requests a page on your server.
- Your server then gathers all the data it needs to render the page.
- Your server uses a Hypernova client to submit an HTTP request to a Hypernova server.
- Hypernova server computes all the views into an HTML string and sends them back to the client.
- Your server then sends down the markup plus the JavaScript to the browser.
- On the browser, JavaScript is used to progressively enhance the application and make it dynamic.
Terminology
- hypernova/server - Service that accepts data via HTTP request and responds with HTML.
- hypernova - The universal component that takes care of turning your view into the HTML structure it needs to server-render. On the browser it bootstraps the server-rendered markup and runs it.
- hypernova-${client} - This can be something like
hypernova-rubyorhypernova-node. It is the client which gives your application the superpower of querying Hypernova and understanding how to fallback to client-rendering in case there is a failure.
Get Started
First you’ll need to install a few packages: the server, the browser component, and the client. For development purposes it is recommended to install either alongside the code you wish to server-render or in the same application.
From here on out we’ll assume you’re using hypernova-ruby and React with hypernova-react.
Node
npm install hypernova --saveThis package contains both the server and the client.
Next, lets configure the development server. To keep things simple we can put the configuration in your root folder, it can be named something like hypernova.js.
var hypernova = ; ;Only the getComponent function is required for Hypernova. All other configuration options are optional. Notes on getComponent can be found below.
We can run this server by starting it up with node.
node hypernova.jsIf all goes well you should see a message that says "Connected". If there is an issue, a stack trace should appear in stderr.
Rails
If your server code is written in a language other than Ruby, then you can build your own client for Hypernova. A spec exists and details on how clients should function as well as fall-back in case of failure.
Add this line to your application’s Gemfile:
And then execute:
$ bundle
Or install it yourself as:
$ gem install hypernova
Now lets add support on the Rails side for Hypernova. First, we’ll need to create an initializer.
config/initializers/hypernova_initializer.rb
Hypernova.configure do |config| config.host = "localhost" config.port = 3030 # The port where the node service is listening endIn your controller, you’ll need an :around_filter so you can opt into Hypernova rendering of view partials.
around_filter :hypernova_render_supportendAnd then in your view we render_react_component.
<%= render_react_component('MyComponent.js', :name => 'Hypernova The Renderer') %>JavaScript
Finally, lets set up MyComponent.js to be server-rendered. We will be using React to render.
const React = ;const renderReact = renderReact; { return <div>Hello propsname!</div>;} moduleexports = ;Visit the page and you should see your React component has been server-rendered. If you’d like to confirm, you can view the source of the page and look for data-hypernova-key. If you see a div filled with HTML then your component was server-rendered, if the div is empty then there was a problem and your component was client-rendered as a fall-back strategy.
If the div was empty, you can check stderr where you’re running the node service.
Debugging
The developer plugin for hypernova-ruby is useful for debugging issues with Hypernova and why it falls back to client-rendering. It’ll display a warning plus a stack trace on the page whenever a component fails to render server-side.
You can install the developer plugin in examples/simple/config/environments/development.rb
Hypernova.add_plugin!(DevelopmentModePlugin.new)You can also check the output of the server. The server outputs to stdout and stderr so if there is an error, check the process where you ran node hypernova.js and you should see the error.
Deploying
The recommended approach is running two separate servers, one that contains your server code and another that contains the Hypernova service. You’ll need to deploy the JavaScript code to the server that contains the Hypernova service as well.
Depending on how you have getComponent configured, you might need to restart your Hypernova service on every deploy. If getComponent caches any code then a restart is paramount so that Hypernova receives the new changes. Caching is recommended because it helps speed up the service.
FAQ
Isn’t sending an HTTP request slow?
There isn’t a lot of overhead or latency, especially if you keep the servers in close proximity to each other. It’s as fast as compiling many ERB templates and gives you the benefit of unifying your view code.
Why not an in-memory JS VM?
This is a valid option. If you’re looking for a siloed experience where the JS service is kept separate, then Hypernova is right for you. This approach also lends itself better to environments that don’t already have a JS VM available.
What if the server blows up?
If something bad happens while Hypernova is attempting to server-render your components it’ll default to failure mode where your page will be client-rendered instead. While this is a comfortable safety net, the goal is to server-render every request.
Pitfalls
These are pitfalls of server-rendering JavaScript code and are not specific to Hypernova.
-
You’ll want to do any DOM-related manipulations in
componentDidMount.componentDidMountruns on the browser but not the server, which means it’s safe to put DOM logic in there. Putting logic outside of the component, in the constructor, or incomponentWillMountwill cause the code to fail since the DOM isn’t present on the server. -
It is recommended that you run your code in a VM sandbox so that requests get a fresh new JavaScript environment. In the event that you decide not to use a VM, you should be aware that singleton patterns and globals run the risk of leaking memory and/or leaking data between requests. If you use
createGetComponentyou’ll get VM by default.
Clients
See clients.md
Browser
The included browser package is a barebones helper which renders markup on the server and then loads it on the browser.
List of compatible browser packages:
Server
Starting up a Hypernova server
const hypernova = ; ;Options, and their defaults
// the limit at which body parser will throw bodyParser: limit: 1024 * 1000 // runs on a single process devMode: false // how components will be retrieved, getComponent: undefined // if not overridden, default will return the number of reported cpus - 1 getCPUs: undefined // the host the app will bind to host: '0.0.0.0' // configure the default winston logger logger: {} // logger instance to use instead of the default winston logger loggerInstance: undefined // the port the app will start on port: 8080 // default endpoint path endpoint: '/batch' // whether jobs in a batch are processed concurrently processJobsConcurrently: true // arguments for server.listen, by default set to the configured [port, host] listenArgs: null // default function to create an express app getComponent
This lets you provide your own implementation on how components are retrieved.
The most common use-case would be to use a VM to keep each module sandboxed between requests. You can use createGetComponent from Hypernova to retrieve a getComponent function that does this.
createGetComponent receives an Object whose keys are the component’s registered name and the value is the absolute path to the component.
const path = ; ;The simplest getComponent would be to use require. One drawback here is that your components would be cached between requests and thus could leak memory and/or data. Another drawback is that the files would have to exist relative to where this require is being used.
;You can also fetch components asynchronously if you wish, and/or cache them. Just return a Promise from getComponent.
;getCPUs
This lets you specify the number of cores Hypernova will run workers on. Receives an argument containing the number of cores as reported by the OS.
If this method is not overridden, or if a falsy value is passed, the default method will return the number of reported cores minus 1.
loggerInstance
This lets you provide your own implementation of a logger as long as it has a log() method.
const winston = ;const options = {}; ;processJobsConcurrently
This determines whether jobs in a batch are processed concurrently or serially. Serial execution is preferable if you use a renderer that is CPU bound and your plugins do not perform IO in the per job hooks.
createApplication
This lets you provide your own function that creates an express app.
You are able to add your own express stuff like more routes, middlewares, etc.
Notice that you must pass a function that returns an express app without calling the listen method!
const express = ;const yourOwnAwesomeMiddleware = ; API
Browser
load
;; Looks up the server-rendered DOM markup and its corresponding script JSON payload and returns it.
serialize
; Generates the markup that the browser will need to bootstrap your view on the browser.
toScript
;; An interface that allows you to create extra script tags for loading more data on the browser.
fromScript
;; The inverse of toScript, this function runs on the browser and attempts to find and JSON.parse the contents of the server generated script.
attrs is an object where the key will be a data-key to be placed on the element, and the value is the data attribute's value.
Server
createGetComponent
;;; Creates a getComponent function which can then be passed into Hypernova so it knows how to retrieve your components. createGetComponent will create a VM so all your bundles can run independently from each other on each request so they don’t interfere with global state. Each component is also cached at startup in order to help speed up run time. The files Object key is the component’s name and its value is the absolute path to the component.
createVM
;;; Creates a VM using Node’s vm module. Calling run will run the provided code and return its module.exports. exportsCache is an instance of lru-cache.
getFiles
A utility function that allows you to retrieve all JS files recursively given an absolute path.
Module
Module is a class that mimics Node’s module interface. It makes require relative to whatever directory it’s run against and makes sure that each JavaScript module runs in its own clean sandbox.
loadModules
Loads all of the provided files into a Module that can be used as a parent Module inside a VM. This utility is useful when you need to pre-load a set of shims, shams, or JavaScript files that alter the runtime context. The require parameter is Node.js’ require function.