HospitalRun frontend
Ember frontend for HospitalRun

![]()
To run the development environment for this frontend you will need to have Git, Node.js, Ember CLI, Bower, and CouchDB installed.
Contributing
Contributions are welcome via pull requests and issues. Please see our contributing guide for more details, including a link to join our project Slack.
Install
To install the frontend please do the following:
- Make sure you have installed Git
- Make sure you have installed Node.js. Versions after 0.10.0 should work, but please note if you encounter errors using 5.x it may be necessary to upgrade your npm version. Versions after 3.5.x should work:
npm install -g npm
- Install ember-cli latest:
npm install -g ember-cli@latest. Depending on your npm permissions you might need root access to install ember-cli. - Install bower:
npm install -g bower - Clone this repo with
git clone https://github.com/HospitalRun/hospitalrun-frontend, go to the cloned folder and runscript/bootstrap. (Note: Depending on your npm permissions you might need root access to install PhantomJS2; also, Windows users must run with Cygwin). - Install and configure CouchDB
- Download and install CouchDB from http://couchdb.apache.org/#download
- Start CouchDB
- If you downloaded the installed app, navigate to CouchDB and double-click on the application.
- If you installed CouchDB via Homebrew or some other command line tool, launch the tool from the command line
- If you're stuck with the installation, check out the instructions published here: http://docs.couchdb.org/en/1.6.1/install/index.html
- Verify that CouchDB is running by successfully navigating to 127.0.0.1:5984/_utils. If that fails, check the installation guide for CouchDB http://docs.couchdb.org/en/1.6.1/install/index.html
- Create admin user:
- If you are running CouchDB 1.x
- If you have just installed CouchDB and have no admin user, please run
./script/initcouch.shin the folder you cloned the HospitalRun repo. A userhradminwill be created with password:test. - If you already have a CouchDB admin user, please run
./script/initcouch.sh USER PASSin the folder you cloned the HospitalRun repo.USERandPASSare the CouchDB admin user credentials.
- If you have just installed CouchDB and have no admin user, please run
- If you are running CouchDB 2.x
- If you have just installed CouchDB and have no admin user, please run
./script/initcouch2.shin the folder you cloned the HospitalRun repo. A userhradminwill be created with password:test. - If you already have a CouchDB admin user, please run
./script/initcouch2.sh USER PASSin the folder you cloned the HospitalRun repo.USERandPASSare the CouchDB admin user credentials.
- If you have just installed CouchDB and have no admin user, please run
- If you are running CouchDB 1.x
- Copy the
server/config-example.jstoserver/config.jsin the folder you cloned the HospitalRun repo. If you already had a CouchDB admin user that you passed into the couch script (./script/initcouch.sh USER PASS), then you will need to modify thecouchAdminUserandcouchAdminPasswordvalues inserver/config.jsto reflect those credentials. (Note: If on Mac, you need to make sure CouchDB can be run. See How to open an app from a unidentified developer and exempt it from Gatekeeper.) - Verify that CouchDB is running by visiting: http://127.0.0.1:5984/_utils/#login
and logging in with the with the credentials you just created from steps 6 and 7.
- If you the page returns an error or 404:
- Run
make serve, it will start couchdb, install npm dependencies and start the server. - Or start the application from your applications folder.
Start
To start the frontend please do the following:
- Start the server by running
npm startin the repo folder. Ifnpm startdoesn't work for you, tryember serveas an alternative. - Go to http://localhost:4200/ in a browser and login with username
hradminand passwordtest.
Running with Docker
To run HospitalRun with Docker please do the following:
- Goto https://docs.docker.com/engine/installation to download and install Docker.
- Clone the repository with the command
git clone https://github.com/HospitalRun/hospitalrun-frontend.git. - Change to the hospitalrun-frontend directory
cd hosptialrun-frontend. - Build the HosptialRun image with
docker build -t hospitalrun-frontend . - Execute
docker run -it --name couchdb -d couchdbto create the couchdb container. - Execute
docker run -it --name hospitalrun-frontend -p 4200:4200 --link couchdb:couchdb -d hospitalrun-frontendto create the HospitalRun container.
Accessing HospitalRun with Docker Toolbox
If you are running with Docker Toolbox you will have to run the following commands to get the IP of the docker machine where hospitalrun-frontend is running with the following:
- Run the following command to get the ip of the docker machine that the image was created on
docker-machine ip default. - Go to
http://<docker-machine ip>:4200in a browser and login with usernamehradminand passwordtest.
Accessing HospitalRun with Docker
If you are not running with docker toolbox please do the following:
- Go to
http://localhost:4200in a browser and login with usernamehradminand passwordtest.
Troubleshooting your local environment
Always make sure to git pull and get the latest from master.
The app will usually tell you when something needs to happen (i.e. if you try to npm start and npm is out of date, it will tell you to run npm update. But If you run into problems you can't resolve, feel free to open an issue, or ask for help in the HospitalRun Slack channel (you can request an invite here).
Otherwise, here are some tips for common issues:
The browser shows only a loading dialog
Is your server (still) running? Is Couch running? If not, that's probably the issue.
My changes aren't showing up in the browser
Try a browser refresh cmd + r.
Loading sample data
If you would like to load sample data, you can do so by navigating to Load DB under the Administration menu. You should see the following screen:
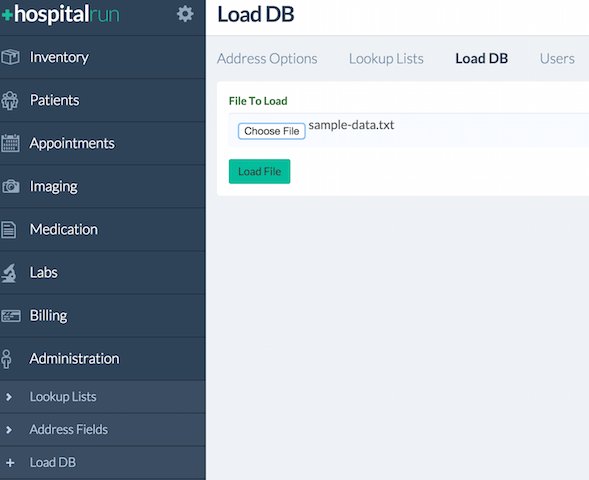
Click on Choose File and select the file sample-data.txt which is included in root directory of the repo at sample-data.txt. Next, click on Load File. When the database load is complete a message will appear indicating if the load was successful.
Testing
Fixtures for Acceptance Tests
Fixtures are PouchDB dumps that are generated with pouchdb-dump-cli.
To create a fixture, run pouchdb-dump http://localhost:5984/main -u hradmin -p test | cat > tests/fixtures/${name_of_fixture}.txt.
To use a fixture, use runWithPouchDump(${name_of_fixture}, function(){..}); in your acceptance test. For example,
;Running Tests Locally
To run the test suite locally while developing, just run ember test from the project root.
Tests will also run automatically via Travis CI when you push a branch to the repository or a pull request. You can view output by going to the Travis test status from the Pull Request merge box.
The SCSS linter
To keep our styling scalable and consistent, we are using an scss linter that will throw an error in the build if you do not conform to it's syntax rules. The syntax rules are defined in the .scss-lint.yml file, and documentation for each linter is available here.
The easiest way to work with styles in the project and abide by our linting rules is to install the linter-scss-lint package for Atom. The package will then show you in real time where your styles are breaking the linter and how to correct them.
Contributing
Again, contributions are welcome via pull requests and issues. Please see our contributing guide for more details.
Seriously, please read the Contribution Guide.
Start Coding
To start coding and understand the frameworks, concepts and structure of the project, please read: Contribution Guide: Start Coding.
Further Reading / Useful Links
Experimental
Make
If you are willing to try using make, ensure you have installed git, node and couchdb (steps 1, 2 and 7 above), you may skip the rest. This requires couchdb in the path to work correctly.
- Run
make serve, it will start couchdb, install npm dependencies and start the server. - Run
make allto run all tests and build the app. - Look into
Makefileto figure other targets available.