概要(Overview)
このプラグインはhomebridgeを通してMH-Z19での二酸化炭素濃度計測結果をHomeKit上に表示する為のものです。(TThis plug-in is for displaying the carbon dioxide concentration measurement result of MH-Z19 on HomeKit through homebridge.)
テスト環境(Testing Environment)
- Raspberry Pi 4 modelB 4GB(UART1、UART2、UART4)
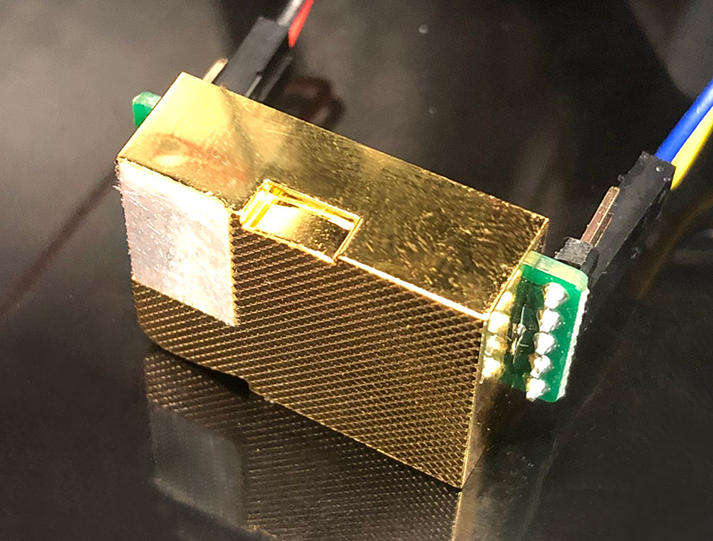
- Winsen MH-Z19C
ここに書いてある事はわたしが設定した内容であり、動作を保証するものではありません。(What is written here is what I have set, and I do not guarantee the operation.) もしかしたら他の環境でも動くかもしれません。
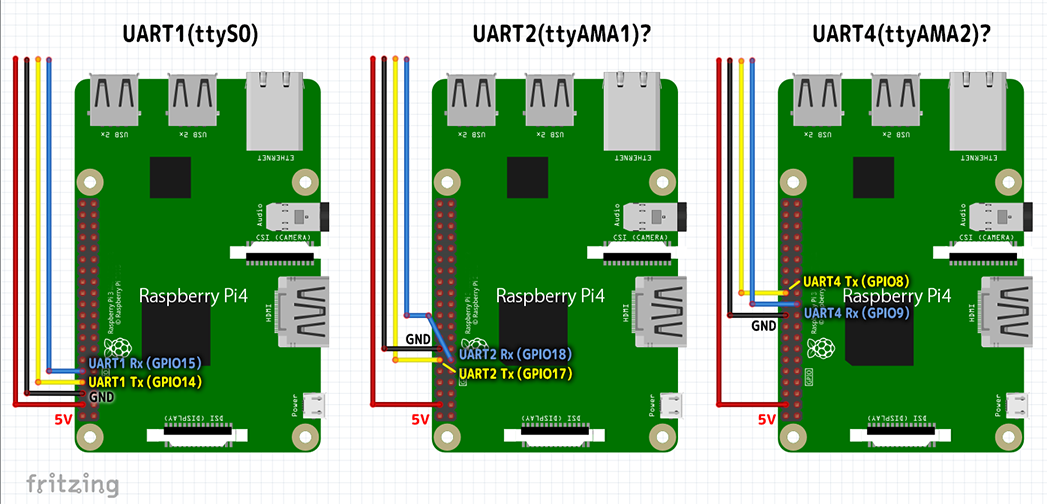
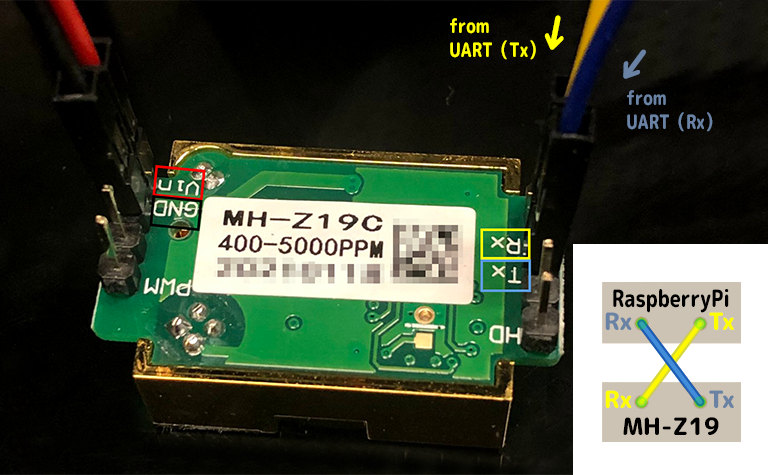
配線図 (Wiring diagram)
事前設定 (Preparation settings)
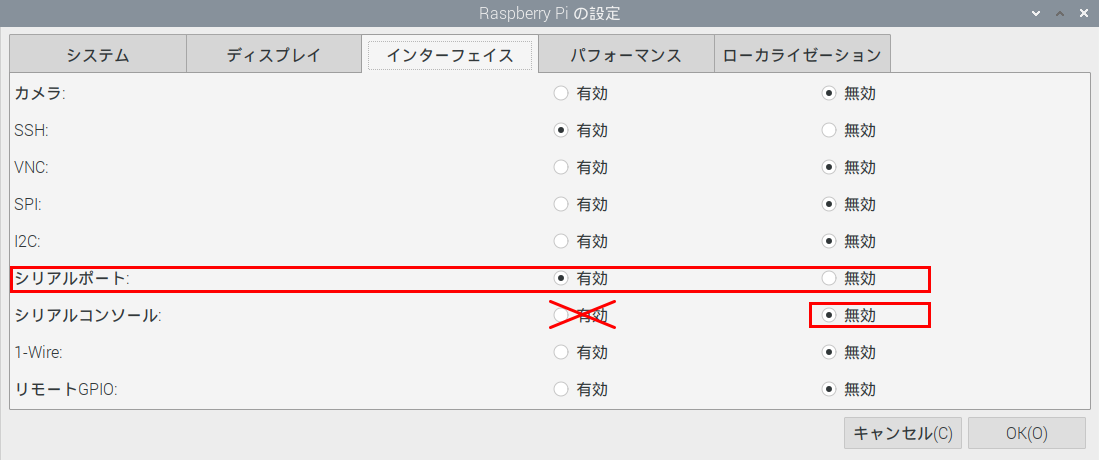
① シリアルポートの有効化 (Enable serial port)
メニューの『設定>Raspberry Pi の設定>インターフェイス』のシリアルポートを有効にします。(SerialPort ⇒ enable)
この際、シリアルコンソールは無効のままにしてください。(Serial console ⇒ Disable)
再起動を促されるので再起動します。(You will be prompted to reboot, so reboot.)
② UART2,UART4を使用する場合 (When using UART2 and UART4)
/boot/config.txt を編集します。(Edit)
例えば(For example)、 sudo nano /boot/config.txt
・・・・

[all]

・・・・

dtoverlay=uart2
dtoverlay=uart4
一番最後に上記の2行を追加します。(Add the above two lines at the very end.)
UART4を使用しない場合は、UART2の行だけを追加します。(If you are not using UART4, add only the UART2 line.)
保存したら再起動します。(After saving, reboot.)
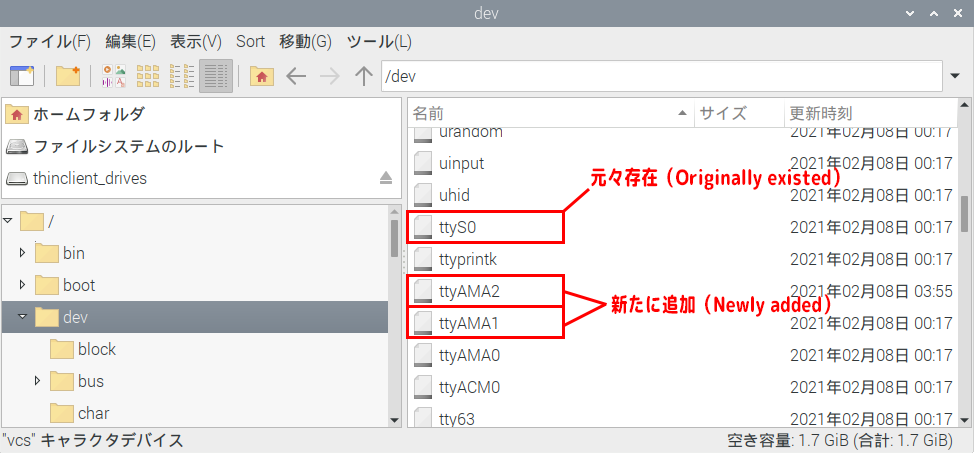
再起動が完了したら /dev を確認してください。(Check /dev when the reboot is complete.)
下記の項目が追加されていたらUART2,UART4の解放は成功です。(Release of UART2 and UART4 is successful if the following items exist.)
③ RaspberryPiを再起動する度に必要な作業 (Work required every time you restart the Raspberry Pi)
- 起動時にserial-gettyがシリアルポートを占有してしまう為、STOPする。(Stop because serial-getty occupies the serial port at startup.)
- プログラムが
sudo無しにシリアルポートにアクセスできるようにパーミッションを変更します。再起動する度に元に戻ります。(Change the permissions so that the program can access the serial port withoutsudo. It will be restored every time you restart.)
具体的には、
UART1の場合、
sudo systemctl stop serial-getty@ttyS0.service
sudo chmod 666 /dev/ttyS0
UART2の場合、
sudo systemctl stop serial-getty@ttyAMA1.service
sudo chmod 666 /dev/ttyAMA1
UART4の場合、
sudo systemctl stop serial-getty@ttyAMA2.service
sudo chmod 666 /dev/ttyAMA2
UART2,UART4は開放状況、環境によってずれる可能性があります。(UART2 and UART4 may shift depending on the open status and environment.)
インストール(Install)
HomebridgeとHomebridge UIが正しくインストールされているものとします。(It is assumed that Homebridge and Homebridge UI are installed correctly.)
config.json の設定例(Configuration example of config.json)
    "accessories": [
        {
            "accessory": "Co2Sensor",
            "name": "Co2 Sensor",
            "uart": "ttyXXX",
            "schedule": "*/5 * * * *",
            "warning_level": 1500
        },
        {
        ・・・・
        }
    ]
-
accessory→ 固定値(Fixed value)[必須項目(required field)] -
name→ お好みに(To your liking)[必須項目(required field)] -
uart→ MH-Z19を接続したUARTをttyXXX形式で指定します。(Specify the UART to which MH-Z19 is connected in ttyXXX format.) -
schedule→ CO2濃度の更新間隔を指定します。(Specify the acquisition interval of CO2 concentration.) -
warning_level→ CO2がこのレベルを超えると警告が表示されるようになります。(A warning will be displayed when CO2 exceeds this level.)
最後に(Finally)
I can't speak English, so I use Google Translate for everything. I'm sorry if there is a rude wording.
