Gleemail
Remember when developing HTML emails used to be fun? Nope, neither do I.
Gleemail is an attempt to change that. It's a local development environment for creating HTML emails that removes a lot of the headaches.
Features
- Build email templates with Mustache.
- Write CSS using Stylus.
- Custom Gleemail HTML tags cleanly render into unsightly nested table structures.
- Automatically inlines CSS styles for you.
- Export templates to other templating engines (MailChimp, Eloqua, FreeMarker, etc.)
- Share Mustache and Stylus partials between email templates.
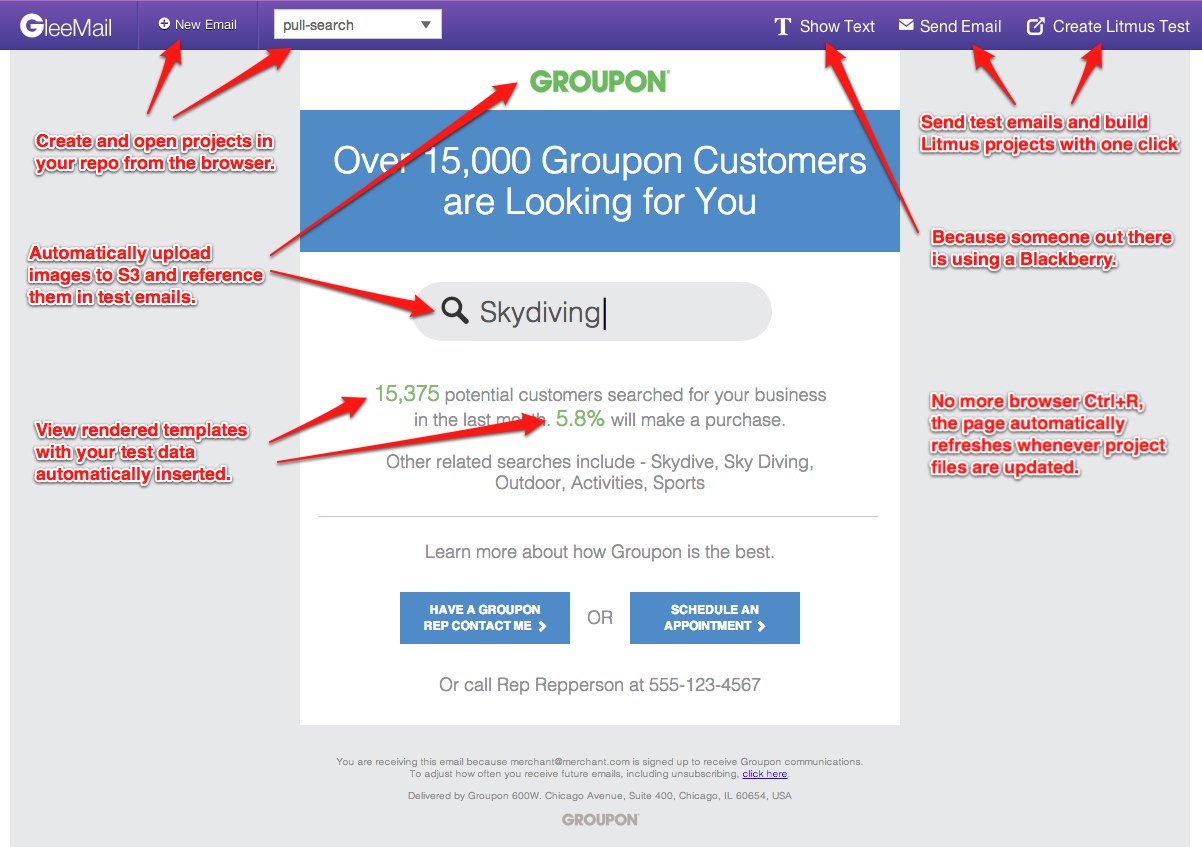
- Live browser preview refreshes whenever you save changes to files.
- View both HTML and text previews of an email in the browser.
- Automatically upload images to S3, automatically reference them in test emails.
- One-click test email delivery.
- One-click project creation in Litmus and Eloqua.
- Automatically render templates with dummy data from a JSON file.
- CLI for rendering templates from the command line.
Getting Started
Install Node.js, then install the gleemail npm package globally:
npm install -g gleemailCreate a new project directory:
gleemail project my-project-dir-nameEdit config.json with your email, S3 and Litmus credentials, then start the server:
cd ./my-project-dir-namegleemail startNow you should be able to visit http://localhost:4433 in Chrome and you will be able to see the example email template. Use the UI to bootstrap your own templates, and the changes you make will be immediately displayed in the browser.
Rendering from the Command Line
To programmatically render templates in a script or from the command line, use the gleemail render command:
cd /path/to/project # Render the HTML version with the first dummy data to stdout gleemail render your-template-name > my-email.html # Render using the third piece of dummy data gleemail render your-template-name -i 2 > my-email.html # Render the text version, use -o to specify output instead of stdout gleemail render your-template-name -t text -o my-email.txt # Render as a Mailchimp template gleemail render your-template-name -r mailchimp > my-email.htmlTo view all the available rendering options, use gleemail help render.
Gleemail Markup
For all of these transformer "macro tags", any regular attributes (id, class, etc) that are placed on the macro element will be transferred to the generated element.
<gm-box>
This gives you a box model for padding around a piece of content using table cells.
Hello World <!-- becomes --> Hello World <gm-stack>
This gives you a vertical stack of elements. Each child of the <gm-stack> is assumed to be its own row.
Hello World !!! <!-- becomes --> Hello World !!! <gm-row> with <gm-col>
Using <gm-row> with nested <gm-col> elements gives you horizontally aligned content.
Attributes placed on the <gm-col> elements are transferred to the generated <td>s.
Hello World !!! <!-- becomes --> Hello World !!! gm-centered Attribute
This attribute can be added to any tag to wrap its contents in a centered table.
This is primarily useful on the <body> element.
My body <!-- becomes --> My body Creating Custom Transformer Macros
To write your own macros, add a hooks.js or hooks.coffee file to your project directory.
It should export a function that take a hooks object, which has a number of methods on it including addTransformer().
Transformer functions can be synchronous or asynchronous, and this is determined by the presence of a second argument in the function signature.
For example:
// This is hooks.js module { // Simple, synchronous macro // Turns: // <gm-green>This is green!</gm-green> // into: // <span style='color: green;'>This is green!</span> hooks; // Asynchronous macro, requires passing $ back in the callback // Turns: // <gm-file path="/path/to/file.txt"></gm-file> // Into: // <pre>Contents of file...</pre> hooks;});Development
Please refer to CONTRIBUTING.md for contribution guidelines, any help is greatly appreciated!
After cloning the repository, do a setup and run the tests:
make setupmake testThe easiest way to use the gleemail command during development is to use the npm link command.
This makes your local executable available as if you had installed it globally from npm:
npm link .To make development easier, you can use these commands to auto-load changes in client and server code:
# In gleemail dir make dev# In project dir gleemail dev