
BackstopJS
Catch CSS curve balls.
BackstopJS automates CSS regression testing of your responsive web UI by comparing DOM screenshots at various viewport sizes.
Features: Plays nice with multiple config files – Simulate user interactions with CasperJS scripts – Fast inline-CLI reports – detailed in-browser reports – Test html5 elements like webfonts and flexbox – also plays nice with source control.
News
Version 1.3.2 available now
Please file questions, comments or issues here.
Version 1.3.2 adds CI Integration with junit reports and some nice to haves
- take screenshots of your entire document
- React app integration check out the example.
Version 1.1
- reliability fixes plus a handful of improvements to close out the original roadmap.
- Simplified installation -- just
npm install backstopjsand you're ready to go! - All
Gulpcommands have been migrated tonpm run <command>format for better compatibility! - now add logic and comments to your configs (optional JS based configs)
- plays nice with other local services (change the BackstopJS port)
Version 0.9.0
- Plays nice with multiple config files (setting the config file path)
Version 0.8.0
- Simulate user interactions with CasperJS scripts
Version 0.7.0
- Fast CLI reporting
Version 0.6.0
- configurable screenshot locations. See moving the bitmap directories below.
- SlimerJS support. See changing the rendering engine below.
Tutorials and Commentary
-
A lovely article on Making Visual Regression Useful by Phillip Gourley
-
Visual regression testing article on css-tricks.com
-
Automated regression testing for AngularJS (and other) web-apps -- article on DWB
-
Want to add BackstopJS to your existing gulp build? Turns out to be pretty easy – use gulp-chug. Learn how in this article by Filip Bartos.
-
Grunt fans -- check out grunt-backstop and this very nicely written article by Joe Watkins
-
BackstopJS brochure at http://BackstopJS.org/.
The BackstopJS workflow
- Set up a test config file: specify screen sizes and DOM selectors.
- Use BackstopJS to create reference screenshots.
- Make some changes to your CSS or add new DOM components.
- Run a test. BackstopJS creates a set of test screenshots and compares them with the reference screenshots you made in step 2 above. Any unwanted/unforeseen changes show up in a nice report.
Installation
BackstopJS package
You can add BackstopJS from the root directory of any project.
$ npm install --save-dev backstopjsInstalling a development version
$ npm install garris/backstopjs#masterConfiguration
If you don't already have a BackstopJS config file. The following command will create a config template file which you can modify in your root directory. Note: this will overwrite any existing backstopjs config file.
From ./node_modules/backstopjs ...
$ npm run genConfigBy default, genConfig will put backstop.json at the project root. Also by default, a backstop_data directory will be created at this same location.
The location of the backstop.json file as well as all resource directories can be specified -- see Setting the config file path below.
A step-by-step tutorial is at css-tricks.com.
DEV NOTE: If a valid config is not present at the project root (or at the path specified on your CLI), BackstopJS will go into Demo mode and run the default config at... ./node_modules/backstopjs/capture/config.default.json
Usage Notes
Generating (or updating) reference bitmaps
$ npm run referenceThis task will create a (or update an existing) bitmaps_reference directory with screen captures from the current project build.
Generating test bitmaps
$ npm run testThis task will create a new set of bitmaps in bitmaps_test/<timestamp>/
Once the test bitmaps are generated, a report comparing the most recent test bitmaps against the current reference bitmaps will run. Significant differences will be detected and shown.
Testing SPAs and AJAX content
It is very common for client-side web apps is to initially download a small chunk of bootstrapping code/content and render it to the screen as soon as it arrives at the browser. Once this has completed, various JS components often take over to progressively load more content.
The problem testing these scenarios is knowing when to take the screenshot. BackstopJS solves this problem with two config properties: readyEvent and delay.
NOTE: Advanced options also include very cool CasperJS features like waitForSelector() and waitUntilVisible() – see adding custom CasperJS scripts for more info...
Trigger screen capture via console.log()
The readyEvent property enables you to trigger the screen capture by logging a predefined string to the console. For example, the following line will delay screen capture until your web app calls console.log("backstopjs_ready")...
"readyEvent": "backstopjs_ready"In the above case it would be up to you to wait for all dependencies to complete before calling logging "backstopjs_ready" string to the console.
Delay screen capture
The delay property enables you to pause screen capturing for a specified duration of time. This delay is applied after readyEvent (if also applied).
"delay": 1000 //delay in msIn the above case, BackstopJS would wait for one second before taking a screenshot.
In the following case, BackstopJS would wait for one second after the string backstopjs_ready is logged to the console.
... "readyEvent": "backstopjs_ready" "delay": 1000 //delay in msDealing with dynamic content
For obvious reasons, this screenshot approach is not optimal for testing live dynamic content. The best way to test a dynamic app would be to use a known static content data stub – or ideally many content stubs of varying lengths which, regardless of input length, should produce certain specific bitmap output.
Hiding selectors
That said, for a use case where you are testing a DOM with say an ad banner or a block of dynamic content which retains static dimensions, we have the hideSelectors property in capture/config.json which will set the corresponding DOM to visibility:hidden, thus hiding the content from our Resemble.js analysis but retaining the original layout flow.
"hideSelectors": Removing selectors
There may also be elements which need to be completely removed during testing. For that we have removeSelectors which sets elements to display:none.
"removeSelectors": Changing test sensitivity
"misMatchThreshold" will change the amount of difference BackstopJS will tollerate before marking a test screenshot as "failed". The default setting is 0.1, this may need to be increased as the dimentions of your screenshot increases.
Capturing the entire document
BackstopJS recognizes a magic selector called document. Use it to capture your entire HTML document (regardless of the height specified in your viewports object).
"scenarios": "selectors": "document" ... ... Note: This is requred if you want to test an entire document layout with a height: 100% rule specified on the <body> element.
Grabbing screens from different environments
Comparing against different environments is easy. (e.g. compare a production environment against a staging environment).
To do this, add a referenceUrl to your scenario configuration. When running $ npm run test BackstopJS will use the url for screen grabs. When running $ npm run reference BackstopJS will check for referenceUrl and use that if it's there. Otherwise it will use url for both.
"scenarios": "label": "cat meme feed sanity check" "url": "http://www.moreCatMemes.com" "referenceUrl": "http://staging.moreCatMemes.com:81" ... Running custom CasperJS scripts (version 0.8.0+)
Simulate user actions (click, scroll, hover, wait, etc.) or states (cookie values) by running your own Casper.js script on ready. For each scenario, the custom .js file you specify is imported and run when the BackstopJS ready event is fired.
From your project root, place your scripts in...
./backstop_data/casper_scriptsat the root of your config or in your scenario...
"onReadyScript": "filename.js" // Runs after onReady event on all scenarios -- use for simulating interactions (.js suffix is optional)"onBeforeScript": "filename.js" // Runs before each scenario -- use for setting cookies or other env state (.js suffix is optional)"scenarios": "label": "cat meme feed sanity check" "onReadyScript": "filename.js" // If found will run instead of onReadyScript set at the root (.js suffix is optional) "onBeforeScript": "filename.js" // If found will run instead of onBeforeScript at the root (.js suffix is optional) ... Inside filename.js, structure it like this:
module { // scenario is the current scenario object being run from your backstop config // vp is the current viewport object being run from your backstop config // Example: setting cookies casper; casper; // `casper.thenOpen()` demonstrates a redirect to the original page with your new cookie value. // this step is not required if used with _onBeforeScript_ casper; // Example: Adding script delays to allow for things like CSS transitions to complete. casper; casper; casper; // Example: changing behaivior based on config values if vpname === 'phone' casper; // ...do other cool stuff here, see Casperjs.org for a full API and many ideas.}Setting the base path for custom CasperJS scripts
By default the base path is a folder called scripts inside your BackstopJS installation directory. You can override this by setting the paths.scripts property in your backstop.json file to point to somewhere in your project directory (recommended).
NOTE: SlimerJS currently requires an absolute path -- so be sure to include the full path when using the "engine": "slimer" configuration option.
"paths": Reporting workflow tips (version 0.7.0+)
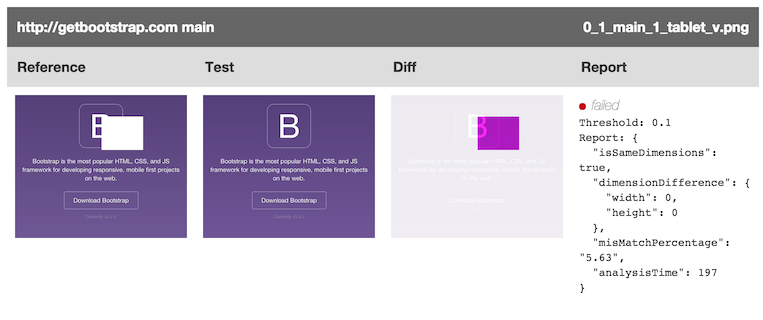
There are two reporting options. The fastest and least obtrusive is the CLI report which gives you a subdued thumbs up or thumbs down for your layout on each run. The other report runs in the in-browser -- this gives you detailed visual feedback for each test case so you can validate why your screen diffs score the way they do.
One testing approach to consider is incorporating BackstopJS into your build process and just let the CLI report run on each build. It's natural for your layout to break while you're in feature development -- refer back to the report when you feel things should be shaping up. Check the in-browser version of the report occasionally as needed when you need deeper information about what's happening in a test case.
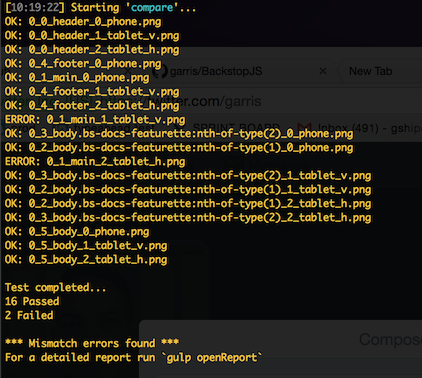
CLI Report
Browser Report
Using the report property in backstop.json enable or disable browser or server-side-reporting by including/excluding the respective properties. The following settings will run both reports at the same time.
"report": If you choose the CLI-only reporting you can always enter the following command to see the latest test run report in the browser.
$ npm run openReportTest report integration with a build system like Jenkins/Travis
The following config would enable the CI - report (default: junit format)
"report" : ,The regression test report will be generated in the JUnit format and the report will be placed in the given directory (default: [backstopjs dir]/test/ci_report/xunit.xml).
You may customize the testsuite name and/or a report file (xunit.xml) path to your build report directory by using the below configuration overrides,
"paths": ,"ci": ,CLI error handling
When a layout error is found in CLI mode, BackstopJS will let you know in a general report displayed in the console. In addition, BackstopJS will throw an error that will be passed to calling process.
Using a js based config file (version 1.0.0+)
JSON-based configs cramping your style? Well, here's some good news -- BackstopJS allows you to import all config parameters as a node module (as an option instead of JSON) which allows you to use comments, variables and logic etc. inside of your config.
To use a js module based config file, explicitly specify your config filepath when running a command. e.g.
$ npm run test -- --configPath=../../backstopTests/someTest.jsRemember to add that extra -- after the test command.
See the next section for more info on setting the config file path.
Be sure to export your config object as a node module. See test/configExample.js for a simple example.
Setting the config file path (version 0.9.0+)
Often, users have multiple config files to test various different scenarios or even different projects. By default, BackstopJS looks for backstop.json in your project's root directory (in parallel with your node_modules directory). You can override this by passing a --configPath argument when running any command. e.g.
# example 1: run reference generation with absolute path $ npm run reference -- --configPath=~/backstopTests/someTest.json# Will capture reference files using scenarios from someTest.json inside backstopTests inside your home folder. # example 2: run test with absolute path $ npm run test -- --configPath=~/backstopTests/someTest.json# Will run tests using scenarios from `someTest.json` inside `backstopTests` inside your home folder. # example 3: run test with relative path $ npm run test -- --configPath=../../backstopTests/someTest.json# Will run tests using scenarios from `someTest.json` inside `backstopTests` inside your project root folder. # example 4: run test with relative path and JS module $ npm run test -- --configPath=../../backstopTests/someTest.js# You can also specify your config parameters as a node module. This will import `someTest.js` from `backstopTests` inside your project root folder. NOTES:
- all paths are relative to the location of the BackstopJS install directory (which is either inside your project's
node_modulesorbower_componentsdepending on how BackstopJS was installed). - Remember to add that extra
--after thenpm run testandnpm run referencecommands.
Setting the bitmap and script directory paths (version 0.6.0+)
By default, BackstopJS saves its screenshots into ./backstopjs/bitmaps_reference/ and ./backstopjs/bitmaps_test/ in parallel with your ./backstop.js config file. The location of these directories are configurable so they can easily be moved inside or outside your source control or file sharing environment.
The compare.json file contains file mappings between reference and test files. This file tells the comparison module what comparisons to run. It is probably best kept inside the bitmaps_test directory.
If you are using custom casper_scripts -- that directory can be specified too.
Please note: these file paths are relative to your ./node_modules/backstopjs/ directory.
"paths": Changing the rendering engine (version 0.6.0+)
BackstopJS supports using PhantomJS or SlimerJS (With thanks to CasperJS for doing the heavy lifting here.)
PhantomJS, the default rendering engine, does not correctly interpret flexbox and web fonts -- so if you are using those things in your app you will be way more happy using SlimerJS. Here is how to do that...
First, install SlimerJS. From your root directory run...
$ sudo npm install -g slimerjsThen, in your backstop.json config file, update the engine property to...
"engine": "slimerjs"Thats it.
Changing the reporting server port
The default port used by BackstopJS is 3001. You can change it by setting the port parameter in the backstop.json file.
Setting Casper command-line flags (version 0.9.0+)
This is for you if for some reason you find yourself needing advanced configuration access to CasperJS. You can set CasperJS flags via casperFlags like so...
"casperFlags": Troubleshooting
Windows users...
Please make sure you have Python installed. see https://github.com/garris/BackstopJS/issues/185
The dreaded command-not-found error...
If this happens then you may not be in the right directory – try...
cd node_modules/backstopjs/Then try running your BackstopJS command again.
Debugging
To enable verbose console output when running your tests set the debug property to true in backstop.json.
"debug": trueViewing response contents
Sometimes it also helps to verify that BackstopJS is receiving the correct response. Enabling the debug property (see Debugging above) will output this data to the console whenever a test is run.
For a sanity check you can also use the following command -- it will output your requested file contents to the console.
Please note: this will check your scenario url only. It does not check for a referenceUrl property.
From ./node_modules/backstopjs ...
$ npm run echoRunning the report server
The test comparison report was written in Angular.js and requires a running HTTP server instance. This instance is auto-started after a test is run. The server is also auto-stopped after 15 minutes so you don't have to go worrying about node processes running all over the place.
You can manually start the server optionally passing your own timeout parameter (in minutes). Passing 0 will disable the timeout feature and run the server until you manually stop it.
From ./node_modules/backstopjs ...
$ npm run start -- -t 0To manually stop the server, from ./node_modules/backstopjs ...
$ npm run stopBackstory:
BackstopJS is a useful wrapper around the very fabulous Resemble.js component written by James Cryer. Other implementations of Resemble.js, namely PhantomCSS require writing long form CasperJS tests -- which is of course great for testing complex UI interactions –- but kind of cumbersome for more simple applications like static CMS templates or lots and lots of app states at different screen sizes.
BackstopJS may be just the thing if you develop custom WordPress, Drupal or other CMS templates. Tested on OSX.
BackstopJS was created by Garris Shipon during the Art.com labs years.
...
Many many thanks to all the contributors with special thanks to...
- Shuresh KM for help on the 1.3.2 release
- Klaus Bayrhammer for all the incredible effort leading up to 1.0 -- the cli reports and compatibility fixes are awesome!
- Evan Lovely and Klaus Bayrhammer for help on the 0.9.0 release
- Robert O'Rourke for help on the 0.8.0 release
- Klaus Bayrhammer for help on the 0.7.0 release
- Benedikt Rötsch for help on the 0.6.0 release
- Yulia Tsareva for help on the 0.5.0 release
- Lewis Nyman and Stoutie for help with 0.4.0 release -- you guys are responsible for really getting the ball rolling!
BackstopJS uses icons from the Noun Project