Jump to
Table of contents
Overview
folder-template is an easy to use directory / files generator.
Its main purpose is to help with generation of components, modules and other folder / files structures from predefined and easy to configure templates.
It's a simpler and more focused alternative to angular-cli and similar tools.
Check the screenshots to quickly get a better idea.
TL;DR
- Install the package:
$ npm install folder-template --save-dev- Expose the CLI through your
package.json'sscripts:
... "scripts": ... "generate": "ft" ...-
Define templates inside a
/templatesdirectory located in your project's root:
Samples here -
Define questions and variable names inside a
.configlocated in each template folder (Eg:/templates/component/.config) -
Run the npm command to generate files / folders:
$ npm run generate component ./component being a folder name from your /templates directory and ./ is the destination path.
Features
- Simple configuration
- Ability to query the user for data
- Compilation is done using handlebars
- Access to all handlebars helpers
- Supports nested structures
Getting started
Installing folder-template
$ npm install folder-template --save-devThis adds the ft CLI command locally to your project and can now be used in your project's npm scripts.
Expose folder-template through npm scripts
Add the following to your project's package.json's scripts section:
... "scripts": ... "generate": "ft" ...This will basically create a npm task in your project which basically exposes the CLI of the folder-template package.
Define some templates
Now we need some templates inside a /templates directory in the root of your project.
There are a few available in the /examples/sample-templates directory of folder-template's github repository.
The sample templates are for Angular 2 but similarily they can be generated for any framework.
Basically every folder inside the /templates directory is a template.
Whatever is inside each of these folders (except .config file) will be compiled with handlebars and copied in the specified destination.
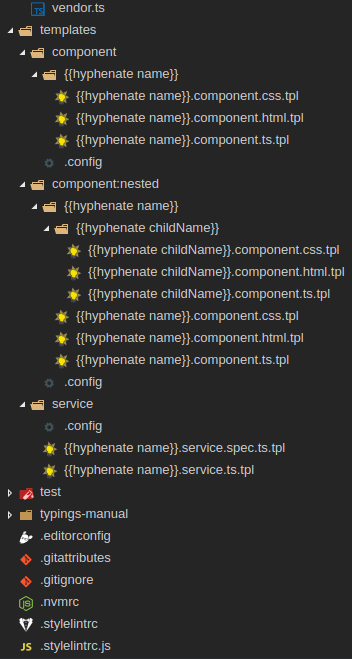
|-- project-root
|   |-- templates
|   |   |-- component
|   |   |   |-- {{hyphenate name}}
|   |   |   |   |-- {{hyphenate name}}.component.css.tpl
|   |   |   |   |-- {{hyphenate name}}.component.html.tpl
|   |   |   |   |-- {{hyphenate name}}.component.ts.tpl
|   |   |   |-- .config
|   |   |-- service
|   |   |   |-- {{hyphenate name}}.service.ts.tpl
|   |   |   |-- .config
|   |-- package.json
|   |-- Gruntfile.js
|   |-- LICENSE.md
|   |-- README.md
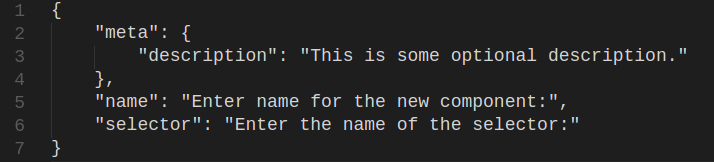
Setup the .config file
When you run folder-template, the CLI will ask some questions to collect data to populate the templates.
The questions and the variable names to store the answers are defined inside a .config folder inside each of the templates folders.
For example the .config
file inside the /templates/component
directory contains the following code:
{
  "meta": {
    "description": "This is some optional description. Eg. Please enter all the input in 'hyphen-case':"
  },
  "name": "Enter name for the new component:",
  "selector": "Enter the name of the selector:"
}
The key names (name, selector) become handlebars variables to be used inside the templates and the filenames.
They will be replaced with the answers given to the questions.
The meta.description property is optional and holds some optional instructions to display to the user before collecting the data.
Generate files / folders
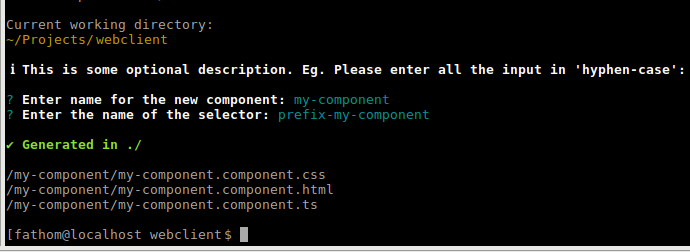
Assuming that the steps above were followed, you can start generating files and folders using commands like the following (in your project's root directory):
$ npm run generate component ./Where:
generateis the alias tofolder-templateCLI (ft) defined inscriptsproperty ofpackage.jsoncomponentis the name of one of the direct folders inside/templatesdirectory from your project's root (specifically these)- and
./is the path where you want the generated files to appear (relative to your project's root)
You should now be asked some questions about the new component (based on the .config file) and
then you should find a new folder with the name you specified in the root of your project.
Screenshots
1. Define a templates directory in your project's root directory:
2. Setup your templates and specify variables and questions in a .config file sitting in each template folder:
3. Generate a template and you'll be queried for data based on the .config file:

Completion screen:
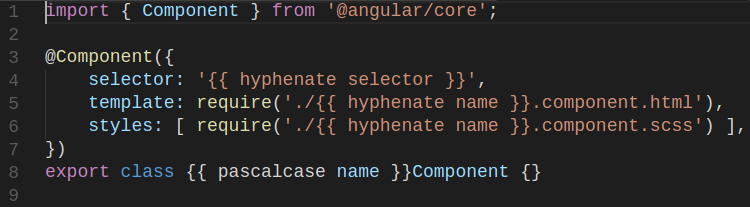
Example of template contents:
Notes
[jump to TOC]
You can use handlebars to parametrise both the contents of files and also the names of the directories and files. Examples here.
You can also use all the handlebars helpers as can be seen in the examples and in screenshots.
Sample project
There is a sample project in the github repo inside /examples/sample-project
To use it, clone the repo:
git clone git@github.com:efidiles/folder-template.git
navigate to /examples/sample-project:
cd folder-template/examples/sample-project
run:
npm run generate component ./
(no need for npm install as it will be done automatically)
Authors
Eduard Fidiles
John Kilpatrick
License
Copyright © 2016, Eduard Fidiles. Released under the MIT license.