CouchDB Envoy Authentication
Only the following methods have been ported from pouch-authentication (Other methods remain as they were upstream, and may be unsuitable for use):
- db.getSession()
- db.login()
- db.logout()
Easy user authentication for PouchDB/CouchDB.
var db = 'http://mysite:5984/mydb' skip_setup: true;db;- Overview
- Setup
- API
- CouchDB Authentication recipes
- First step: disable the Admin Party!
- Everybody can read and write everything
- Everybody can read, only some can write (everything)
- Everybody can read, only some can write (some things)
- Some people can read and write everything
- Some people can read (some docs), some people can write (those same docs)
- Everybody has to be logged in to do anything
- Tests
- License
Overview
You know what's hard? Security. You know what makes security really easy? CouchDB.
That's right, CouchDB is more than a database: it's also a RESTful web server with a built-in authentication framework. And it boasts some top-notch security features:
- salts and hashes passwords automatically with PBKDF2
- stores a cookie in the browser
- refreshes the cookie every 10 minutes (default)
And best of all, CouchDB does it with good ol'-fashioned HTTP. Just open up the network tab and watch the JSON fly back and forth.
To get started, just install CouchDB, throw in a little SSL, and you've got everything you need for your site's authentication.
Project status
This plugin uses vanilla CouchDB. The goal is to give you a lightweight authentication API that doesn't require anything fancy – no additional server daemons, no third-party providers, just straight-up Pouch and Couch.
So this is more of a reference implementation than an all-in-one solution. If there's a feature missing that you need, you will probably need to write a custom server (see the CouchDB Authentication recipes section for details).
This plugin does not work in Node.js. It's designed for the browser.
Setup
Requirements
- CouchDB v1.3.0+ or IrisCouch
- PouchDB v2.0.0+
PouchDB setup
Bower:
bower install pouchdb
bower install pouchdb-authentication
Browserify :
npm install pouchdb --save
npm install pouchdb-authentication --save
var PouchDB = ;PouchDB;Static :
Or, just grab the latest pouchdb.authentication.min.js from the releases page and declare it after PouchDB:
CouchDB setup
Install CouchDB:
sudo apt-get install couchdb # debian, ubuntu, etc.
brew install couchdb         # mac
Or, get yourself a hosted one at IrisCouch. It works the same.
Next, set up CORS so that PouchDB can access your CouchDB from any URL. For convenience we'll use add-cors-to-couchdb.
npm install -g add-cors-to-couchdb # may require sudo
add-cors-to-couchdb                # for IrisCouch, see add-cors-to-couchdb instructions
In a production environment, don't forget to set up SSL.
PouchDB setup
Create a PouchDB attached to an HTTP backend. This is the one you'll use for pouchdb-authentication stuff.
var db = 'http://localhost:5984/mydb' skipSetup: true;(Note that the users are shared across the entire CouchDB instance, not just mydb. Also, the skipSetup is to prevent PouchDB from doing any HTTP requests to the server while we're not logged in, which would cause a modal authentication popup.)
Of course, you'll probably want to sync that database with a local one:
var local = 'local_db';local;But the pouchdb-authentication API will operate on your remote PouchDB object, not your local one.
API
Like PouchDB, every function takes a Node-style callback of the form function(error, response). Or you can use promises:
db;Every function also takes a set of options. Unless otherwise noted, the only available option is ajax, which corresponds to the standard PouchDB ajax options. (See the PouchDB API for details.) Currently the only ajax option is ajax.cache, which can be set to true to disable cache-busting on IE.
db.signup(username, password [, options] [, callback])
Sign up a new user who doesn't exist yet. Throws an error if the user already exists or if the username is invalid, or if some network error occurred. CouchDB has some limitations on user names (e.g. they cannot contain the character :).
db;Example response:
"ok":true "id":"org.couchdb.user:batman" "rev":"1-575ed65bb40cbe90dc882ced8044a90f"Note: Signing up does not automatically log in a user; you will need to call db.login() afterwards.
Options
- metadata : Object of metadata you want to store with the username, e.g. an email address or any other info. Can be as deeply structured as you want.
Example:
db;Note that CouchDB does not enforce a password policy or a username policy, unless you add a security doc to the _users database.
You can also type signUp().
db.login(username, password [, options] [ callback])
Log in an existing user. Throws an error if the user doesn't exist yet, the password is wrong, the HTTP server is unreachable, or a meteor struck your computer.
db;Example response:
"ok":true"name":"david""roles":You can also type logIn().
db.logout([callback])
Logs out whichever user is currently logged in. If nobody's logged in, it does nothing and just returns {"ok" : true}.
Example:
dbExample response:
"ok":trueYou can also type logOut().
db.getSession([opts] [, callback])
Returns information about the current session. In other words, this tells you which user is currently logged in.
Example:
db;Example response:
"info": "authenticated": "cookie" "authentication_db": "_users" "authentication_handlers": "oauth" "cookie" "default" "ok": true "userCtx": "name": "batman" "roles": Note: getSession() returns basic user information, like name and roles, but doesn't return metadata. If you need the metadata, use getUser().
db.getUser(username [, opts][, callback])
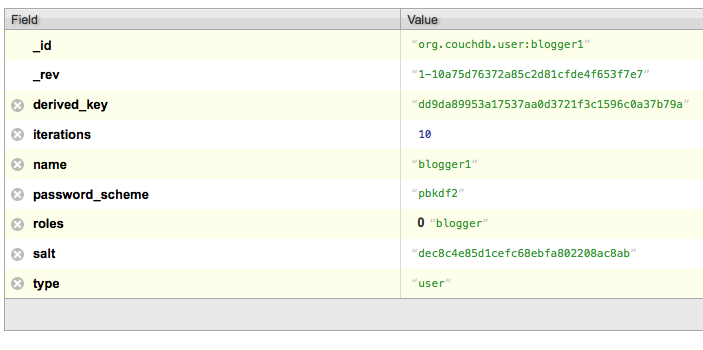
Returns the user document associated with a username. (CouchDB, in a pleasing show of consistency, stores users as JSON documents in the special _users database.) This is the primary way to get metadata about a user.
Example:
db;Example response:
"_id": "org.couchdb.user:aquaman" "_rev": "1-60288b5b056a8af31e910bca2523ea6a" "derived_key": "05c3314f180faed646af3b77e637ffecf2e3fb93" "iterations": 10 "name": "aquaman" "password_scheme": "pbkdf2" "roles": "salt": "bce14111a559e00587f3e5f207e4a316" "type": "user"Note: Only server admins or the user themselves can fetch user data. Otherwise you will get a 404 not_found error.
db.putUser(username, opts [, callback])
Update the metadata of a user.
db;db.changePassword(username, password [, opts][, callback])
Set new password for user username.
Example:
dbNote: Only server admins or the user themselves can change user data. Otherwise you will get a 404 not_found error.
db.changeUsername(oldUsername, newUsername[, opts][, callback])
Renames oldUsername to newUsername.
Example:
dbNote: Only server admins change a username. Otherwise you will get a 404 not_found error.
CouchDB authentication recipes
So you just installed CouchDB, but you're not sure how to set up the right user permissions? Look no further.
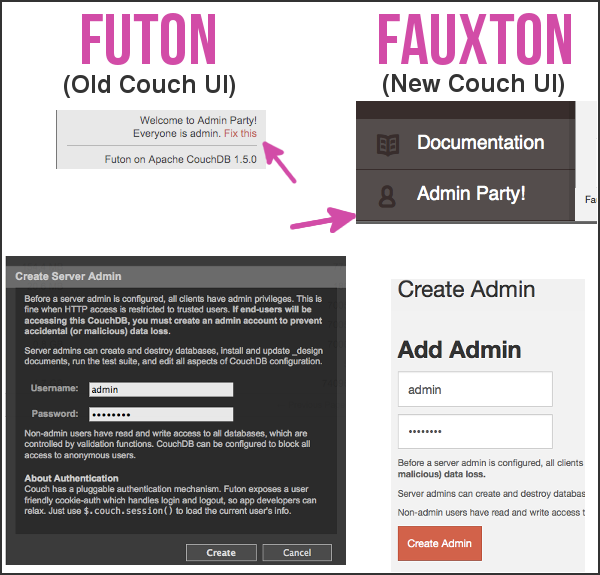
First step: disable the Admin Party!
When you first install CouchDB, it will be in the "Admin Party" mode, which means everyone is an admin. You'll want to disable this and create at least one admin user, so that random people can't mess with your CouchDB settings:
Below is a list of recipes for common authentication use cases.
- Everybody can read and write everything
- Everybody can read, only some can write (everything)
- Everybody can read, only some can write (some things)
- Some people can read and write everything
- Some people can read (some docs), some people can write (those same docs)
- Everybody has to be logged in to do anything
Everybody can read and write everything
- Example: a public wiki
Howto
Just create a new database; this is the default. It's very dangerous, though, since users can even overwite the history of a document. So you probably don't want it.
Everybody can read, only some can write (everything)
- Example: a blog
Howto
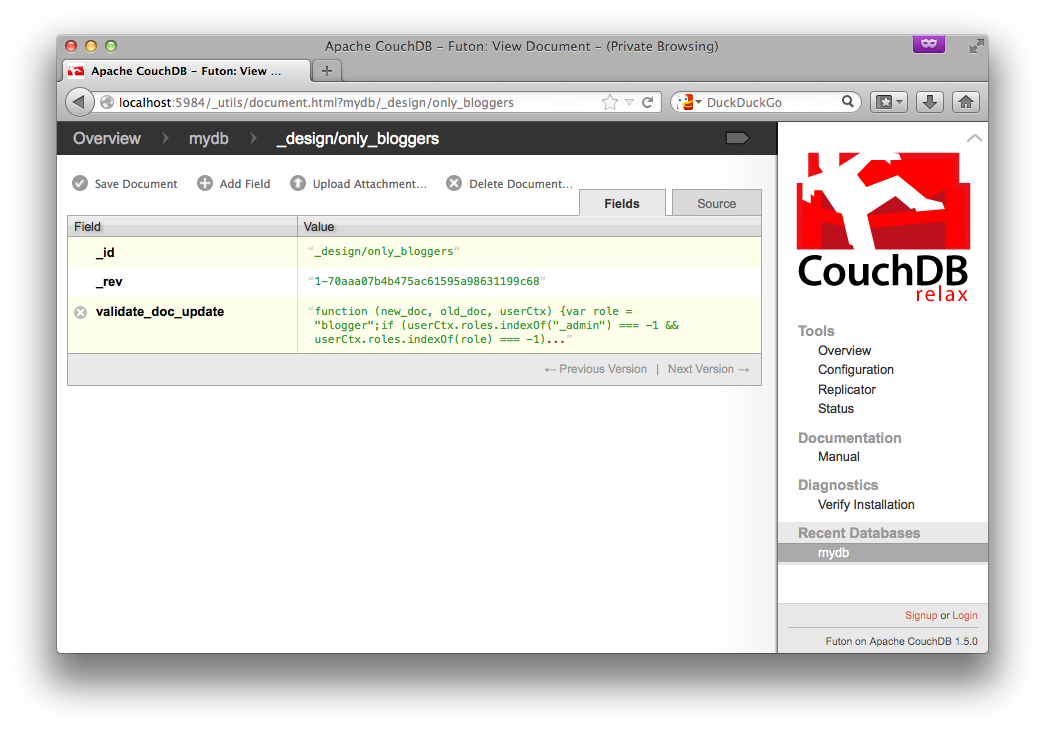
Create a new database, then add a design doc with a validate_doc_update function (see the CouchDB docs for details). This function will be called whenever a document is created, modified, or deleted. In it, we'll check that the user is either an admin or has the 'blogger' role.
The function looks like this:
{ var role = "blogger"; if userCtxroles === -1 && userCtxroles === -1 throwforbidden : "Only users with role " + role + " or an admin can modify this database."; }You can create the document like this:
curl -X POST http://admin:password@localhost:5984/mydb \
-H 'content-type:application/json' \
-d $'{"_id":"_design/only_bloggers","validate_doc_update":"function (newDoc, oldDoc, userCtx) {\\nvar role = \\"blogger\\";\\nif (userCtx.roles.indexOf(\\"_admin\\") === -1 && userCtx.roles.indexOf(role) === -1) {\\nthrow({forbidden : \\"Only users with role \\" + role + \\" or an admin can modify this database.\\"});\\n}\\n}"}'
In the above command, you will need to change admin/password (admin and password), localhost:5984 (your Couch URL), mydb (your database), only_bloggers (name of the design doc, can be whatever you want), and blogger (name of the new role).
You can also create the document in the Futon interface itself:

From now on, you can give users the role "blogger", so they can add/modify/remove documents. (Only admins can change someone's roles.)
Admins can also modify documents, but they are the only ones who can change the security settings.
Everyone else will get an error if they try to write (but not if they try to read).
$ curl -X POST http://blogger1:blogger1@localhost:5984/mydb -H 'content-type:application/json' -d '{"some" : "doc"}'
{"ok":true,"id":"ef24bec394e1a45f32ea917121002282","rev":"1-65c2325c1ab76e8279e6c2e3abc1da69"}
$ curl -X POST http://foobar:foobar@localhost:5984/mydb -H 'content-type:application/json' -d '{"some" : "doc"}'
{"error":"forbidden","reason":"Only users with role blogger or an admin can modify this database."}
Everybody can read, only some can write (some things)
- Example: Twitter
In this example, all tweets are public, but everybody can only create/edit/delete their own tweets.
Very similar to the above, we'll create a design doc with a validate_doc_update function, but this time we'll also ensure that every document contains a user field, and that the user field matches the name of the user who's modifying it:
{ if userCtxroles === -1 && newDocuser !== userCtxname throwforbidden : "doc.user must be the same as your username."; } Here's a curl command you can use:
curl -X POST http://admin:password@localhost:5984/mydb \
-H 'content-type:application/json' \
-d $'{"_id":"_design/only_correct_user","validate_doc_update":"function (newDoc, oldDoc, userCtx) {\\nif (userCtx.roles.indexOf(\'_admin\') === -1 && newDoc.user !== userCtx.name) {\\nthrow({forbidden : \\"doc.user must be the same as your username.\\"});\\n}\\n}"}'
In the above command, you will need to change admin/password (admin and password), localhost:5984 (your Couch URL), mydb (your database), and only_correct_user (name of the design doc, can be whatever you want).
You can also use the Futon UI to do this. See the "blogger" example above for details.
Some people can read and write everything
- Example: a shared company wiki
Howto
Create a new database, then click the "Security" button:
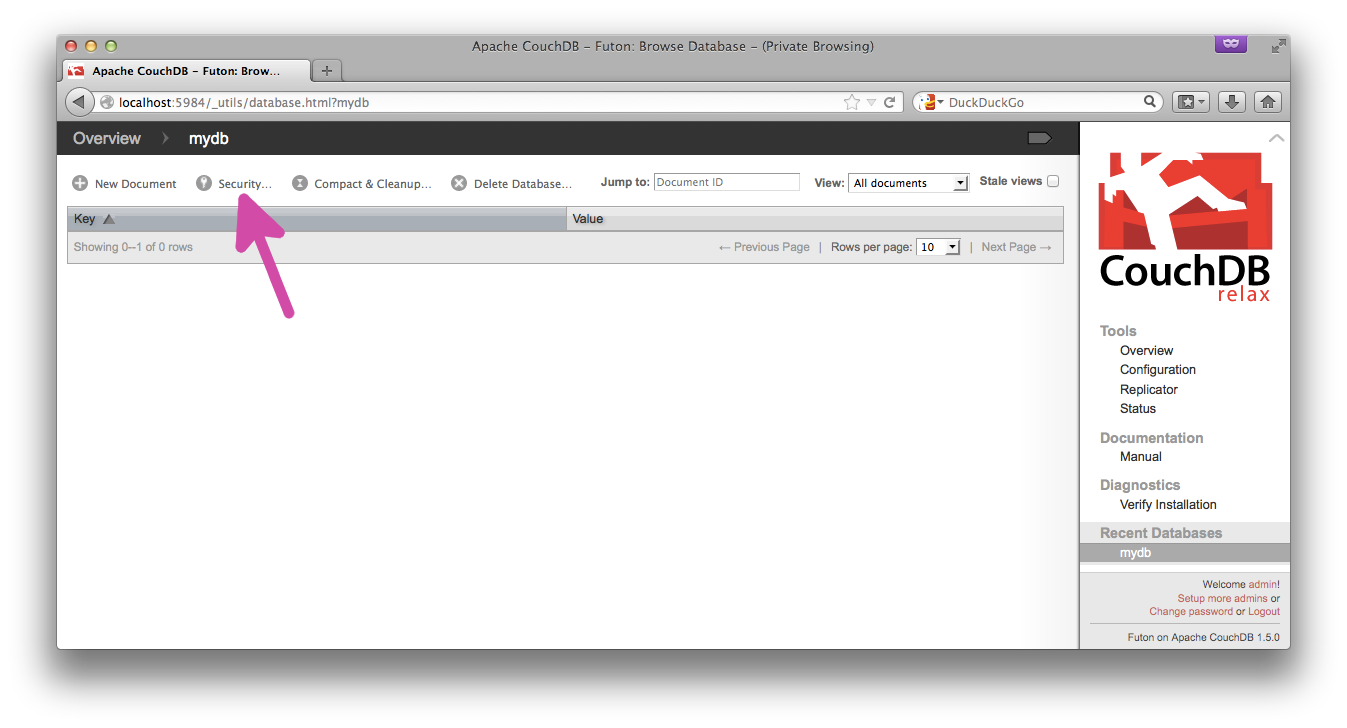
Set a new role as the read/write role. We'll call this one "employee":
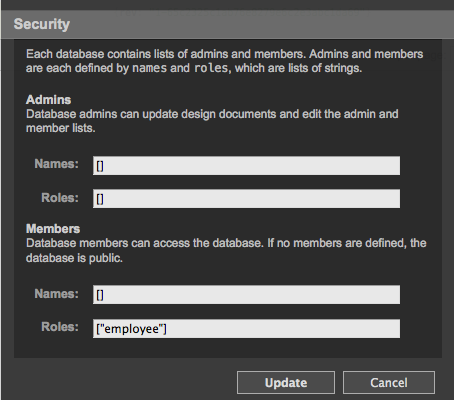
In this scheme, only admins can change the security settings, but any user with the role "employee" can view or add/modify/delete documents. The database is not public; only valid users with the role "employee" can read from it.
See the "blogger" example above for how to set roles.
Some people can read (some docs), some people can write (those same docs)
- Example: A private file locker
Howto
The standard practice for this is to set up one database per user. Don't be scared: databases are cheap, and Cloudant says 100k databases per account is not uncommon.
Alternatively, if you have users who belong to multiple groups, and each group has a set of documents, then you should use a one database per role setup, with CouchDB's roles system.
Then, you just need to set the database to be read-only/write-only for people with the correct user name (or correct role), using the db/_security API. (See screenshots above for manual steps.)
There are a few different ways to accomplish this, and unfortunately you can't do it with CouchDB alone (as of this writing). But here are a few different third-party options you can try:
CouchPerUser
Native CouchDB Erlang plugin that automatically creates one database per user. The database name is just a hex-encoded hash of the user name, and it completely predictable.
Update! This is now much easier to use, because there are prebuilt Docker images containing the CouchPerUser plugin.
couchdb-dbperuser-provisioning
Node.js daemon to do the same as above.
CouchDB-Selfservice
Python process that gives you a URL to use when registering users, and creates a database for that user on registration.
PHP-on-Couch
PHP library that provides some sugar over the CouchDB API, e.g. for admin stuff.
Hoodie
Batteries-included no-backend framework. Currently (as of January 2016) being ported to use PouchDB.
PouchBase (formerly pouch.host)
(Work in progress as of January 2015.) Hosted PouchDB Server with per-user read-write access.
Everybody has to be logged in to do anything
- Example: Medical healthcare records
Howto
The highest level of security offered by CouchDB. No requests whatsoever are allowed from unauthenticated users.
First, ensure that at least one CouchDB user has been created (if you've disabled admin party, you'll already have at least one admin user). Next, if you're using CORS, ensure the cors.headers array contains authorization (this should already be set if you've followed CouchDB setup). Finally, set httpd.require_valid_user to true.
To prevent browser HTTP basic authentication modal dialogs of ye olde times, we have to be subtle in the way we use PouchDB. To prevent a rogue unauthenticated request to CouchDB (used to check whether the remote DB exists), pass skipSetup: true in Pouch's constructor options. Secondly, to authenticate the request against _session, add the HTTP basic authorization header to db.login()'s AJAX options.
Example usage:
var user = name: 'admin' password: 'admin'; var pouchOpts = skipSetup: true; var ajaxOpts = ajax: headers: Authorization: 'Basic ' + window ; var db = 'http://localhost:5984/test' pouchOpts; db;Test this library
First off:
npm install
To test in the browser (locally):
npm run dev
To test in PhantomJS:
npm test
License
Apache 2.0