Happo.io
Happo is a visual regression testing tool for React. It hooks into your CI environment to compare the visual appearance of your components before and after a change. Screenshots are taken in different browsers and across different screen sizes to ensure consistent cross-browser and responsive styling of your application.
Installation
npm install happo.io --save-dev
Getting started
Before you can run happo, you need to define one or more component example
files. Let's assume there's a <Button> component that we're adding examples
for. First, create a file called Button-happo.jsx and save it next to your
Button.jsx file (if this doesn't match your naming scheme you can use the
include option). Add a few exports to this file (yes, you can use
ES6 here):
const primary = <Button ="primary">Primary</Button>;const secondary = <Button ="secondary">Secondary</Button>;Then, we need to add some configuration. API tokens are used to authenticate
you with the remote happo.io service: apiKey and apiSecret. These can be
found on your account page at https://happo.io/me. You also need to tell happo
what browsers you want to target. In this example, we're using two Firefox
targets. One at 1024 x 768 screen ("desktop") and one on a 320 x 640 screen
("mobile").
const RemoteBrowserTarget = ; moduleexports = // It's good practice to never store API tokens directly in the config file. // Here, we're using environment variables. apiKey: processenvHAPPO_API_KEY apiSecret: processenvHAPPO_API_SECRET targets: 'firefox-desktop': 'firefox' viewport: '1024x768' 'firefox-mobile': 'firefox' viewport: '320x640' ;Once we're done with the configuration it's time to try things out. Before we
do that, let's add a script to our package.json file so that it's easier to
invoke commands:
This will expose a happo script we can run with
npm run happo runGo ahead and run that command now.
If things are successful, you'll see something like this at the end of the run:
Uploading report for 07f7bd689025c8e
Done 07f7bd689025c8e
This first run will serve as our baseline. But now we need something to compare
that baseline with. A good way to test the whole flow is to make a change to a
component example and verify that happo will catch that difference. Open one of
your *-happo.jsx files and make some changes, e.g.
const primary = <Button ="primary">PRIMARY</Button>;const secondary = <Button ="secondary">Secondary</Button>;const tertiary = <Button ="tertiary">Tertiary</Button>;Here, we made primary button have ALL CAPS and added a tertiary variant.
Let's run happo a second time:
npm run happo runThis time, we'll get a different hash:
Uploading report for 07f8a31ec5f24...
Done 07f8a31ec5f24
Once the second run is done, we can compare the two runs by passing both hashes
to the happo compare action:
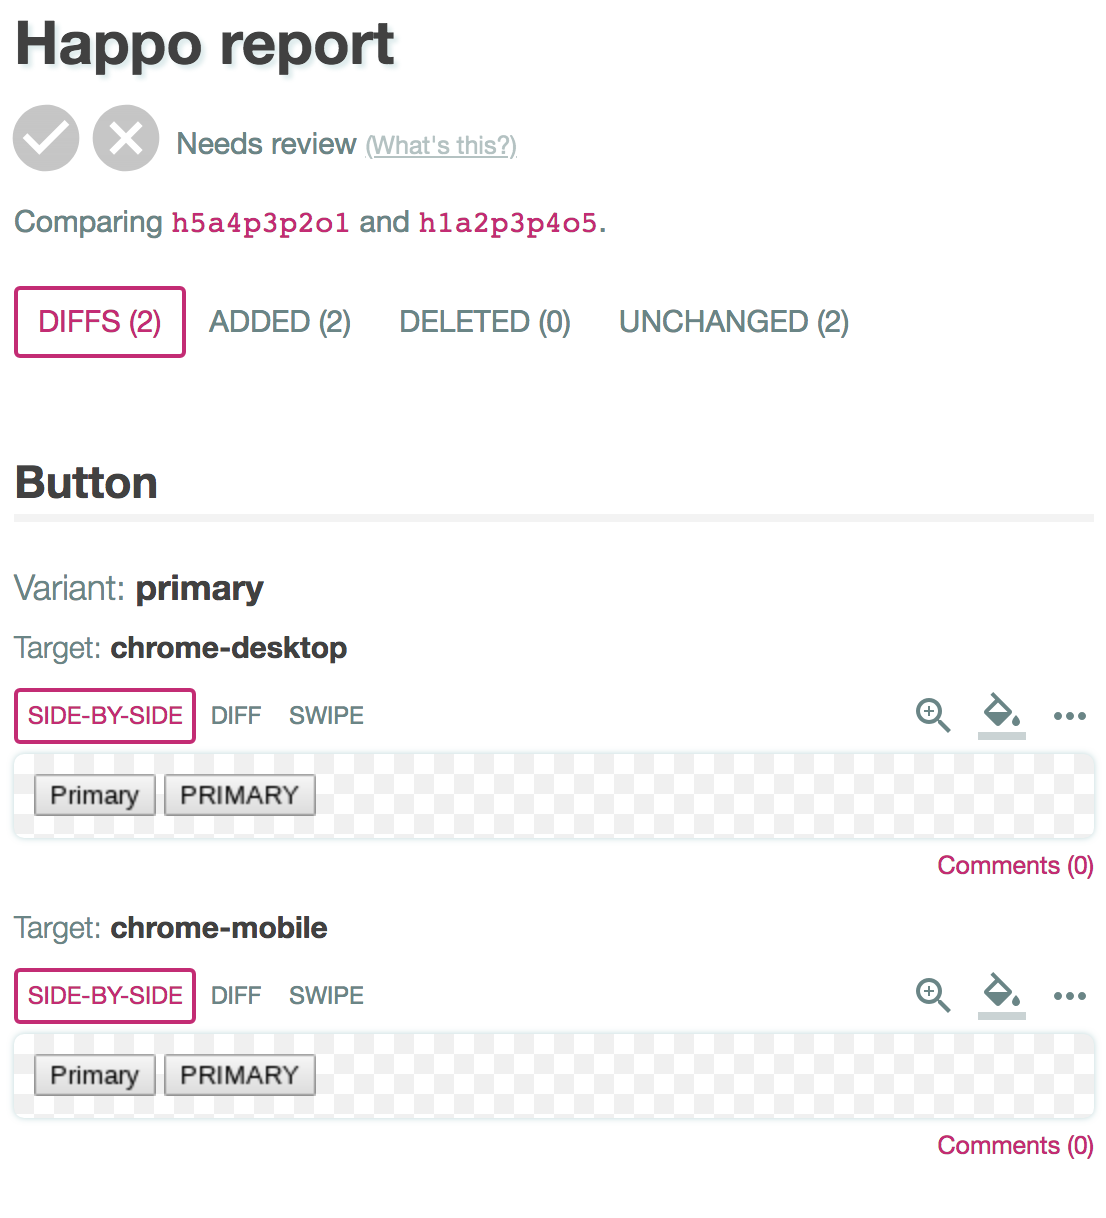
$ npm run happo compare 07f7bd689025c8e 07f8a31ec5f24The two reports are different. View full report athttps://happo.io/compare?q=07f7bd689025c8e..07f8a31ec5f24If you open this URL in a browser, you'll see something like this:
We've now covered the most important steps and commands involved in making a full happo run. Normally, you won't run all these commands locally. Instead, you'll configure your CI environment to do it for you, on every PR/commit/branch pushed. Let's look at how you can do that next.
Defining examples
The default way of defining happo examples for a component is through a
ComponentName-happo.jsx file, with an ES export for each variant you are
looking to test:
const primary = <Button ="primary">Primary</Button>;const secondary = <Button ="secondary">Secondary</Button>;If you are more comfortable with CommonJS syntax, you can export an object instead:
moduleexports = <Button ="primary">Primary</Button> <Button ="secondary">Secondary</Button>;Happo will infer the component name from the file. In the example above, if the
file is named Button-happo.jsx, the inferred name will be Button.
If you want to group multiple components in one file you can export an array instead, with objects defining the component and its variants. This can be handy if you for some reason want to auto-generate happo examples from another source (e.g. a style-guide, component-gallery).
component: 'Button' variants: <Button ="primary">Primary</Button> <Button ="secondary">Secondary</Button> component: 'Icon' variants: <Icon ="small" /> <Icon ="large" /> Integrating with your CI environment
Once you've gone through the Getting Started guide, you should have a good understanding of what commands are involved in making a full, two-pass, happo run. Happo works by running twice. Once to create a baseline, and a second time to compare against this baseline. If you are using a pull-request model to push code to your repo, you can run the baseline run on the commit that the PR/branch was based off of. If you have a commit-by-commit model, you can compare against the previous commit. Since multiple changes might be pushed at the same time, using the same commit as base, there's a happo command you can use to check if the baseline even has to be created:
happo has-report <sha>If this command exits successfully (exit code 0), the report already exists. In this case, you don't have to checkout that commit and run happo on it. If it exits with a non-zero exit code, the report hasn't been created and you need to do git checkout and run happo.
When you run happo compare <sha1> <sha2>, a message will be printed to stdout
containing a link to the page where you can view changes. You can use this
message to post a comment on the PR/commit. Additionally, the exit code will
tell you whether there was any diffs or not. Exit code zero means no diffs. Any
other exit code means there was one or more diffs (including added and removed
examples).
CSS Loading Strategies
Happo works best when CSS code is co-located with the components. In some
cases, you'll get away with zero configuration to get this working. But in many
cases, you'll have to add a little webpack config to the mix. Happo uses
webpack under the hood when generating browser-executable javascript. The
customizeWebpackConfig config option will let you inject things like webpack
loaders to the happo run. E.g.
moduleexports = { configmodule = rules: test: /\.css$/ use: loader: cssLoader ; // it's important that we return the modified config return config; }Configuration
Happo will look for configuration in a .happo.js file in the current working
folder. You can override the path to this file through the --config CLI
option. This file isn't subject to babel transpilation, so it's best to stay
with good old CommonJS syntax unless you're on the very latest Node version.
include
Controls what files happo will grab examples from. The default is
'**/@(*-happo|happo).@(js|jsx)'. This option is useful if you want to apply a
different naming scheme, e.g. **/*-examples.js.
stylesheets
If you rely on externally loaded stylesheets, list their URLs in this config
option, e.g. ['http://cdn/style.css'].
targets
This is where you specify the browsers you want to be part of your happo run. E.g.
moduleexports = targets: 'firefox-desktop': 'firefox' viewport: '1024x768' 'firefox-mobile': 'firefox' viewport: '320x640' 'chrome': 'chrome' viewport: '800x600' ;Currently supported browsers:
firefoxchrome
customizeWebpackConfig
A function you can use to override the default webpack config used internally
by happo during a run. Make sure to always return the passed in config. E.g.
moduleexports = { configmodule = rules: test: /\.css$/ use: loader: cssLoader ; // it's important that we return the modified config return config; }