Google Sign-In Cordova/PhoneGap Plugin


⚠️ From plugin version 6.0.0 the minimum required cordova-ios version is 4.5.0. Need to use a lower cordova-ios version? Use plugin version 5.3.2 or lower.
0. Index
- Description
- Screenshots
- Google API setup
- Installation (CLI / Plugman)
- Installation (PhoneGap Build)
- Installation (iOS and Cocoapods)
- Usage
- Exchanging the
idToken - Exchanging the
serverAuthCode - Troubleshooting
- Changelog
1. Description
This plugin allows you to authenticate and identify users with Google Sign-In on iOS and Android. Out of the box, you'll get email, display name, given name, family name, profile picture url, and user id. You can also configure it to get an idToken and serverAuthCode.
This plugin only wraps access to the Google Sign-In API. Further API access should be implemented per use-case, per developer.
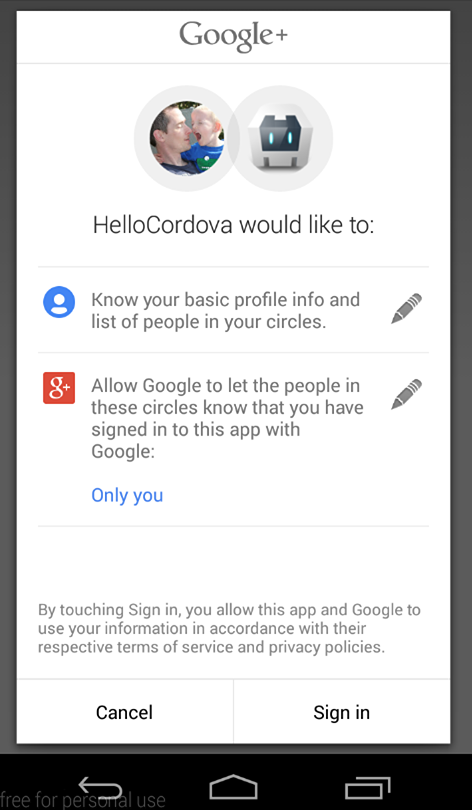
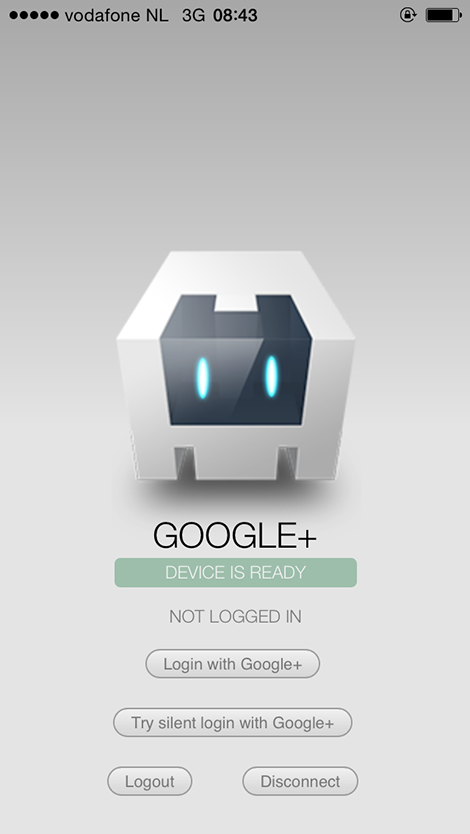
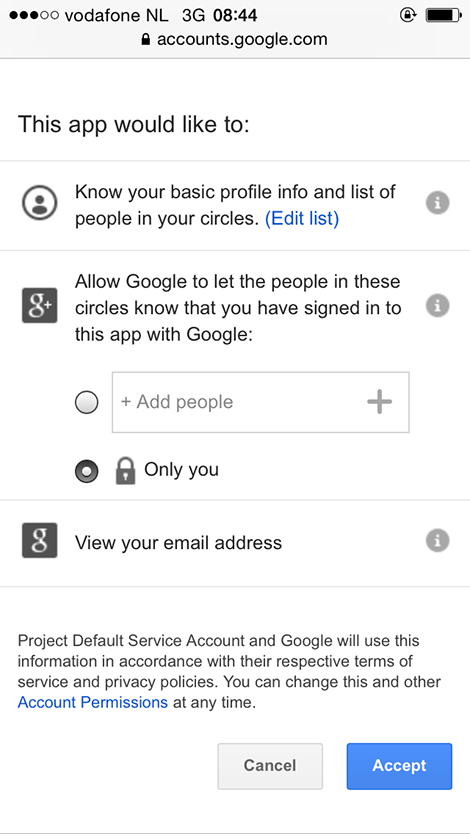
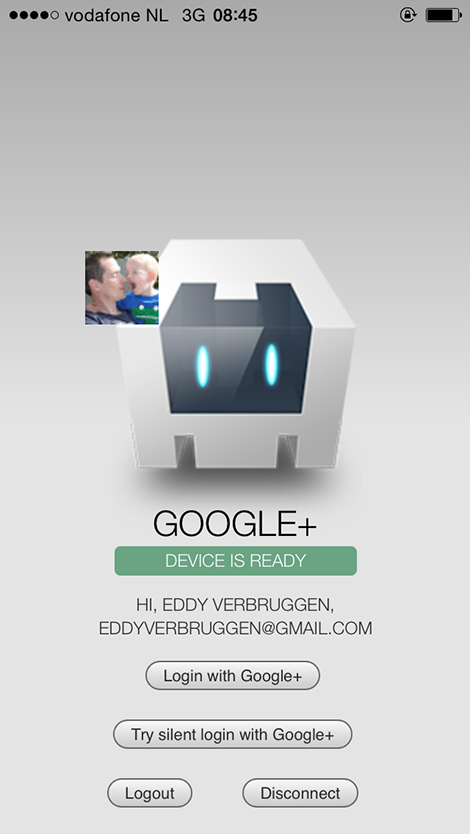
2. Screenshots
Android


iOS
3. Google API setup
To communicate with Google you need to do some tedious setup, sorry.
It is (strongly) recommended that you use the same project for both iOS and Android.
Before you proceed
Go into your config.xml and make sure that your package name (i.e. the app ID) is what you want it to be. Use this package name when setting up iOS and Android in the following steps! If you don't, you will likely get a 12501, 'user cancelled' error despite never cancelling the log in process.
This step is especially important if you are using a framework such as Ionic to scaffold out your project. When you create the project, the config.xml has a placeholder packagename, e.g. com.ionic.*, so you can start developing right away.
<?xml version='1.0' encoding='utf-8'?>
<widget id="** REPLACE THIS VALUE **" ...>
...
</widget>
Browser
Browser platform require a valid WEB_APPLICATION_CLIENT_ID that generated at Google Developer Console.
Ensure you have added your url address (example: http://localhost:3000) to Authorized JavaScript origins section.
See this screenshot for example
iOS
To get your iOS REVERSED_CLIENT_ID, generate a configuration file here.
This GoogleService-Info.plist file contains the REVERSED_CLIENT_ID you'll need during installation. This value is only needed for iOS.
The REVERSED_CLIENT_ID is also known as the "iOS URL Scheme" on the Developer's Console.
Login on iOS takes the user to a SafariViewController through the Google SDK, instead of the separate Safari browser.
Android
To configure Android, generate a configuration file here. Enable Google Sign-In and add an Android App to add the SHA1 fingerprint. Once Google Sign-In is enabled Google will automatically create necessary credentials in Developer Console for web and Android. There is no need to add the generated google-services.json file into your cordova project. You may need to configure the consent screen.
Make sure you execute the keytool steps as explained here or authentication will fail (do this for both release and debug keystores).
IMPORTANT:
- The step above, about
keytool, show 2 types of certificate fingerprints, the Release and the Debug, when generating the configuration file, it's better to use the Debug certificate fingerprint, after that, you have to go on Google Credentials Manager, and manually create a credential for OAuth2 client with your Release certificate fingerprint. This is necessary to your application work on both Development and Production releases. - Ensure that you are using the correct alias name while generating the fingerprint.
$ keytool -exportcert -keystore <path-to-debug-or-production-keystore> -list -v -alias <alias-name>
Login on Android will use the accounts signed in on the user's device.
Integrating Google Play Services
To set up Google Play Services version, you can use PLAY_SERVICES_VERSION parameter (with 11.8.0 value by default). It is useful in order to avoid conflicts with another plugins which use any other different version of Google Play Service, because they MUST be the same version.
Publishing your app in Google Play Store
Google re-signs your app with a different certificate when you publish it in the Play Store. Once your app is published, copy the SHA-1 fingerprint of the "App signing certificate", found in the "App signing" section under "Release Management", in Google Play Console. Paste this fingerprint in the Release OAuth client ID in Google Credentials Manager.
Web Client Id
If you want to get an idToken or serverAuthCode back from the Sign In Process, you will need to pass the client ID for your project's web application. This can be found on your project's API credentials page on the Google Developer's Console.
4. Installation (PhoneGap CLI / Cordova CLI)
This plugin is compatible with:
- Cordova Plugman
- PhoneGap 3.0 CLI
- Ionic (must use the Cordova CLI)
- Meteor JS
Here's how it works (backup your project first!):
Using the Cordova CLI and npm:
$ cordova plugin add cordova-plugin-googleplus --save --variable REVERSED_CLIENT_ID=myreversedclientid --variable WEB_APPLICATION_CLIENT_ID=mywebapplicationclientid
$ cordova prepare
Using the Cordova CLI to fetch the latest version from GitHub:
$ cordova plugin add https://github.com/EddyVerbruggen/cordova-plugin-googleplus --save --variable REVERSED_CLIENT_ID=myreversedclientid  --variable WEB_APPLICATION_CLIENT_ID=mywebapplicationclientid
$ cordova prepare
IMPORTANT:
-
Please note that
myreversedclientidis a place holder for the reversed clientId you find in your iOS configuration file. Do not surround this value with quotes. (iOS only Applications) -
If you are building a hybrid application (iOS and Android), or an Android application, you have to replace
myreversedclientidwith the reverse value of Client ID in your Release credential generated on step 3, on Google Developer's Console, this will be: "com.googleusercontent.apps.uniqueId", without quotes. Example: '123-abc123.apps.googleusercontent.com' becomes 'com.googleusercontent.apps.123-abc123'. -
myreversedclientidis a place holder for Oauth Client ID specifically generated for web application in your Google Developer's Console.
GooglePlus.js is brought in automatically. There is no need to change or add anything in your html.
5. Installation (PhoneGap Build)
Add this to your config.xml:
For the (stable) NPM Version:
<plugin name="cordova-plugin-googleplus" source="npm">
  <variable name="REVERSED_CLIENT_ID" value="myreversedclientid" />
  <variable name="WEB_APPLICATION_CLIENT_ID" value="mywebapplicationclientid" />
</plugin>
For the latest version from Git (not recommended):
<plugin spec="https://github.com/EddyVerbruggen/cordova-plugin-googleplus.git" source="git">
  <variable name="REVERSED_CLIENT_ID" value="myreversedclientid" />
  <variable name="WEB_APPLICATION_CLIENT_ID" value="mywebapplicationclientid" />
<plugin>
6. Installation (iOS and Cocoapods)
This plugin use the CocoaPods dependency manager in order to satisfy the iOS Google SignIn SDK library dependencies.
Therefore please make sure you have Cocoapods installed in your iOS build environment - setup instructions can be found here. Also make sure your local Cocoapods repo is up-to-date by running pod repo update.
If building your project in Xcode, you need to open YourProject.xcworkspace (not YourProject.xcodeproj) so both your Cordova app project and the Pods project will be loaded into Xcode.
You can list the pod dependencies in your Cordova iOS project by installing cocoapods-dependencies:
sudo gem install cocoapods-dependencies
cd platforms/ios/
pod dependencies
7. Usage
Check the demo app to get you going quickly, or hurt yourself and follow these steps.
Note that none of these methods should be called before deviceready has fired.
Example:
document.addEventListener('deviceready', deviceReady, false);

function deviceReady() {
    //I get called when everything's ready for the plugin to be called!
    console.log('Device is ready!');
    window.plugins.googleplus.trySilentLogin(...);
}
isAvailable
3/31/16: This method is no longer required to be checked first. It is kept for code orthoganality.
Login
The login function walks the user through the Google Auth process. All parameters are optional, however there are a few caveats.
To get an idToken on Android, you must pass in your webClientId (a frequent mistake is to supply Android Client ID). On iOS, the idToken is included in the sign in result by default.
To get a serverAuthCode, you must pass in your webClientId and set offline to true. If offline is true, but no webClientId is provided, the serverAuthCode will NOT be requested.
The default scopes requested are profile and email (always requested). To request other scopes, add them as a space-separated list to the scopes parameter. They will be requested exactly as passed in. Refer to the Google Scopes documentation for info on valid scopes that can be requested. For example, 'scope': 'https://www.googleapis.com/auth/youtube https://www.googleapis.com/auth/tasks'.
Naturally, in order to use any additional scopes or APIs, they will need to be activated in your project Developer's Console.
Usage
window.plugins.googleplus.login(
    {
      'scopes': '... ', // optional, space-separated list of scopes, If not included or empty, defaults to `profile` and `email`.
      'webClientId': 'client id of the web app/server side', // optional clientId of your Web application from Credentials settings of your project - On Android, this MUST be included to get an idToken. On iOS, it is not required.
      'offline': true // optional, but requires the webClientId - if set to true the plugin will also return a serverAuthCode, which can be used to grant offline access to a non-Google server
    },
    function (obj) {
      alert(JSON.stringify(obj)); // do something useful instead of alerting
    },
    function (msg) {
      alert('error: ' + msg);
    }
);
The success callback (second argument) gets a JSON object with the following contents, with example data of my Google account:
 obj.email          // 'eddyverbruggen@gmail.com'
 obj.userId         // user id
 obj.displayName    // 'Eddy Verbruggen'
 obj.familyName     // 'Verbruggen'
 obj.givenName      // 'Eddy'
 obj.imageUrl       // 'http://link-to-my-profilepic.google.com'
 obj.idToken        // idToken that can be exchanged to verify user identity.
 obj.serverAuthCode // Auth code that can be exchanged for an access token and refresh token for offline access
 obj.accessToken    // OAuth2 access token
Additional user information is available by use case. Add the scopes needed to the scopes option then return the info to the result object being created in the handleSignInResult and didSignInForUser functions on Android and iOS, respectively.
On Android, the error callback (third argument) receives an error status code if authentication was not successful. A description of those status codes can be found on Google's android developer website at GoogleSignInStatusCodes.
On iOS, the error callback will include an NSError localizedDescription.
Try silent login
You can call trySilentLogin to check if they're already signed in to the app and sign them in silently if they are.
If it succeeds you will get the same object as the login function gets,
but if it fails it will not show the authentication dialog to the user.
Calling trySilentLogin is done the same as login, except for the function name.
window.plugins.googleplus.trySilentLogin(
    {
      'scopes': '... ', // optional - space-separated list of scopes, If not included or empty, defaults to `profile` and `email`.
      'webClientId': 'client id of the web app/server side', // optional - clientId of your Web application from Credentials settings of your project - On Android, this MUST be included to get an idToken. On iOS, it is not required.
      'offline': true, // Optional, but requires the webClientId - if set to true the plugin will also return a serverAuthCode, which can be used to grant offline access to a non-Google server
    },
    function (obj) {
      alert(JSON.stringify(obj)); // do something useful instead of alerting
    },
    function (msg) {
      alert('error: ' + msg);
    }
);
It is strongly recommended that trySilentLogin is implemented with the same options as login, to avoid any potential complications.
logout
This will clear the OAuth2 token.
window.plugins.googleplus.logout(
    function (msg) {
      alert(msg); // do something useful instead of alerting
    }
);
disconnect
This will clear the OAuth2 token, forget which account was used to login, and disconnect that account from the app. This will require the user to allow the app access again next time they sign in. Be aware that this effect is not always instantaneous. It can take time to completely disconnect.
window.plugins.googleplus.disconnect(
    function (msg) {
      alert(msg); // do something useful instead of alerting
    }
);
8. Exchanging the idToken
Google Documentation for Authenticating with a Backend Server
As the above articles mention, the idToken can be exchanged for user information to confirm the users identity.
Note: Google does not want user identity data sent directly to a server. The idToken is their preferred method to send that data securely and safely, as it must be verified through their servers in order to unpack.
This has several uses. On the client-side, it can be a way to get doubly confirm the user identity, or it can be used to get details such as the email host domain. The server-side is where the idToken really hits its stride. It is an easy way to confirm the users identity before allowing them access to that servers resources or before exchanging the serverAuthCode for an access and refresh token (see the next section).
If your server-side only needs identity, and not additional account access, this is a secure and simple way to supply that information.
9. Exchanging the serverAuthCode
Google Documentation for Enabling Server-Side Access
As the above articles mention, the serverAuthCode is an item that can be exchanged for an access and refresh token. Unlike the idToken, this allows the server-side to have direct access to the users Google account.
Only in the initial login request serverAuthCode will be returned. If you wish to receive the token a second time, you can by using logout first.
You have a couple options when it comes to this exchange: you can use the Google REST Apis to get those in the hybrid app itself or you can send the code to your backend server to be exchanged there, using whatever method necessary (Google provides examples for Java, Python, and JS/HTTP).
As stated before, this plugin is all about user authentication and identity, so any use of the user's account beyond that needs to be implemented per use case, per application.
10. Troubleshooting
-
Q: I can't get authentication to work on Android. And why is there no ANDROID API KEY?
-
A: On Android you need to execute the
keytoolsteps, see the installation instructions for details. -
Q: After following the
keytoolsteps, I still can't get authentication to work on Android. I'm having a "10 error"!!! -
A: You need to get the SHA 1 cert from your apk file. Run:
keytool -list -printcert -jarfile <your apk>and copy the SHA 1 to your Android Client ID on Google Console. -
Q: OMG $@#*! the Android build is failing
-
A: You need to have Android Support Repository and Android Support Library installed in the Android SDK manager. Make sure you're using a fairly up to date version of those.
-
Q: Why isn't this working on my Android Emulator???
-
A: Make sure you are using a Virtual Device running with a Google APIs target and/or a Google APIs CPU!
-
Q: I'm getting Error 10, what do I do?
-
A: This is likely caused by cordova not using the keystore you want to use (e.g. because you generated your own). Please check https://cordova.apache.org/docs/en/latest/guide/platforms/android/#signing-an-app to read how to do this. Some have reported that you need to run
cordova cleanbefore running the build to resolve error 10. -
Q: I'm getting Error 16, what do I do?
-
A: This is always a problem because the signature (or fingerprint) of your android app when signed is not added to the google console (or firebase) OAuth whitelist. Please double check if you did everything required for this. See the mini-guide below.
Error 16 & app signing mini-guide
First, make sure you fully read and understand the guide on App Signing from the android documentation!
After/while reading that, double check if you did all steps 1-4 below correctly:
1. Make a keystore
In order to sign your app (on dev or publish) you will need to make a local keystore and key with Android Studio or via terminal. Google has a feature called "Google Play App Signing" where they will keep the key on their server and sign your app for you, but if you use this feature or not, you will need a local keystore and key either way.
- If you do not use "Google Play App Signing" → go to 3A
- If you do use "Google Play App Signing" → go to 3B
2A. Without Google Play App Signing
Your local keystore and key will be your official app signing key.
You will need to whitelist the following key fingerprints (in SHA1 format) in Google OAuth settings:
- android default
debug.keystorekey - your own created keystore with its key (for App Signing)
2B. With Google Play App Signing enabled
Your local keystore and key will be your "Upload key" and another key for official "App Signing key" is created and managed by Google.
You need to whitelist the following key fingerprints (in SHA1 format) in Google Oauth settings:
- android default
debug.keystorekey - your own created keystore with its key (for Uploading)
- google's App Signing key
3. Get key fingerprints
Get the above keys' fingerprints (in SHA1 format) to be able to whitelist them.
A. Debug key
For the android default debug.keystore do:
keytool -exportcert -keystore /Users/myusername/.android/debug.keystore -list -v
You will see the SHA1 fingerprint for the debug key in terminal. Copy that.
B. App signing or Upload key
For the own created keystore with key (either for 2A or 2B) do:
keytool -exportcert -keystore /path/to/your/key/yourKeystoreFile.keystore -list -v
You will see the SHA1 fingerprint for the debug key in terminal. Copy that.
C. Google's App signing key
Only when Google Play App Signing is enabled (for 2B). You can find the key Google will use to sign your builds in the Google Play Console.
Requirement: You need to have finished the basic info on your android app and then you need to upload a signed APK for internal testing. Once this is uploaded you will be able to access the following menu:
Go to Release Management > App sigining. There you will see
- "App signing certificate" and SHA-1 fingerprint
- "Upload certificate" and SHA-1 fingerprint
The "Upload" one is (and should be) the same as key B. above. And the "App signing certificate" is the key that Google will use. Copy this one.
4. Whitelist the key fingerprints
Again we have 2 options to whitelist them. Projects that use only the Google Cloud Platform or projects that use Firebase.
A. Google Cloud Platform projects
(In case you also use Firebase, you can skip this step)
- Go to API & Services > credentials
- Create credentials > OAuth client ID
- choose "android" and insert your SHA1
- Repeat this for all keys (2 or 3)
B. Firebase projects
- Go to the console > Projects settings
- Select your Android app at the bottom. (if you don't have any, add an android app, you can ignore the whole tutorial they give you, it's irrelevant for Cordova apps)
- Add the finger prints to the "SHA certificate fingerprints" section.
- Double check your Google Cloud console: API & Services > credentials and see that Firebase has added these automatically at the bottom under "OAuth 2.0 client IDs"