Cookie Sense
Deploy a cookie-consent system to your website with one line of code, allowing you to easily comply with the EU cookie laws.
GitHub Repository - Open Source Please feel free to make any contributions you'd like, or post an issue if you'd like to see something new or something fixed.
This repository is beginner friendly. Don't worry if you make a mistake or do something incorrectly! :)
Install
NPM
npm i cookiesense
<script src='./node_modules/cookiesense/build/main.js'></script>
CDN
<script src='https://cdn.jsdelivr.net/npm/cookiesense@1/build/main.min.js'></script>
To ensure you have installed cookiesense correctly, try cookiesense.test(); in the console.
About
Introduction
CookieSense allows you to easily and quickly add cookie consent popup boxes to your site to help you comply with EU cookie laws. Each popup box is called a "cookiesense", and can be configured just to your liking. Choose from one of our pre-made templates or provide an ID selector to mark an element on your site to be used instead.
When a user accepts or refuses the cookie consent, a cookie is created called default-consent with a value of true or false respectively. If you have multiple cookiesense's for different needs, you can provide a name for them - in this case, the cookies will be saved as so: [name]-consent, where [name] is the custom name provided.
Why would I need more than one popup/cookiesense?
The cookie laws can be pretty hectic. Perhaps you have a large site, and for the main section of your site you require a specific set of permissions. Then for a completely different section of your site, you require a completely different set of permissions. Having the ability to create multiple popups/cookiesenses each configured specially for it's purpose will allow you to easily keep track of what cookie permissions you have. This also means you are not shoving all this cookie consent stuff in the users face when they visit your site - instead you're asking for the required permissions for that page.
Or, maybe you do want to ask all at once - well you can! You can do almost anything with the configuration.
Found something that can't be done but should be? Make an issue!
Contributing
To contribute, simply clone the repo and type npm install. This package requires no depencies except TypeScript as a dev-dependency.
Use npm run compile to compile the TypeScript into build/main.js, which you can link to an index.html for testing.
Use npm run dev to constantly check for TypeScript changes and compile automatically (this is essentially tsc -w)
If you're going to make a change, please create an issue for it first, then the commit. Thank you!
Quick Start
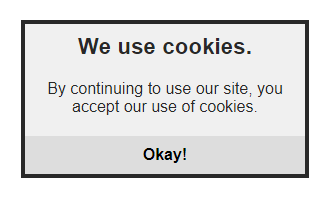
To quickly get started with our bare-bones minimum cookiesense, use our default template.
const cs = new cookiesense({ template: 'default' });

console.log(cs.check()); // returns TRUE if the user accepted the cookie consent. False otherwise.
We will have lots of templates, though this one simply states the use of cookies on your site and that by continuing you accept to the use of cookies. There is only one button, being the accept button.
Configuration
Every cookiesense must have a configuration - even if it's empty. Here is an example of a typical cookiesense.
Code
const cs = new cookiesense({
template: 'default',
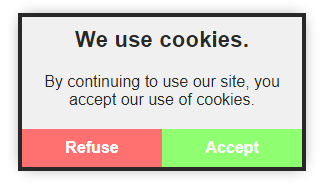
choice: true, // show refuse & accept buttons. by default it only shows accept button
content: { // Ability to fully customize the popup element and every element within it
popup: {
shadow: '0 0 25px -5px rgba(1,1,1,.5)'
},
accept: {
bgColor: '#8FFF71',
textColor: 'white'
},
refuse: {
bgColor: '#FF7171',
textColor: 'white'
}
}
});Output
Options
Since version 3.0.0 config options accept, refuse, title and notice have been removed. Colour config colours has also been removed. These have all been replaced by a new, easier config system. See Content Customization.
name?: string - Uniquely identifies the cookiesense instance and is the prefix for the consent cookie. If the user accepts/refuses the cookie consent, a cookie will be saved as name-consent with true or false respectively. name is what prefixes this cookie.
template?: string - The pre-made popup element to use.
choice?: boolean - Whether to add a 'Refuse' button to the popup or not.
persist?: boolean - If true, the popup will show on every page load as long as the user has refused.
expiry?: number - When the user accepts or refuses the cookiesense popup, cookiesene will create a cookie named something along the lines of default-consent with a value of true or false depending on what the user chose. By defualt this 'consent status' cookie will expire in 30 days, however by changing this config option you have the ability to set the expiry time in days. e.g '10' for 10 days, '20' for 20 days. After the specified amount of days, the cookie consent popup will reappear for the user to re-accept or refuse it again.
useLocalStorage?: boolean - If true, the cookie-consent status will be saved in localStorage instead of as a cookie. Read about the expiry config option above to learn more about the cookie-consent status.
gutter?: number - Space between the popup and edges of the screen, in px. Default is 25px.
position?: string - Position of the popup on the screen. e.g top left, center, center bottom. Note: if using center, always have it first in the string.
saverefuse?: boolean - When false, this has the same effect as persist, although this doesn't save a cookie if refused. Default is true.
warn?: boolean - Whether to output warning messages to the console.
content?: Customization - An object which controls the colours and text of the popup element. See Content Customization
Content Customization
Newly added in version 3.0.0, you now have the ability to modify the style properties of your popup element. From changing the popup background to editing the notice text, you can fully customize the default template to match the design of your website.
In previous versions, changing text used four different config options. Then to change the colours, you had to have an object with all these bundled options that got messy and hard to manage. We have changed this to now be a much easier experience.
Here is an example:
Code
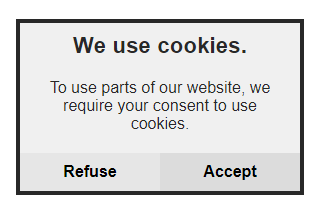
new cookiesense({
  content: {
    popup: {
      bgColor: 'rgb(255, 119, 0)',
      border: '2px solid white',
      boxShadow: '0px 0px 10px rgba(black, .2)'
    },
    title: {
      text: 'We use cookies.',
      textColor: 'white',
    },
    btnAccept: {
      text: 'Dismiss',
      textColor: 'white'
    }
  }
});
Output

Popup
Compared to the other config optons, such as title, btnAccept etc, popup is unique and has different options.
popup: {
  bgColor?: string,     // Background colour (e.g '#FFF', 'rgb(1,1,1)', 'linear-gradient(black, white)')
  boxShadow?: string,   // Box shadow (e.g '0px 0px 0px 10px black')
  width?: string,       // Popup width (e.g '400px' or '20%' or '50em')
  border?: string,      // Border (e.g '2px solid black')
  css?: string          // Inline css (e.g 'font-size:1em;line-height:2em;')
}
Everything else
Every other element within the popup has the exact same available properties. These are as follows:
Note: This is an example for the 'title' element. THe following options can be applied to title, notice, btnAccept, and btnRefuse.
title: { // this could be 'notice', 'btnAccept' or 'btnRefuse' also, not just 'title'.
  bgColor?: string,     // background colour
  textColor?: string,   // text colour
  text?: string,        // text value
  boxShadow?: string,   // box shadow
  textShadow?: string,  // text shadow
  border?: string,      // border
  css?: string,         // inline css
}
Values
The following are the accepted values for the above configuration options.
bgColor?: string - Can be any colour accepted by CSS. e.g rgb(40,20,80), red or even gradients such as linear-gradient(black, white).
textColor?: string - Can be any colour accepted by CSS, just like bgColor. Though unlike bgColor, this does not accept gradients.
text?: string - Any string that will replace the elements current text. Note: HTML will not work here, as we're using HTMLElement.innerText to set this rather than HTMLElement.innerHTML
boxShadow?: string - Any 'shadow' config accepted by CSS. e.g 0 0 0 10px black.
textShadow?: string - Exactly the same as boxShadow.
border?: string - Any 'border' config accepted by CSS. e.g 2px solid black.
css?: string - A string of inline CSS, exactly how you'd have it inside a style attribute on an element. e.g font-size:2em;line-height:1.7em;.
Methods
There are a few methods you can use to manage your cookiesense.
Note: updateTitle(), updateNotice(), updateAcceptBtn(), and updateRefuseBtn() have all been removed since version 3.0.0.
test(): void
Description - Logs a message to the console allowing you to ensure everything is working okay.
check(): boolean
Description - Checks if the user has accepted the cookie consent or not.
Returns - true if accepted. false if the user refused (or hasn't answered yet).
open(): void
Description - Opens the current cookiesense. Useful for if you want to manually open the cookiesense for whatever reason.
close(): void
Description - Closes the current cookiesense. Useful for if you want to manually close the cookiesense for whatever reason.
reset(): void
Description - Resets the cookiesense consent cookie. The user will have to refresh (to make it popup again) and accept/refuse again.
updatePosition(position: string): void
Description - Takes in a position and updates the popup element accordingly. Useful for responsive design, changing position depending on browser width etc.
Parameters
position: string - A string that specifies the position to set the popup element. E.g
center bottom, top left, bottom right. When using center alongside another position, e.g center top make sure you always have center position first in the string.
Templates
Currently there are not many templates. We're trying to eradicate the use of templates and simply have it pure config-only.
Note: These images are pretty shoddy. Once we have a website up and running you'll be able to see the popups in real-time as you configure them.
default
When config option choice is set to true, this is what you'll get:
bar
This is with choice set to true, though when it's false only the "Okay!" button will be available.
