

Note: These docs are for version 3.x. Upgrading from 2.x or earlier? Please see our Migration Guide
The official Bitski Javascript SDK for the browser. This SDK provides:
- A Web3 provider that can be used with any Web3 library to connect your DApp to the blockchain.
- A simple OAuth2/OIDC based login flow for authenticating users and requesting access to their wallets.
Unlike other wallets, Bitski does not require your users to install a browser extension or mobile app. By using OAuth, users can sign in with their Bitski account using a standard web browser and grant your DApp access to their account. You can then make requests just like you would with any other wallet, but without your users needing to know the ins and outs of extensions or native DApp browsers.
Note: Integrating the Bitski SDK into your DApp will not prevent Bitski users from using the Bitski browser extension or mobile app. If a user has the extension or app installed, they will be able to use it to sign transactions and access their wallet.
A complete example of a very basic application might look like this:
import { Bitski } from 'bitski';
import Web3 from 'web3';

const bitski = new Bitski('CLIENT-ID', 'https://myapp.com/callback.html');

const loginButton = document.getElementById('login-button');
loginButton.addEventListener('click', async () => {
  // This signs the user in for the first time, and sets `window.ethereum` to
  // the Bitski provider. After this has been called, you can initialize your
  // Dapp's instance of Web3/Ethers
  await bitski.signIn();
  initializeDApp();
});

const logoutButton = document.getElementById('logout-button');
logoutButton.addEventListener('click', async () => {
  // This signs the user out and restores `window.ethereum` to whatever value it was
  // before (e.g. restoring browser extensions if they had injected themselves previously).
  await bitski.signOut();
});

document.addEventListener('load', async () => {
  // This signs the user in IF they have signed in before, and sets `window.ethereum`
  // to the Bitski provider. This should be called on page load BEFORE you initialize
  // your Dapp, so that `window.ethereum` is setup properly.
  await bitski.initialize();
  initializeDApp();
});

const initializeDApp = () => {
  if (!window.ethereum) return;

  const web3 = new Web3(window.ethereum);

  // now you can get accounts
  const accounts = await web3.eth.getAccounts();

  // and submit transactions for the user to approve
  const txn = await web3.eth.sendTransaction({
    from: accounts[0],
    to: '...',
    value: web3.utils.toWei('1'),
  });
};
Let's walk through how this works and how you can setup your own DApp.
-
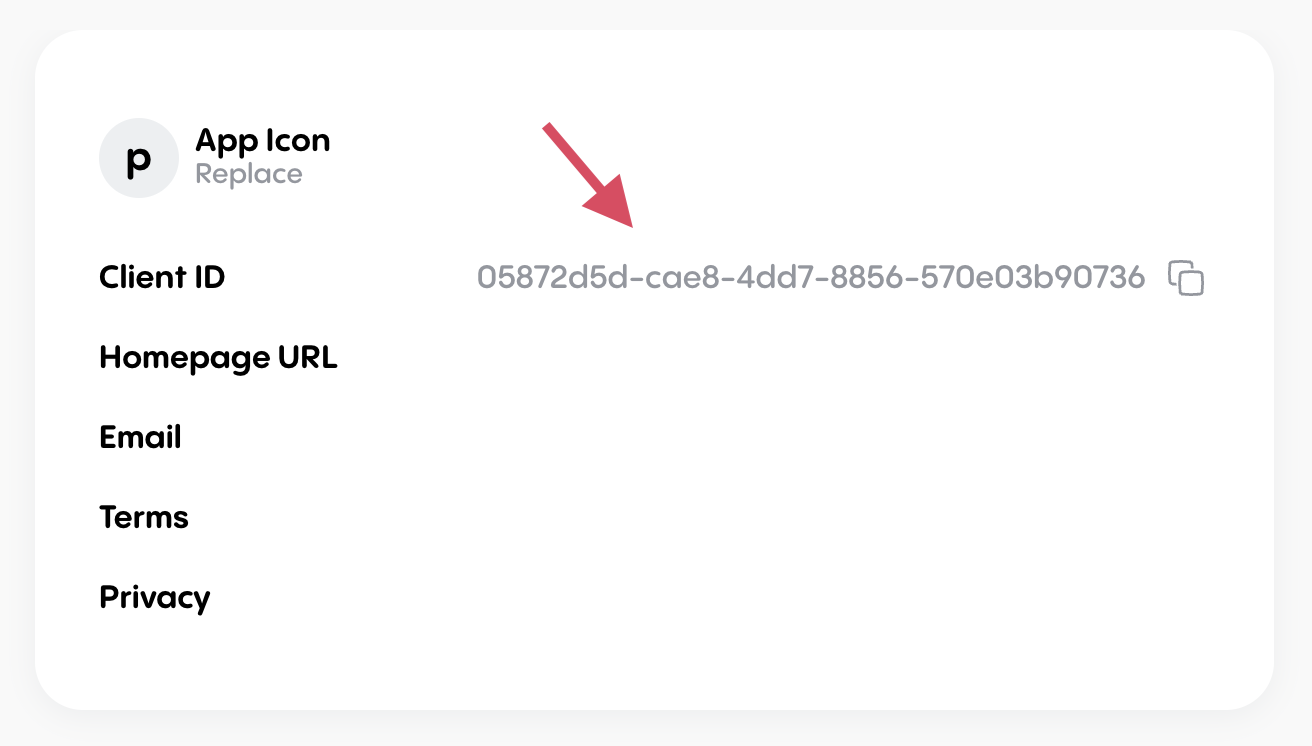
Since the SDK uses OAuth to connect to Bitski, you will need to create an OAuth client for your DApp and get its client ID. You can do this on the Bitski developer portal.
Click new app to create a client

Afterward, you'll see your app's client details
-
Add the Bitski SDK to your DApp:
npm install --save bitski
-
Create the Bitski SDK instance. You must pass in your client ID and a redirect URL (we'll cover the redirect URL next):
import { Bitski } from 'bitski';

const bitski = new Bitski('CLIENT-ID', 'https://myapp.com/callback.html');
-
Create a login callback page for your DApp. This page will be used to receive OAuth response containing the user's access tokens after they've logged in. You can set up this page by copying this callback.html and hosting it on your server.
-
Add the URL to the callback page to your app's authorized redirect urls in the Bitski Developer Portal, on the Authorization tab. This URL should match the one you passed to create the Bitski instance.

-
Add a login button to your DApp. When the user clicks the button, call the
signInmethod on the Bitski instance. After login, Bitski will setwindow.ethereumto its Web3 provider, allowing you to use it with Web3.js or Ethers.js.const loginButton = document.getElementById('login-button'); loginButton.addEventListener('click', async () => { await bitski.signIn(); initializeDApp(); });
-
Because Bitski is a library and not an extension, the provider will not be available after the user reloads the page or when they revisit. To reinitialize the provider, you must call
bitski.initialize()when the page first loads. This will check for an existing Bitski session and if it finds one, restore it andwindow.ethereum.document.addEventListener('load', async () => { await bitski.initialize(); initializeDApp(); });
-
(Optional, but recommended) Add a logout button to your DApp and call
bitski.signOut()when the user clicks it. This will clear the user's session tokens, and stop Bitski from initializing it's provider on the next page load. This will not log the user out of Bitski, just your DApp.const logoutButton = document.getElementById('logout-button'); logoutButton.addEventListener('click', async () => { await bitski.signOut(); });
-
Add the logic for your DApp in
initializeDApp()and start coding!
Note: In Node and other environments without access to
window, the SDK will initialize but won't be usable. This allows you to include the SDK in isomorphic server-side code without causing errors.
If you would prefer to manually handle the callback in your app rather than
using the callback.html page, you can do so by following these steps:
- Create a dedicated route for this purpose (keep in mind that this is the page that will be rendered inside of the popup, so keep the elements on the page to a minimum).
- Add the URL to this route to your app's authorized redirect urls in the Bitski Developer Portal.
- When this route is loaded run the following code:
import { popupCallback } from 'bitski';
// Sends a message to the parent window with the access token and dismisses the popup
popupCallback();
Note: The access token may be passed as a hash on the url (ie. #token=blah), which may conflict with existing hash-based navigation your app may be doing.
If you want your users to see the Bitski sign-in screen instead of the login
screen, you can pass the login_hint parameter to the signIn method.
import { LOGIN_HINT_SIGNUP } from 'bitski';

bitski.signIn({ login_hint: LOGIN_HINT_SIGNUP });If you want to select the WaaS account on login, you can additionally pass the prompt parameter to the signIn method.
import { LOGIN_HINT_SIGNUP, LOGIN_PROMPT } from 'bitski';

bitski.signIn({ login_hint: LOGIN_HINT_SIGNUP, prompt: LOGIN_PROMPT });
Note: In order for the popup window to properly open in most browsers, this needs to be triggered with a click action, otherwise it could be blocked. For your convenience, we've included a standard login button that handles that for you.
For your convenience we provide a connect button that you can drop into your page that will trigger the sign in behavior automatically when clicked.
const btnInstance = bitski.getConnectButton([options][, callback]);Here's an example of how you might set that up:
<!-- my-app.html -->
<div id="bitski-button"></div>
// my-app.js
import { Bitski, AuthenticationStatus } from 'bitski';
import Web3 from 'web3';
const bitski = new Bitski('<YOUR-CLIENT-ID>', '<YOUR-REDIRECT-URL'>);
const web3 = new Web3(bitski.getProvider());
function checkAuthStatus() {
//Check if we are logged in
if (bitski.authStatus === AuthenticationStatus.NotConnected) {
//create the connect button
const containerElement = document.querySelector('#bitski-button');
const connectButton = bitski.getConnectButton({ container: containerElement });
connectButton.callback = (error, user) => {
if (error) {
// Handle errors
return;
}
//Logged in!
connectButton.remove();
continueToApp();
};
// Optionally handle cancellation
connectButton.onCancel = () => {
// Will be called when the user clicks sign in, but dismisses popup
};
} else {
//already logged in
continueToApp();
}
}
window.addEventListener('load', () => {
checkAuthStatus();
});There are a few options you can pass in. These are not required, but allow you to customize the experience:
- container: An HTML element that you want to inject the button into. If you don't pass anything in you can inject it yourself by accessing the button's element key.
- size: The size of the button.
SMALL,MEDIUM, orLARGE. Default isMEDIUM. - authMethod: The sign in method to use.
POPUPorREDIRECT. Default isPOPUP. - signInOptions: The options to pass during the sign in request (login_hint and prompt are supported. See above.)
Note that the callback will be called for either successful or failed login attempts. To handle the case where the user cancels part way through, set the onCancel handler.
Popups are the default login method, as they have a few advantages:
- Easy to setup and integrate in an existing DApp. Opening a popup does not change the state of the page or require you to reinitialize your login flow.
- Works more like an extension based Web3 wallet in general, with an initial "connect" step that is similar to other wallets.
But they have a few downsides:
- Slightly less secure, requiring
window.postMessageto communicate with the the DApp. - Popup could be blocked by the browser or by popup blockers.
If you would prefer a more standard and secure approach, you can use the redirect flow instead. The OAuth2 redirect flow follows these general steps:
- The user clicks the "Sign in with Bitski" button on your DApp.
- The button redirects the user to the Bitski login page.
- The user logs in and approves access to your DApp.
- The user is redirected back to your DApp with an access token in the URL.
Because this flow requires a redirect, you will need to set up a route in your
DApp that will handle when the user is redirected back to your DApp. This route
should first call bitski.redirectCallback(), and then it should restore the
state of your DApp to what it was before the user clicked the login button.
An example of how this might work could be the following:
// index.js
import { Bitski } from 'bitski';
import Web3 from 'web3';

const bitski = new Bitski('CLIENT-ID', 'https://myapp.com/callback');

document.addEventListener('load', async () => {
  if (window.location.pathname === '/callback') {
    // This is the redirect callback route
    await bitski.redirectCallback();
    const prevLocation = localStorage.getItem('prevLocation');

    // Restore the previous location or go to the home page
    window.location = prevLocation ?? `${window.location.origin}/`;
  } else {
    await bitski.initialize();
    initializeDApp();
  }
});

const loginButton = document.getElementById('login-button');
loginButton.addEventListener('click', async () => {
  // Save the current location for when we return
  localStorage.setItem('prevLocation', window.location.href);
  await bitski.signInRedirect();
});

const initializeDApp = () => {
  // ...
};If you want to make public calls to the blockchain before the user has logged in, you can use the provider directly to do so:
import { Bitski } from 'bitski';
import Web3 from 'web3';

const bitski = new Bitski('CLIENT-ID', 'https://myapp.com/callback.html');

const provider = bitski.getProvider();
const web3 = new Web3(provider);

// public calls are always available
const blockNumber = await web3.eth.getBlockNumber();

// but you can't get accounts or submit transactions. This
// throws an error because the user is not yet logged in
const accounts = await web3.eth.getAccounts();The provider supports the standardized wallet_addEthereumChain and
wallet_switchEthereumChain methods. By default, the provider will connect to
Ethereum Mainnet the first time the user connects. If the chain is changed using
wallet_switchEthereumChain, it will reconnect to the most recent chain the
next time the wallet is initialized.
Scopes are OAuth's method for authorizing external applications to access different functions and values. By default the SDK will request 'openid' (required), and 'offline' scopes. Offline is used to obtain a refresh token, which will allow you to request access tokens in the future without displaying a popup. There are additional possible scopes that you can request. See our documentation for more information.
To customize the scopes your app will request, pass them as an array during initialization. Note that 'openid' is always implicitly requested, and that if you customize this list, you should remember to add 'offline' unless you don't want to receive a refresh token.
const bitski = new Bitski('<YOUR-CLIENT-ID>', '<YOUR-REDIRECT-URL>', ['offline', 'email']);You can implicitly check the user's authentication status by calling by calling
bitski.initialize() on load. If the user has signed in, then window.ethereum
will become available and you can start making requests.
If you want to check the status before initializing the provider, you can call
bitski.getAuthStatus(), which returns a promise containing one of 3 values:
- Connected: The user has an active access token. No action is needed.
- Expired: The user is signed in but needs a fresh access token.
- NotConnected: The user has not signed in before.
If the status is NotConnected, the user will have to sign in before you can
access their accounts, or request their signature. This is the primary state
that you need to handle. For more on signing in, see the next section.
if (bitski.authStatus === AuthenticationStatus.NotConnected) {
  // Show connect button or use your own button and call bitski.signIn()
}
If the status is Expired, that means you have a refresh token available, which can be used to acquire a fresh access token without prompting the user to sign in again. By default, when a request that requires an access token is made, the provider will attempt to get a new access token for you.
const accounts = await web3.eth.getAccounts();
// Provider will check authStatus
// If expired, it will attempt to refresh, then perform the request
If you want to handle this request yourself, try the following:
if (bitski.authStatus === AuthenticationStatus.Expired) {
  // Call connect, which will refresh the access token
  await bitski.connect();
  // Continue with your app
}For apps that use a first-party account with a backend, you may want to ensure that the Bitski user is valid, or that they really own the account. Since the client can easily be compromised, you can't necessarily rely on the client to send these details directly. Instead, you should send the user's access token or the refresh token to your server to verify it with Bitski's endpoints directly.
To retrieve the access token in this SDK:
const accessToken = await bitski.getCurrentAccessToken();Once you have the access token, submit it to your server however you like. Then, from your server you can use the access token to derive the Bitski user id by using the OAuth standard userinfo endpoint, or the user's account using the eth_accounts JSON-RPC method. For more info on how to do this, see our documentation.
The last step is to consider how you want to handle wallet choice. With Bitski you can offer the choice between a built in provider (Metamask, Toshi, or other dapp browsers) and a Bitski wallet. Simply checking for the presence of a built in provider may not offer your users enough choice. Consider the case where a user has both Metamask installed and a Bitski wallet. They may want to use different wallets with different apps. Here are a few approaches you can take:
In this scenario, you would show a Bitski connect button and a "Use Existing Provider" button. This gives the user control over what accounts to use while not overwhelming crypto newcomers with choice.
<!-- login.html -->
<div id="login-bitski"></div>
<a id="login-injected" style="display: none;" href="#">Use Existing Provider</a>
// login.js
const bitski = new Bitski('<YOUR-CLIENT-ID>', '<YOUR-REDIRECT-URL>');
function continueToApp(provider) {
web3 = new Web3(window.ethereum);
// continue!
}
window.addEventListener('load', () => {
const useExistingBtn = document.querySelector('#login-injected');
const useBitskiBtn = document.querySelector('#login-bitski');
// inject bitski connect button
const connectBtn = bitski.getConnectButton({ container: useBitskiBtn });
// set bitski post-login callback
connectBtn.callback = function () {
continueToApp();
};
if (window.ethereum) {
// Show use existing button
useExistingBtn.style.display = 'block';
// Add action
useExistingBtn.addEventListener('click', () => {
window.ethereum.enable().then(() => {
continueToApp();
});
});
}
});In this scenario, when you get to the point where you need a wallet to continue in your app, you can offer the choice between Bitski and other providers, whether an injected provider is available or not. You would show a Bitski connect button along side either a download button (if no injected provider) or continue button for each solution you want to promote.
<!-- login.html -->
<div id="login-bitski"></div>
<a id="download-mm" href="#" target="_blank">Download Metamask</a>
<a id="login-injected" style="display: none;" href="#">Use Existing Provider</a>
// login.js
const bitski = new Bitski('<YOUR-CLIENT-ID>', '<YOUR-REDIRECT-URL>');
function continueToApp() {
web3 = new Web3(window.ethereum);
// continue!
}
window.addEventListener('load', () => {
const useExistingBtn = document.querySelector('#login-injected');
const useBitskiBtn = document.querySelector('#login-bitski');
const downloadMMBtn = document.querySelector('#download-mm');
// inject bitski connect button
const connectBtn = bitski.getConnectButton({ container: useBitskiBtn });
// set bitski post-login callback
connectBtn.callback = function () {
continueToApp();
};
if (window.ethereum) {
// Show use existing button
downloadMMBtn.style.display = 'none';
useExistingBtn.style.display = 'block';
// Add action
useExistingBtn.addEventListener('click', () => {
window.ethereum.enable().then(() => {
continueToApp();
});
});
}
});In some circumstances it might make sense to require a particular wallet. For example, maybe your dapp needs to be used in a native or cross-platform context. In these cases, you can simply ignore any injected providers and use Bitski.
const bitski = new Bitski('<YOUR-CLIENT-ID>', '<YOUR-REDIRECT-URL>');

await bitski.signIn();

const web3 = new Web3(window.ethereum);If you have a content security policy in place on your site, you will need to
enable exceptions for the SDK. The SDK requires connect-src in order to
connect to the Bitski API for loading wallet details, and script-src in order
to load the full SDK dynamically (this allows us to include a thin shim rather
than the full SDK until the user actually needs it).
-
connect-src:https://api.bitski.com -
script-src:https://cdn.bitskistatic.com
Bitski provides a “bug bounty” to engage with the security researchers in the community. If you have found a vulnerability in our product or service, please submit a vulnerability report to the Bitski security team.