![]()
alpinejs-ray
Debug your Alpine.js code with Ray to fix problems faster
This package can be installed into any project using Alpine.js to send messages to the Ray app.
Note: use version
^1.4of this package for Alpine v2, and^2.0for Alpine v3.
Installation
Installation via CDN (recommended)
The preferred way to use this package is to load it via CDN, which must be done before loading Alpine.
You must also load the axios library prior to loading alpinejs-ray and Alpine:
<script src="https://cdn.jsdelivr.net/npm/axios@latest/dist/axios.min.js"></script>
<script src="https://cdn.jsdelivr.net/npm/alpinejs-ray@2/dist/standalone.min.js"></script>
<script src="https://cdn.jsdelivr.net/npm/alpinejs@3/dist/cdn.min.js" defer>
Installation via Module Import
First, install alpinejs-ray with npm (or your preferred package manager):
npm install alpinejs-rayAlthough not the recommended way, you can import package normally, along with alpinejs and axios:
import Alpine from 'alpinejs';
import AlpineRayPlugin from 'alpinejs-ray';

window.axios = require('axios');
window.axios.defaults.headers.common['X-Requested-With'] = 'XMLHttpRequest';

window.Alpine = Alpine;

Alpine.plugin(AlpineRayPlugin);
Alpine.start();
Configuration
To configure alpinejs-ray, you must create an alpineRayConfig property on the window object before loading alpinejs-ray:
<script>
    window.alpineRayConfig = {
        logComponentsInit: true,
        logErrors: true,
        logEvents: ['abc'],
    };
</script>

<!-- load axios and alpinejs-ray -->| Name | Type(s) | Default | Description |
|---|---|---|---|
logComponentsInit |
boolean |
false |
Send info on component initializations to Ray |
logErrors |
boolean |
false |
Send javascript errors to Ray instead of the console |
logEvents |
boolean, array |
false |
Send specified custom events to Ray, or false to disable |
Usage
Once the plugin is installed, you may access the $ray() magic method within your components.
See the node-ray reference for a full list of available methods.
Directives
You may use the x-ray directive within your html markup to easily send data to Ray. The value of the directive must be a valid javascript expression.
<div x-data>
    <!-- sends 'hello world' and the value of the 'mystore.somevalue' Alpine store to Ray -->
    <div x-ray="'hello world'"></div>
    <div x-ray="$store.mystore.somevalue"></div>
</div>
The values for the x-ray directive are reactive; if the value changes, the new data will be sent to and displayed in Ray in-place.
The changed value will be momentarily highlighted in Ray as well to indicate that it was updated.
Example Components
<button @click="$ray('hello from alpine')">Send to Ray</button><div x-data="onClickData()">
<div x-show="show">Hi There Ray!</div>
<button x-on:click="toggle()">Show/Hide (Ray)</button>
</div>
<script>
function onClickData() {
return {
init() {
this.$ray().html('<strong>init on-click-ray data</strong>');
},
toggle() {
this.show = !this.show;
this.$ray('toggled show value to ' + (this.show ? 'true' : 'false'));
},
show: false,
};
}
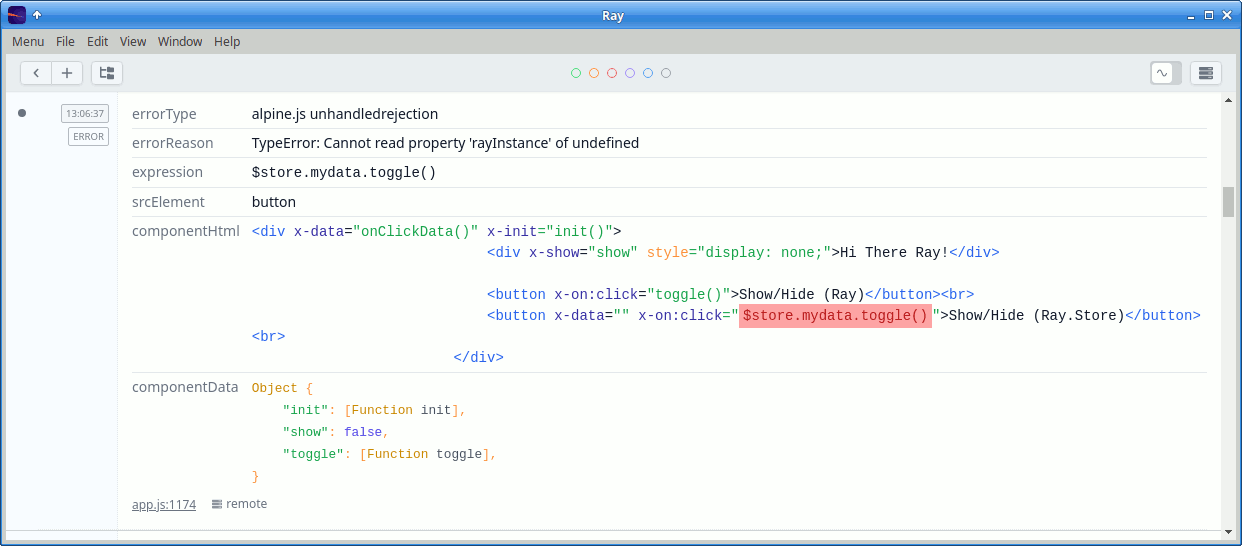
</script>Displaying errors
Errors can be automatically sent to Ray. The portion of the code that caused the error is highlighted.
Tracking Data Stores
You may automatically send Alpine stores to Ray whenever the store data is updated. Consider the following:
window.Alpine.store('mydata', {
    showing: false,
});

setInterval( () => {
    window.Alpine.store('mydata').showing = !window.Alpine.store('mydata').showing;
}, 3000);
To watch the store and display changes in Ray, use the $ray().watchStore('name') method:
<div x-data="componentData()">
    <div x-show="$store.mydata.showing">Hi There Ray!</div>
    <button x-on:click="toggle()">Show/Hide (Ray)</button>
</div>

<script>
window.Alpine.store('mydata', {
    showing: false,
});

function componentData() {
    return {
        init() {
            this.$ray().watchStore('mydata');
        },
        toggle() {
            this.$store.mydata.showing = !this.$store.mydata.showing;
        },
    };
}
</script>
Development Setup
For development of alpinejs-ray, clone the repository and install dependencies via npm:
npm installFinally, build all library files; they will be output to the dist directory.
npm run build:allTesting
alpinejs-ray uses Jest for unit tests. To run the test suite:
npm run testChangelog
Please see CHANGELOG for more information on what has changed recently.
Contributing
Please see CONTRIBUTING for details.
Security Vulnerabilities
Please review our security policy on how to report security vulnerabilities.
Credits
License
The MIT License (MIT). Please see License File for more information.