xeokit-convert

Use xeokit-convert to:
- Convert BIM and AEC models directly into XKT files for super fast loading into xeokit
- Generate XKT files with JavaScript
xeokit-convert replaces xeokit-gltf-to-xkt and xeokit-xkt-utils, which are deprecated.
CAUTION: Direct IFC conversion is an alpha status feature, since it depends on web-ifc, a 3rd-party library, which is also alpha at this time. As such, some IFC models may not convert properly. If this is the case for your models, consider using our standard conversion setup until issues have been resolved.

Contents
- Introduction
- Acknowledgements
- Resources
- Features
- Installing
- Components
-
Using
convert2xkt -
Using
XKTModel - Building
Introduction
xeokit-convert provides the means to convert 3D BIM and AEC models
into XKT files for super fast loading into xeokit, along with programming tools to generate XKT
files with JavaScript on Node.js.
The XKT format compresses large double-precision models to a compact payload that loads quickly over the Web into a xeokit viewer running in the browser. We can use xeokit-convert to convert several source formats into XKT, such as IFC, glTF and CityJSON.
Acknowledgements
Our thanks to the authors of these open source libraries, which we use internally within xeokit-convert:
- loaders.gl - Copyright (C) 2015 Uber Technologies, Inc. (MIT License)
- Basis Universal - Binomal LLC, (Apache 2 License)
- Pako - Copyright (C) 2014-2017 by Vitaly Puzrin and Andrei Tuputcyn (MIT License)
- earcut - Copyright (C) 2016, Mapbox (ISC License)
- web-ifc - Copyright (C) 2020-2021 web-ifc contributors (Mozilla Public License Version 2.0)
Resources
Features
- A Node-based CLI tool to convert various 3D model formats to XKT files.
- A JavaScript toolkit of components for loading, generating and saving XKT files.
Installing
npm i @xeokit/xeokit-convertIf you get RuntimeError: memory access out of bounds while converting IFC, then you'll need to compile the
3rd-party web-ifc WASM module for your system - see Building Binaries.
Components
The table below lists the components provided by xeokit-convert.
At the center of the toolkit, we've got the converter tool, provided as both a Node.js function and CLI executable.
Bundled with the converter, we've got the XKT document model, a bunch of loaders for different formats, and a function to serialize the document model to a BLOB. We use these components within the converter tool, and also provide them as part of the public API for extensibility.
| Component | Description |
|---|---|
|
convert2xkt (function) convert2xkt (Node script) |
A Node-based JavaScript function and CLI tool that converts various AEC model formats into xeokit's native, super-fast-loading XKT format. |
| XKTModel | A JavaScript document model that represents the contents of an XKT file in memory. Using this, we can programmatically build a document model in JavaScript, adding geometries, materials, objects etc, then serialize it to an XKT file. |
| parseIFCIntoXKTModel | Parses IFC data into an XKTModel. This is an alpha-status feature. |
| parseGLTFIntoXKTModel | Parses glTF into an XKTModel. Supports all glTF formats, along with textures. |
| parseGLTFJSONIntoXKTModel | Parses glTF JSON into an XKTModel. Our original lightweight glTF parser that does not support .glb and textures. |
| parseCityJSONIntoXKTModel | Parses CityJSON into an XKTModel
|
| parseLASIntoXKTModel | Parses LAS and LAZ into an XKTModel
|
| parseSTLIntoXKTModel | Parses STL into an XKTModel
|
| writeXKTModelToArrayBuffer | Serializes an XKTModel to an XKT file |
Using convert2xkt
The convert2xkt tool converts various model formats into xeokit's native XKT format, which is designed to load
super fast over the Web into a xeokit viewer. We provide this tool as both a CLI script and as
a function to use within
our own Node scripts.
node convert2xkt.js -h

Usage: convert2xkt [options]

Options:
  -v, --version           output the version number
  -s, --source [file]     path to source file
  -f, --format [string]   source file format (optional); supported formats are gltf, ifc, laz, las, pcd, ply, stl and cityjson
  -m, --metamodel [file]  path to source metamodel JSON file (optional)
  -i, --include [types]   only convert these types (optional)
  -x, --exclude [types]   never convert these types (optional)
  -r, --rotatex           rotate model 90 degrees about X axis (for las and cityjson)
  -g, --disablegeoreuse   disable geometry reuse (for ifc and gltf)
  -t, --textures          convert textures (for gltf)
  -o, --output [file]     path to target .xkt file; creates directories on path automatically if not existing
  -l, --log               enable logging
  -h, --help              display help for command

XKT version: 10
Converting an IFC file into an XKT file on the command line
Let's use the convert2xkt Node script to convert an IFC file to XKT on the command line.
node convert2xkt.js -s rme_advanced_sample_project.ifc -o rme_advanced_sample_project.ifc.xkt -l

[convert2xkt] Reading input file: rme_advanced_sample_project.ifc
[convert2xkt] Input file size: 35309.94 kB
[convert2xkt] Geometry reuse is enabled
[convert2xkt] Converting...
[convert2xkt] Converted to: XKT v9
[convert2xkt] XKT size: 1632.98 kB
[convert2xkt] Compression ratio: 21.62
[convert2xkt] Conversion time: 54.41 s
[convert2xkt] Converted metaobjects: 0
[convert2xkt] Converted property sets: 0
[convert2xkt] Converted drawable objects: 1986
[convert2xkt] Converted geometries: 3897
[convert2xkt] Converted triangles: 286076
[convert2xkt] Converted vertices: 547740
[convert2xkt] reuseGeometries: false
[convert2xkt] minTileSize: 10000
[convert2xkt] Writing XKT file: rme_advanced_sample_project.ifc.xkt
Viewing the XKT file with xeokit
Now that we've got an XKT file, we can now view it in the browser using a xeokit Viewer configured with an XKTLoaderPlugin .
import {Viewer, XKTLoaderPlugin} from
        "https://cdn.jsdelivr.net/npm/@xeokit/xeokit-sdk@1/dist/xeokit-sdk.es.min.js";

const viewer = new Viewer({
    canvasId: "myCanvas"
});

const xktLoader = new XKTLoaderPlugin(viewer);

const modelNode = xktLoader.load({
    id: "myModel",
    src: "./rme_sample_project.ifc.xkt"
});
Querying the XKT version in Node.js
From with a Node script, we can query which XKT version xeokit-convert currently generates:
const {XKT_INFO} = require("./dist/xeokit-convert.cjs.js");

const xktVersion = XKT_INFO.xktVersion; // Unsigned integer
console.log(`XKT version: ${xktVersion}`);
Converting an IFC file into an XKT file in Node.js
We can use the convert2xkt function from within our Nodejs scripts to programmatically convert files to XKT.
This is awesome for automated model conversion, and our performance test suite.
const convert2xkt = require("@xeokit/xeokit-convert/dist/convert2xkt.cjs.js");

convert2xkt({
    source: "rme_advanced_sample_project.ifc",
    output: "rme_advanced_sample_project.ifc.xkt",
    log: (msg) => {
        console.log(msg)
    }
}).then(() => {
    console.log("Converted.");
}, (errMsg) => {
    console.error("Conversion failed: " + errMsg)
});
Converting IFC file data into XKT data in Node.js
When using the convert2xkt function in our Node scripts, we can manage all file data in memory.
This is great for when we want more control over where we read and write the files.
const convert2xkt = require("@xeokit/xeokit-convert/dist/convert2xkt.cjs.js");
const fs = require('fs');

convert2xkt({
    sourceData: fs.readFileSync("rme_advanced_sample_project.ifc"),
    outputXKT: (xtkArrayBuffer) => {
        fs.writeFileSync("rme_advanced_sample_project.ifc.xkt", xtkArrayBuffer);
    }
}).then(() => {
    console.log("Converted.");
}, (errMsg) => {
    console.error("Conversion failed: " + errMsg)
});
Using XKTModel
XKTModel is a JavaScript class that represents the contents of an XKT file in memory.
It's a sort of XKT document model, with methods to build 3D objects within it, functions to import various model formats, and a function to serialize it to an XKT file.
We can use these tools to:
- programmatically XKT files,
- combine multiple models into an XKT file, from different formats,
- develop custom XKT converters, and
- extend
convert2xktto support more formats.
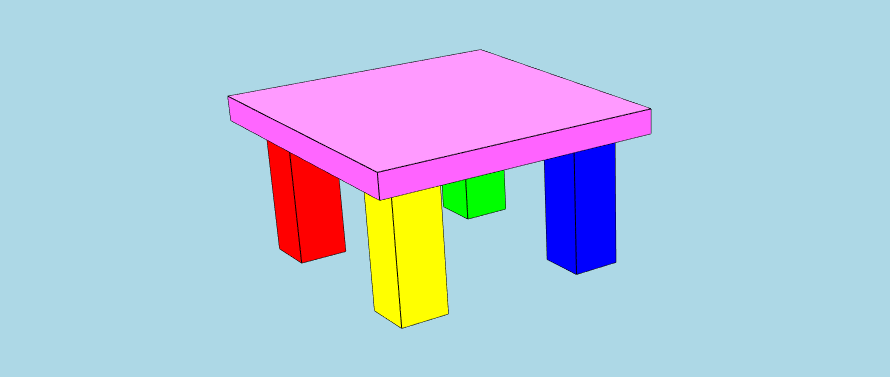
Programmatically Building an XKT File
To demonstrate the API, let's
use XKTModel 's
builder methods to programmatically build a model that resembles the screenshot below. Then we'll serialize
the XKTModel to an
ArrayBuffer, which we'll finally load that into a
xeokit Viewer
using XKTLoaderPlugin
.
We'll code this example to run in the browser, using the ES module in xeokit-convert.es.js. We could also code it to run on node, using the CommonJS module in xeokit-convert.cjs.js.
const {
    XKTModel,
    writeXKTModelToArrayBuffer
} = require("@xeokit/xeokit-convert/dist/xeokit-convert.cjs.js");
const fs = require('fs');

const xktModel = new XKTModel();

// Create metamodel - this part is optional

// Create property sets to hold info about the model

xktModel.createPropertySet({
    propertySetId: "tableTopPropSet",
    propertySetType: "Default",
    propertySetName: "Table Top",
    properties: [
        {
            id: "tableTopMaterial",
            type: "Default",
            name: "Table top material",
            value: "Marble"
        },
        {
            id: "tableTopDimensions",
            type: "Default",
            name: "Table top dimensions",
            value: "90x90x3 cm"
        }
    ]
});

xktModel.createPropertySet({
    propertySetId: "tableLegPropSet",
    propertySetType: "Default",
    propertySetName: "Table Leg",
    properties: [
        {
            id: "tableLegMaterial",
            type: "Default",
            name: "Table leg material",
            value: "Pine"
        },
        {
            id: "tableLegDimensions",
            type: "Default",
            name: "Table leg dimensions",
            value: "5x5x50 cm"
        }
    ]
});

// Create a hierarchy of metaobjects to describe the structure of the model

xktModel.createMetaObject({ // Root XKTMetaObject, has no XKTEntity
    metaObjectId: "table",
    metaObjectName: "The Table",
    metaObjectType: "furniture"
});

xktModel.createMetaObject({
    metaObjectId: "redLeg",
    metaObjectName: "Red Table Leg",
    metaObjectType: "furniturePart",
    parentMetaObjectId: "table",
    propertySetIds: ["tableLegPropSet"]
});

xktModel.createMetaObject({
    metaObjectId: "greenLeg",
    metaObjectName: "Green Table Leg",
    metaObjectType: "furniturePart",
    parentMetaObjectId: "table",
    propertySetIds: ["tableLegPropSet"]
});

xktModel.createMetaObject({
    metaObjectId: "blueLeg",
    metaObjectName: "Blue Table Leg",
    metaObjectType: "furniturePart",
    parentMetaObjectId: "table",
    propertySetIds: ["tableLegPropSet"]
});

xktModel.createMetaObject({
    metaObjectId: "yellowLeg",
    metaObjectName: "Yellow Table Leg",
    metaObjectType: "furniturePart",
    parentMetaObjectId: "table",
    propertySetIds: ["tableLegPropSet"]
});

xktModel.createMetaObject({
    metaObjectId: "pinkTop",
    metaObjectName: "The Pink Table Top",
    metaObjectType: "furniturePart",
    parentMetaObjectId: "table",
    propertySetIds: ["tableTopPropSet"]
});

// Create an XKTGeometry that defines a box shape, as a triangle mesh

xktModel.createGeometry({
    geometryId: "boxGeometry",
    primitiveType: "triangles", // Also "lines" and "points"
    positions: [
        1, 1, 1, -1, 1, 1, -1, -1, 1, 1, -1, 1, 1, 1, 1, 1, -1, 1, 1, -1, -1, 1, 1, -1, 1, 1, 1, 1, 1, -1, -1, 1,
        -1, -1, 1, 1, -1, 1, 1, -1, 1, -1, -1, -1, -1, -1, -1, 1, -1, -1, -1, 1, -1, -1, 1, -1, 1, -1, -1, 1, 1, -1,
        -1, -1, -1, -1, -1, 1, -1, 1, 1, -1
    ],
    normals: [ // Only for "triangles"
        0, 0, 1, 0, 0, 1, 0, 0, 1, 0, 0, 1, 1, 0, 0, 1, 0, 0, 1, 0, 0, 1, 0, 0, 0, 1, 0, 0, 1, 0, 0, 1, 0, 0, 1, 0,
        -1, 0, 0, -1, 0, 0, -1, 0, 0, -1, 0, 0, 0, -1, 0, 0, -1, 0, 0, -1, 0, 0, -1, 0, 0, 0, -1, 0, 0, -1, 0, 0,
        -1, 0, 0, -1
    ],
    indices: [
        0, 1, 2, 0, 2, 3, 4, 5, 6, 4, 6, 7, 8, 9, 10, 8, 10, 11, 12, 13, 14, 12, 14, 15, 16, 17, 18, 16, 18, 19,
        20, 21, 22, 20, 22, 23
    ]
});

// Create five XKTMeshes, which represent the table top and legs.
// Each XKTMesh has its own color, position, orientation and size,
// and uses the XKTGeometry to define its shape.
// An XKTGeometry can be used by multiple XKTMeshes.

xktModel.createMesh({
    meshId: "redLegMesh",
    geometryId: "boxGeometry",
    position: [-4, -6, -4],
    scale: [1, 3, 1],
    rotation: [0, 0, 0],
    color: [1, 0, 0],
    opacity: 1
});

xktModel.createMesh({
    meshId: "greenLegMesh",
    geometryId: "boxGeometry",
    position: [4, -6, -4],
    scale: [1, 3, 1],
    rotation: [0, 0, 0],
    color: [0, 1, 0],
    opacity: 1
});

xktModel.createMesh({
    meshId: "blueLegMesh",
    geometryId: "boxGeometry",
    position: [4, -6, 4],
    scale: [1, 3, 1],
    rotation: [0, 0, 0],
    color: [0, 0, 1],
    opacity: 1
});

xktModel.createMesh({
    meshId: "yellowLegMesh",
    geometryId: "boxGeometry",
    position: [-4, -6, 4],
    scale: [1, 3, 1],
    rotation: [0, 0, 0],
    color: [1, 1, 0],
    opacity: 1
});

xktModel.createMesh({
    meshId: "pinkTopMesh",
    geometryId: "boxGeometry",
    position: [0, -3, 0],
    scale: [6, 0.5, 6],
    rotation: [0, 0, 0],
    color: [1, 0, 1],
    opacity: 1
});

// Create five XKTEntities, which represent abstract, named objects in the model.
// Each XKTEntity has an XKTMesh.
// An XKTEntity can have multiple XKTMeshes.
// An XKTMesh can only belong to one XKTEntity.

xktModel.createEntity({
    entityId: "redLeg",
    meshIds: ["redLegMesh"]
});

xktModel.createEntity({
    entityId: "greenLeg",
    meshIds: ["greenLegMesh"]
});

xktModel.createEntity({
    entityId: "blueLeg",
    meshIds: ["blueLegMesh"]
});

xktModel.createEntity({
    entityId: "yellowLeg",
    meshIds: ["yellowLegMesh"]
});

xktModel.createEntity({
    entityId: "pinkTop",
    meshIds: ["pinkTopMesh"]
});
Once we've built
our XKTModel, we
need to finalize it. Then it's ready to use. Note that finalizing is an asynhronous operation, so we await its
completion before continuing.
await xktModel.finalize();Serializing the XKTModel to an ArrayBuffer
Next, we'll
use writeXKTModelToArrayBuffer
to serialize
our XKTModel to
an ArrayBuffer.
const xktArrayBuffer = writeXKTModelToArrayBuffer(xktModel);

fs.writeFileSync("./myModel.xkt", xktArrayBuffer);
Loading the ArrayBuffer into a Viewer
Let's now create a Viewer,
then load the ArrayBuffer into it using
an XKTLoaderPlugin
.
const viewer = new Viewer({
    canvasId: "myCanvas"
});

const xktLoader = new XKTLoaderPlugin(viewer);

const model = xktLoader.load({
    id: "myModel",
    src: "./myModel.xkt"
});
Finally, when the model has loaded, let's fit it in view.
model.on("loaded", () => {
    viewer.cameraFlight.flyTo(model);
});
Loading IFC into an XKTModel
Let's
use parseIFCIntoXKTModel
to import IFC into
an XKTModel.
As before, we'll also use the classes and functions introduced in the previous examples to serialize
the XKTModel to
an ArrayBuffer, then load it into
a Viewer.
const viewer = new Viewer({
    canvasId: "myCanvas"
});

const xktLoader = new XKTLoaderPlugin(viewer);

utils.loadArraybuffer("./assets/models/ifc/rac_advanced_sample_project.ifc", async (data) => {

        const xktModel = new XKTModel();

        parseIFCIntoXKTModel({data, xktModel, wasmPath: "../dist/"}).then(() => {

            xktModel.finalize().then(() => {

                const xktArrayBuffer = writeXKTModelToArrayBuffer(xktModel);

                xktLoader.load({
                    id: "myModel",
                    xkt: xktArrayBuffer,
                    edges: true
                });

                viewer.cameraFlight.flyTo(viewer.scene);
            });
        });
    },
    (errMsg) => {
    });
Loading LAS into an XKTModel
Let's
use parseLASIntoXKTModel
to import LAS into
an XKTModel.
As before, we'll also use the classes and functions introduced in the previous examples to serialize
the XKTModel to
an ArrayBuffer, then load it into
a Viewer.
const viewer = new Viewer({
    canvasId: "myCanvas"
});

const xktLoader = new XKTLoaderPlugin(viewer);

utils.loadArraybuffer("./assets/models/laz/indoor.0.1.laz", async (data) => {

        const xktModel = new XKTModel();

        parseLASIntoXKTModel({data, xktModel, rotateX: true}).then(() => {

            xktModel.finalize().then(() => {

                const xktArrayBuffer = writeXKTModelToArrayBuffer(xktModel);

                xktLoader.load({
                    id: "myModel",
                    xkt: xktArrayBuffer,
                    edges: true
                });

                viewer.cameraFlight.flyTo(viewer.scene);
            });
        });
    },
    (errMsg) => {
    });
Loading glTF into an XKTModel
Let's
use parseGLTFIntoXKTModel
to import glTF into
an XKTModel.
We'll also use the classes and functions introduced in the previous examples to serialize
the XKTModel to
an ArrayBuffer, then validate the ArrayBuffer and load it into
a Viewer.
const viewer = new Viewer({
    canvasId: "myCanvas"
});

const xktLoader = new XKTLoaderPlugin(viewer);

utils.loadArraybuffer("./assets/models/gltf/MAP/glTF-Embedded/MAP.gltf", (gltf) => {

        const xktModel = new XKTModel();

        parseGLTFIntoXKTModel({data: gltf, xktModel: xktModel}).then(() => {

            xktModel.finalize().then(() => {

                const xktArrayBuffer = writeXKTModelToArrayBuffer(xktModel);

                xktLoader.load({
                    id: "myModel",
                    xkt: xktArrayBuffer
                });

                viewer.cameraFlight.flyTo(viewer.scene);
            });
        });
    },
    (errMsg) => {
    });
Loading STL into an XKTModel
Let's
use parseSTLIntoXKTModel
to import STL into
an XKTModel.
As before, we'll also use the classes and functions introduced in the previous examples to serialize
the XKTModel to
an ArrayBuffer, then load it into
a Viewer.
const viewer = new Viewer({
    canvasId: "myCanvas"
});

const xktLoader = new XKTLoaderPlugin(viewer);

utils.loadArraybuffer("./assets/models/stl/binary/spurGear.stl", (json) => {

        const xktModel = new XKTModel();

        parseSTLIntoXKTModel({stlData: json, xktModel: xktModel}).then(() => {

            xktModel.finalize().then(() => {

                const xktArrayBuffer = writeXKTModelToArrayBuffer(xktModel);

                xktLoader.load({
                    id: "myModel",
                    xkt: xktArrayBuffer
                });

                viewer.cameraFlight.flyTo(viewer.scene);
            });
        });
    },
    (errMsg) => {
    });
Building
Building Binaries
Building the binaries in ./dist:
npm update
npm run build
This will build:
- ./dist/convert2xkt.cjs.js - Nodejs CLI converter tool
- ./dist/xeokit-convert.cjs.js - CommonJS module library of XKT classes and functions
- ./dist/xeokit-convert.es.js - ES module library of XKT classes and functions
- ./dist/web-ifc.wasm - 3rd-party web-ifc WASM module
Building the JavaScript API documentation in ./docs:
npm run docsRuntimeError: memory access out of bounds
With luck, the WASM module already be compiled appropriately for your target x86 system.
However, if you get this error:
RuntimeError: memory access out of boundsthen you will need to compile that WASM module for your target system. Please follow the instructions for that on the web-ifc project page, then replace ./dist/web-ifc.wasm with your compiled binary.
Building Tests
Install Firefox for Puppeteer:
PUPPETEER_PRODUCT=firefox npm i puppeteerRun the tests using Firefox:
npm build-tests