
![]()
A powerful RESTful Headless CMS written in Typescript using Express and Angular
JWT auth, Access-Control Lists (ACL), Uploads, MongoDB, Angular and Angular Material in one 📦
Made with
Table of contents
- Quick Start
- Features
- Cli Options
- Develop
- Basic API Routes
- Resource Permissions
- Coding Tips
- Structure
- Uploads
- Under The Hood
- Tests
- Debug
- Authors
- Copyright and license
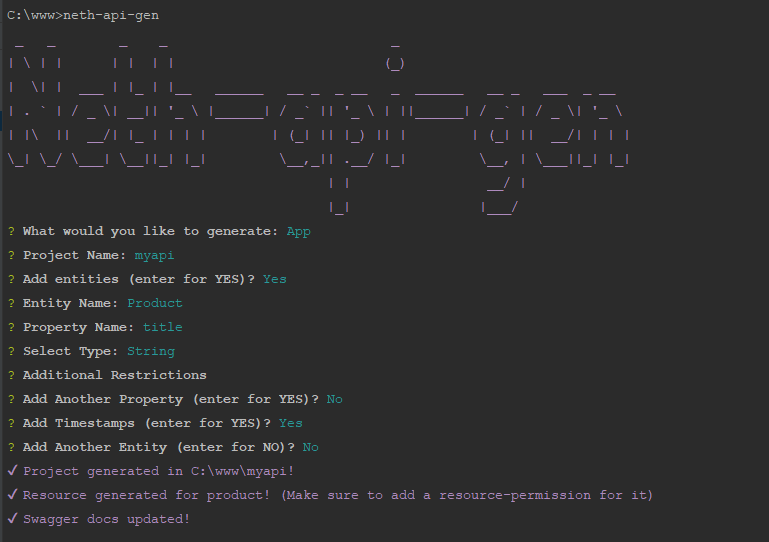
Quick Start
-
⚡ Npm install globally$ npm i -g @netherium/api-gen
-
🚀 Launch$ neth-api-gen
-
💻 Fill in choices
-
🙏 If you generated project, navigate and install dependenciesServer
$ cd myproject/server
$ npm install
$ copy `.env.sample` to `.env` and adjust credentials
$ npm run dev
Navigate to http://localhost:4000/api/auth/init to initialize app
Client
$ cd myproject/client
$ npm install
$ npm run start (or ng serve)
Navigate to http://localhost:4200 and login with your credentials

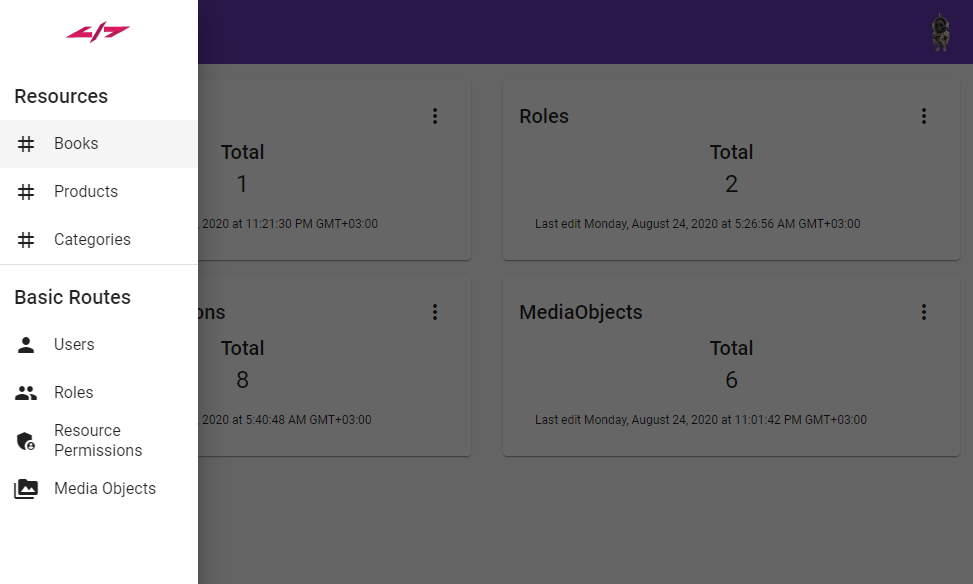
All resources are located in the sidenav under Resources
Features
- Typescript Intellisense Awesomeness throughout backend and UI
- Robust routing and middleware based on same principles of Express
- Solid modularized admin panel with Angular and Angular Material
- MongoDB integration
- Fuzzy search with 'mongoose-fuzzy-searching'
- Protected routes, ACL based with middleware, using
jwt-token - File Upload routes and thumbnail generator
- Test and Coverage
- REST API Documentation via swagger-ui-express
- Various helper files and tools, i.e. CORS integration, swagger.yaml, .env environment setup
- Several scripts for easy development and testing
Cli Options
-
💨 Gimmie my API!!!neth-api-gen- Select
app - Add entities according to your needs
- Get a production ready(
🤞 ) api + admin panel including basic routes + the entities you've added (ACL required) - Impress your team!
-
💡 I forgot to add...neth-api-gen- Select
entities - Add more entities to your existing neth-api-gen project, or a solid boilerplate for an ExpressJs/Angular project (modifications may apply)
- Go and play!
-
🕹️ I want more control and faster!!!neth-api-gen -i mysample.json- Import all the options from a json file, instead of a UI
- Do it once, do it many!
-
😕 But where is that JSON???neth-api-gen -s- Oh yeah, forgot to mention it
-
❓ Can you help???neth-api-gen -h- I can
generateApp: true, swaggerDocs is irrelevant, but you need to provide swaggerPath: "myproject/swagger.yaml"
Develop
-
🙏 If you generated project, navigate and install dependenciesServer
$ cd myproject/server
$ npm install
Client
$ cd myproject/client $ npm install -
🌲 Setup your environment files:Server
.env,.env.test,.env.production, according to.env.sample(under myproject/server)ADDRESS=localhost PORT=4000 MONGODB_URL=mongodb://localhost:27017/YOUDBNAMEHERE SECRET=YOURSECRETHERE ...
Client
environment.ts,environment.prod.ts(under myproject/client/environments)apiUrl: 'http://localhost:4000/api', // Endpoint of the server authorizedRole: ['Admin'] // Roles that have authorized access to admin panel ...
-
💨 DevelopServer
$ npm run dev
Client
$ npm run start (ng serve)
-
💡 Initialize: Navigate to http://localhost:4000/api/auth/init- 2 Roles will be created, 1 Admin, 1 Public
- 1 User will be created, based on your
.envcredentials - Resource permissions will be created for basic routes, with default access to admin Role
-
🚀 Build!Server
$ npm run build
Client
$ npm run build
-
🎆 Your build is ready to deploy !🎆
Basic Routes
The basic routes provided are listed below.
Each one of them is being reflected by its own route, controller, model
Auth
-
🔓 api/auth/register[POST] -
🔓 api/auth/login[POST] -
🔐 api/auth/profile[GET, PUT, DELETE] -
🔓 api/auth/init[GET]
Roles
-
🔐 api/roles[GET, GET/:id, POST, PUT/:id, DELETE/:id]
Resource-Permissions
-
🔐 api/resource-permissions[GET, GET/:id, POST, PUT/:id, DELETE/:id]
Users
-
🔐 api/users[GET, GET/:id, POST, PUT/:id, DELETE/:id]
Media-Objects
-
🔐 api/media-objects[GET, GET/:id, POST, PUT/:id, DELETE/:id]
Docs
-
🔓 api/docs[GET]
Root
-
🔓 /[GET]
Endpoints
-
🔐 api/endpoints[GET]
Books (Provided example Resource Route)
-
🔐 api/books[GET, GET/:id, POST, PUT/:id, DELETE/:id]
Resource Permissions
- Add a new route with Access-Control List (ACL) by invoking middleware function
Auth.getACL()I.e. filearticle.route.ts
    export class ArticleRoute {
      constructor() {
        this.router.get('/', Auth.getAcl(), controller.list);
        ...
        this.router.post('/', Auth.getAcl(), controller.create);
      }
}- Add the appropriate resource-permission for this resource for each method (
list,create, in this case) and for each method the roles that will have access to.
POST api/resource-permissions
{
    resourceName: 'articles',
    methods: [
        {
            name: 'list',
            roles: [PublicRoleId]
        },
        {
            name: 'create',
            roles: [AdminRoleId, RegisteredUserRoleId]
        }
    ]
}Coding Tips
Get Service
- Register any service in
server.ts, underregisterServicesfunction - Access it anywhere by destructuring it
const {uploadService} = req.app.get('services');
Get Authenticated User
- When a route is authenticated, you can access the authenticated user by
res.locals.authUser
Get Resource Permissions
- For optimization, resource-permissions are stored in
app.locals.resourcePermissions. If you update manually a resource (i.e. not via api call, but database manipulation), restart server or callAuth.updateAppPermissions()
Structure
Follow the structure below. It will keep things and your mind tidy
Server
.
├── dist                # Compiled files ready to deploy `npm run build`
├── uploads             # When using local provider this is where uploads go
│
├── src                 # Your code goes here
│   ├── routes          # Routes that define endpoints, methods, handlers and middleware
│   ├── controllers     # Controllers that handle functionality from routes
│   ├── models          # Mongoose models and typescript interfaces
│   ├── middleware      # Middleware functions
│   ├── services        # Services in OOP style that can be called in controllers
│   ├── helpers         # Exported functions that need no instantiation
│   └── server.ts       # Server entrypoint file
│
├── test                # Automated tests `npm run test`
│
├── swagger.yaml        # Swagger documentation (`api/docs`) defined in yaml format
├── LICENSE             # License file
└── README.md

Client
.
├── dist                            # Compiled files ready to deploy `npm run build`
│
├── src                             # Your code goes here
│   ├── app
│   │   ├── components              # Shared components throughout the Angular app
│   │   ├── models                  # Shared models throughout the Angular app
│   │   ├── services                # Shared core services throughout the Angular app
│   │   ├── dialogs                 # Shared dialogs
│   │   ├── modules                 # Lazy loaded modules, each generated resource corresponds to 1 module
│   │   └── app-routing.module.ts   # Routing module that binds all lazy loaded modules, each generated resource has a child under `childrenRoutes`
│   ├── assets                      # Static resources
│   ├── environments                # Angular environment configuration
│   ├── theming                     # Angular Material Theming Styles
│
... Rest Default Angular Structure
Uploads
- Uploads can be stored locally or remotely, see
.env - To upload a file
POST api/uploadswithContent-Type: multipart/form-data;or use Postman - Field
fileis the file data,altenativeText,captionare optional strings -
PUT api/uploads/:idacceptsContent-Type: application/json;as onlyaltenativeText,captioncan be modified - If file of image type, a thumbnail (80x80) will be generated
Under The Hood
-
When you generate an
App- an Express project based on Neth-express-api-ts is created
- an Angular project based on Neth-ng is created
-
When you generate an
Entity, multiple files are generated underserverandclientfolders Server- Controller, Model, Route files are generated under their corresponding folders
./server/src/controllers/entity.controller.ts, ./server/src/models/entity.model.ts, ./server/src/routes/entity.route.ts - An entry in
server.tsis created, under methodroutes
Client
- A module is created under its corresponding folder
./client/src/app/modules/entityfolder/... - An entry in
app-routing.module.tsis created, under variablechildrenRoutes
- Controller, Model, Route files are generated under their corresponding folders
Tests
- Server testing based on Mocha, chai and chai-http
- Client testing based on the default Angular test tools Jasmine (Tests not provided/generated for Angular, but you can follow standard Angular practices)
Run tests
Server
$ cd myproject/server
$ npm test
Client
$ cd myproject/client
$ npm test (or ng test)
Coverage
Server Coverage is based on nyc
Run coverage (generated under folder coverage)
$ npm run test:coverageDebug
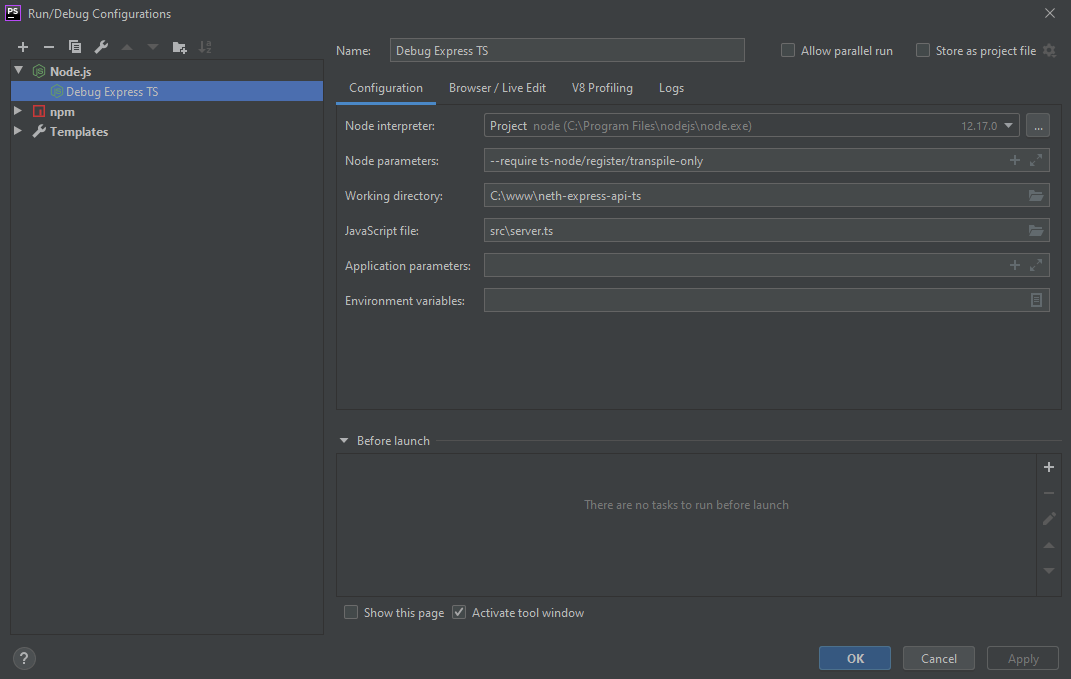
To debug TS without compiling it, you can setup your IDE of choice as in the example below
Note: Running older versions of node may require attaching --inspect before --require
Authors
Copyright and license
Code released under the MIT license