
@logisticinfotech/react-native-payfort-sdk
Getting started
$ npm install @logisticinfotech/react-native-payfort-sdk --save
Mostly automatic installation
$ react-native link @logisticinfotech/react-native-payfort-sdk
Manual installation
iOS
- In XCode, in the project navigator, right click
Libraries➜Add Files to [your project's name] - Go to
node_modules➜@logisticinfotech/react-native-payfort-sdkand addPayFort.xcodeproj - In XCode, in the project navigator, select your project. Add
libPayFort.ato your project'sBuild Phases➜Link Binary With Libraries - Run your project (
Cmd+R)<
Android
- Open up
android/app/src/main/java/[...]/MainActivity.java
- Add
import com.RNPayfortSdk.RNPayfortSdkPackage;to the imports at the top of the file - Add
new RNPayfortSdkPackage()to the list returned by thegetPackages()method
-
Append the following lines to
android/settings.gradle:include ':@logisticinfotech/react-native-payfort-sdk' project(':@logisticinfotech/react-native-payfort-sdk').projectDir = new File(rootProject.projectDir, '../node_modules/@logisticinfotech/react-native-payfort-sdk/android') -
Insert the following lines inside the dependencies block in
android/app/build.gradle:compile project(':@logisticinfotech/react-native-payfort-sdk')
Steps to follow before use
Android
- Download PayFort module file from here.
- Extract FORTSDKv1.5.zip.
- Open directory of android of your react native project in Android Studio.
- Click on File → New → New Module→ Select "Import .JAR/.AAR Packages" → Click on Next → Select FORTSDKv1.5.aar in File name → Click on Finish.
iOS
- Download PayFort SDK Module file from here.
- Extract PayFortSDK1.9.zip and open & copy PayFortSDK.bundle & PayFortSDK.framework to iOS directory of your project.
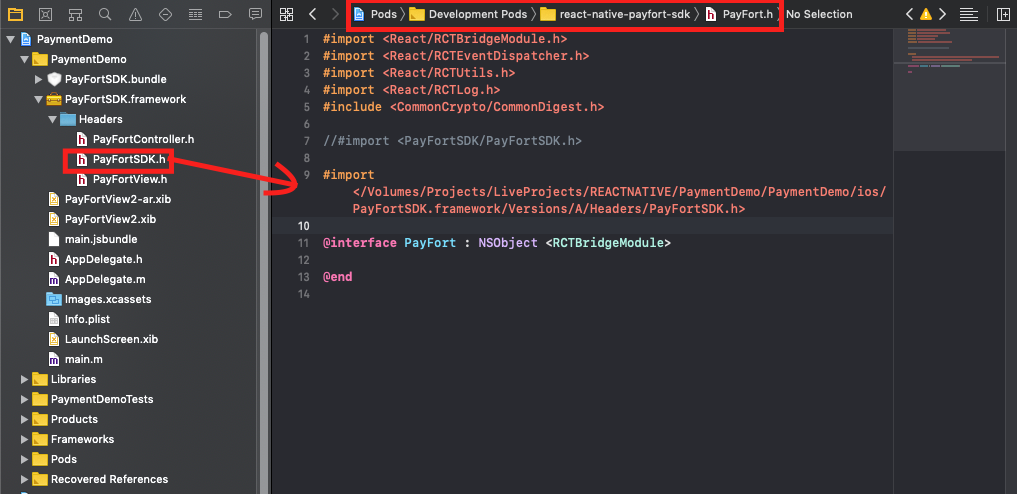
- Replace
#import <PayFortSDK/PayFortView.h>to#import "PayFortView.h"and replace#import <PayFortSDK/PayFortController.h>to#import "PayFortController.h"in PayFortSDK.framework → Headers → PayFortSDK.h - Copy path of PayFortSDK.h file from PayFortSDK.framework → Headers and add that path in Pods → Development Pods → react-native-payfort-sdk → PayFort.h as shown in screenshot
- Add
pod 'JVFloatLabeledTextField'in the pod file. - open iOS folder in terminal and run command "pod install" .

Usage
import { RNPayFort } from "@logisticinfotech/react-native-payfort-sdk/PayFortSDK/PayFortSDK";

onPay = async () => {
  await RNPayFort({
    command: "PURCHASE",
    access_code: "xxxxxxxxxxxxxxxxxx",
    merchant_identifier: "xxxxxxxxxx",
    sha_request_phrase: "xxxxxxxxxxxxxxxxxx",
    amount: 100,
    currencyType: "SAR",
    language: "en",
    email: "naishadh@logisticinfotech.co.in",
    testing: true,
  })
    .then((response) => {
      console.log(response);
    })
    .catch((error) => {
      console.log(error);
    });
};
Usage with sdk_token provided
import {
  getPayFortDeviceId,
  RNPayFort,
} from "@logisticinfotech/react-native-payfort-sdk/PayFortSDK/PayFortSDK";

getDeviceToken = async () => {
  getPayFortDeviceId().then(async (deviceId) => {
    await Axios.post("YOUR_WEB_URL_FOR_SDK_TOKEN_GENERATION", {
      deviceId: deviceId,
    })
      .then((response) => {
        this.setState({ sdk_token: response.data.sdk_token }, () => {
          this.onPay();
        });
      })
      .catch((error) => {
        console.log(error);
      });
  });
};

onPay = async () => {
  await RNPayFort({
    command: "PURCHASE",
    access_code: "xxxxxxxxxxxxxxxxxx",
    merchant_identifier: "xxxxxxxxxx",
    sha_request_phrase: "xxxxxxxxxxxxxxxxxx",
    amount: 100,
    currencyType: "SAR",
    language: "en",
    email: "naishadh@logisticinfotech.co.in",
    testing: true,
    sdk_token: this.state.sdk_token,
  })
    .then((response) => {
      console.log(response);
    })
    .catch((error) => {
      console.log(error);
    });
};
Note
There is no any difference between sdk_token provided and without provided.
-
In case if you are not providing sdk_token then it will call payfort sdk_token generation api automatically without any worries.
-
In case if you want to provide sdk_token manually then you have to first get deviceId from
getPayFortDeviceId()method and pass deviceId as parameter to payfort sdk_token generation api, response of that api will give you sdk_token. Provide that sdk_token to parameters as above example.

Note
-
Before sending the amount value of any transaction, you have to multiply the value with the currency decimal code according to ISO code 3. For example: If the amount value was 500 AED; according to ISO code 3, you should multiply the value with 100 (2 decimal points); so it will be sent in the request as 50000. Another example: If the amount value was 100 JOD; according to ISO code 3, you should multiply the value with 1000 (3 decimal points); so it will be sent in the request as 100000.
-
If you have unique merchant_reference then you can add to parameter, else system will generate unique merchant_reference by its own.
Basic properties
| Parameter Name | Type | Mandatory | Description | Length | Special Characters | Possible/ Expected Values | Example |
|---|---|---|---|---|---|---|---|
| command | Alpha | Command | 20 | "AUTHORIZATION" or "PURCHASE" | |||
| access_code | Alphanumeric | This will be your unique access_code provided by payfort console. | |||||
| merchant_identifier | Alphanumeric | This will be your unique merchant_identifier provided by payfort console. | |||||
| sha_request_phrase | Alphanumeric | This will be your unique sha_request_phrase provided by payfort console. | |||||
| amount | Numeric | The transaction's amount. *Each currency has predefined allowed decimal points that should be taken into consideration when sending the amount. | 10 | 10000 | |||
| currency | Alpha | The currency of the transaction’s amount in ISO code 3. | 3 | AED | |||
| language | Alpha | The checkout page and messages language. | 2 | "en" or "ar" | |||
| customer_email | Alphanumeric | The customer's email. | 254 | _ - . @ | customer@domain.com | ||
| testing | Boolean | Testing or Production | "true" or "false" | ||||
| merchant_reference | Alphanumeric | The Merchant’s unique order number. | 40 | _ - . | XYZ9239-yu898 | ||
| token_name | Alphanumeric | The Token received from the Tokenization process. | 100 | _ - . @ | Op9Vmp | ||
| sdk_token | Alphanumeric | You can provide if you have sdk_token already generated from payfort api from your server side. Note: For this you will have to first generate deviceID from given method getPayFortDeviceId(), then provide deviceId as parameter for payfort sdk_token generation api. |
|||||
| payment_option | Alpha | Payment option. | 10 | "MASTERCARD" or "VISA" or "AMEX" or "MADA (for Purchase operations and eci Ecommerce only)" or "MEEZA (for Purchase operations and ECOMMERCE eci only)" | |||
| eci | Alpha | E-commerce indicator. | 16 | ECOMMERCE | |||
| order_description | Alphanumeric | A description of the order. | 150 | # ' / . _ - : $ Space | iPhone 6-S | ||
| customer_ip | Alphanumeric | It holds the customer's IP address. *It's Mandatory, if the fraud service is active. | 45 | . | 192.178.1.10 | ||
| customer_name | Alpha | The customer's name. | 40 | _ \ / - . , | John Smith | ||
| phone_number | Alphanumeric | The customer’s phone number. | 19 | + - ( ) Space | 0096279 7219966 | ||
| settlement_reference | Alphanumeric | The Merchant submits this value to the FORT. The value is then passed to the Acquiring bank and displayed to the merchant in the Acquirer settlement file. | 34 | . - _ | XYZ9239-yu898 | ||
| merchant_extra | Alphanumeric | Extra data sent by merchant. Will be received and sent back as received. Will not be displayed in any report. | 999 | . ; / _ - , ' @ | JohnSmith | ||
| merchant_extra1 | Alphanumeric | Extra data sent by merchant. Will be received and sent back as received. Will not be displayed in any report. | 250 | . ; / _ - , ' @ | JohnSmith | ||
| merchant_extra2 | Alphanumeric | Extra data sent by merchant. Will be received and sent back as received. Will not be displayed in any report. | 250 | . ; / _ - , ' @ | JohnSmith | ||
| merchant_extra3 | Alphanumeric | Extra data sent by merchant. Will be received and sent back as received. Will not be displayed in any report. | 250 | . ; / _ - , ' @ | JohnSmith | ||
| merchant_extra4 | Alphanumeric | Extra data sent by merchant. Will be received and sent back as received. Will not be displayed in any report. | 250 | . ; / _ - , ' @ | JohnSmith |
Methods
getPayFortDeviceToken() : For generate deviceId to provide as parameter in sdk_token generation api.
RNPayFort(parameters) : For payment procedure.
Test Card Details
You want to test a transaction but you don’t have a credit card or user credentials for our other payments options? Well we’ve got your back, here you can find card numbers for any type of test you wish to do.
Credit Cards
| Card type | Number | Expiry date | CVV / CVC |
|---|---|---|---|
| Visa | 4005550000000001 | 05/21 | 123 |
| MasterCard | 5123456789012346 | 05/21 | 123 |
| AMEX | 345678901234564 | 05/21 | 1234 |
3-D Secure Credit Cards
| Card type | Number | Expiry date | CVV / CVC |
|---|---|---|---|
| Visa | 4557012345678902 | 05/21 | 123 |
| MasterCard | 5313581000123430 | 05/21 | 123 |
| AMEX | 374200000000004 | 05/21 | 1234 |
Local Payment Methods
| Payment option | Number | Expiry date | CVV / CVC |
|---|---|---|---|
| Knet | 0000000001 | 05/17 | 1234 |
| Payment option | Number | Expiry date | OTP | Pin |
|---|---|---|---|---|
| Naps | 4215375500883243 | 06/17 | 1234 | 1234 |
| Payment option | Payment ID | Password | OTP |
|---|---|---|---|
| Sadad | sadadOlpTest | 1234 | 112358 |
| Payment option | Number | Card type |
|---|---|---|
| E-dirham | 4724439901004942 | Gold Card |
Digital Wallets
| Payment option | Number | Expiry date | CVV / CVC |
|---|---|---|---|
| MasterPass | 4000000000000002 | 05/21 | 123 |
| Visa Checkout | 4000000000000002 | 05/21 | 123 |