
React Native JitsiMeet
React Native Wrapper for Jitsi Meet SDK.
Install
yarn add @bortolilucas/react-native-jitsimeet

or

npm i --save @bortolilucas/react-native-jitsimeet
Usage
The package can be invoked in two modes
- As a new Activity/UIViewController on top of RN Application
- As a RN View
import JitsiMeet, { JitsiMeetView } from '@bortolilucas/react-native-jitsimeet';
import React, { useState } from 'react';
import { StyleSheet, View, Pressable, Text } from 'react-native';

const conferenceOptions = {
  room: 'ReactNativeJitsiRoom',
  userInfo: {
    displayName: 'React Native Jitsi Meet Example',
    email: 'example@test.com',
    avatar: 'https://picsum.photos/200',
  },
  featureFlags: {
    'live-streaming.enabled': false,
  },
};

function App() {
  const [showJitsiView, setShowJitsiView] = useState(false);

  const startJitsiAsNativeController = async () => {
    /*
      Mode 1 - Starts a new Jitsi Activity/UIViewController on top of RN Application (outside of JS).
      It doesn't require rendering JitsiMeetView Component.
    */

    await JitsiMeet.launchJitsiMeetView(conferenceOptions);

    /*
      Note:
        JitsiMeet.launchJitsiMeetView will return a promise, which is resolved once the conference is terminated and the JitsiMeetView is dismissed.
    */
  };

  /*
    The localParticipant leaves the current conference.
  */
  const hangUp = () => {
    JitsiMeet.hangUp();
  };

  if (showJitsiView) {
    /* Mode 2 - Starts Jitsi as a RN View */

    return (
      <JitsiMeetView
        style={styles.jitsiMeetView}
        options={conferenceOptions}
        onConferenceTerminated={(_) => setShowJitsiView(false)}
        onConferenceJoined={(e) => console.log(e.nativeEvent)}
        onConferenceWillJoin={(e) => console.log(e.nativeEvent)}
      />
    );
  }

  return (
    <View style={styles.container}>
      <Pressable
        onPress={startJitsiAsNativeController}
        style={({ pressed }) => [
          styles.pressable,
          { opacity: pressed ? 0.5 : 1 },
        ]}
      >
        <Text style={styles.pressableText}>
          Start Jitsi on top of RN Application
        </Text>
      </Pressable>
      <Pressable
        onPress={() => setShowJitsiView(true)}
        style={({ pressed }) => [
          styles.pressable,
          { opacity: pressed ? 0.5 : 1 },
        ]}
      >
        <Text style={styles.pressableText}>Start Jitsi as a RN View</Text>
      </Pressable>
    </View>
  );
}

const styles = StyleSheet.create({
  container: {
    flex: 1,
    alignItems: 'center',
    justifyContent: 'center',
  },
  pressable: {
    width: '80%',
    borderRadius: 15,
    height: 50,
    marginVertical: 10,
    justifyContent: 'center',
    alignItems: 'center',
    backgroundColor: 'blue',
  },
  pressableText: {
    fontSize: 17,
    fontWeight: 'bold',
    textAlign: 'center',
    color: '#fff',
  },
  jitsiMeetView: {
    flex: 1,
  },
});

export default App;
See Options for further information.
iOS install
1.) This library uses Swift code, so make sure that you have created the Objective-C bridging header file.
If not, open your project in Xcode and create an empty Swift file.
Xcode will ask if you wish to create the bridging header file, please choose yes.
For more information check Create Objective-C bridging header file.
2.) Replace the following code in AppDelegate.m (ONLY required for mode 1. If you're using mode 2, skip this step):
UIViewController *rootViewController = [UIViewController new];
rootViewController.view = rootView;
self.window.rootViewController = rootViewController;
with this one
UIViewController *rootViewController = [UIViewController new];
UINavigationController *navigationController = [[UINavigationController alloc]initWithRootViewController:rootViewController];
navigationController.navigationBarHidden = YES;
rootViewController.view = rootView;
self.window.rootViewController = navigationController;
This will create a navigation controller to be able to navigate between the Jitsi component and your react native screens.
3.) Add the following lines to your Info.plist
<key>NSCameraUsageDescription</key>
<string>Camera Permission</string>
<key>NSMicrophoneUsageDescription</key>
<string>Microphone Permission</string>
<key>NSCalendarUsageDescription</key>
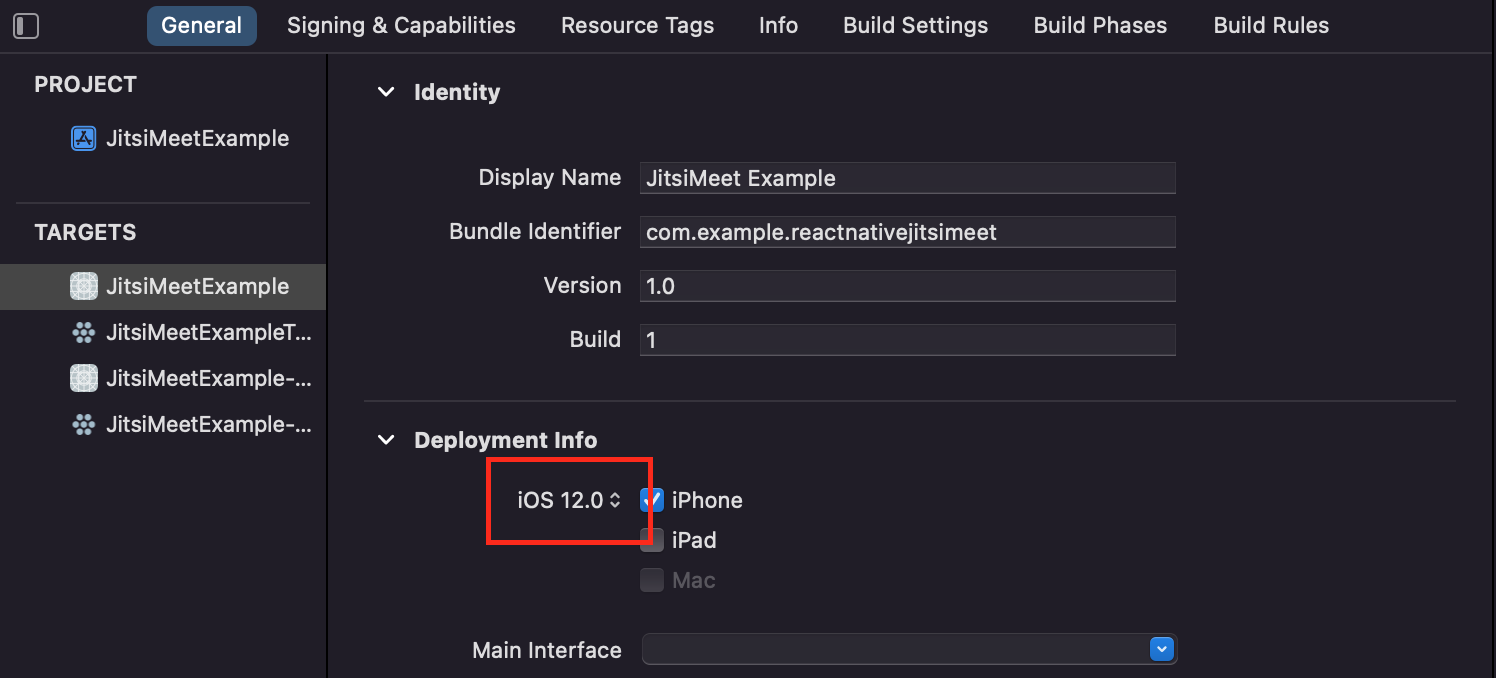
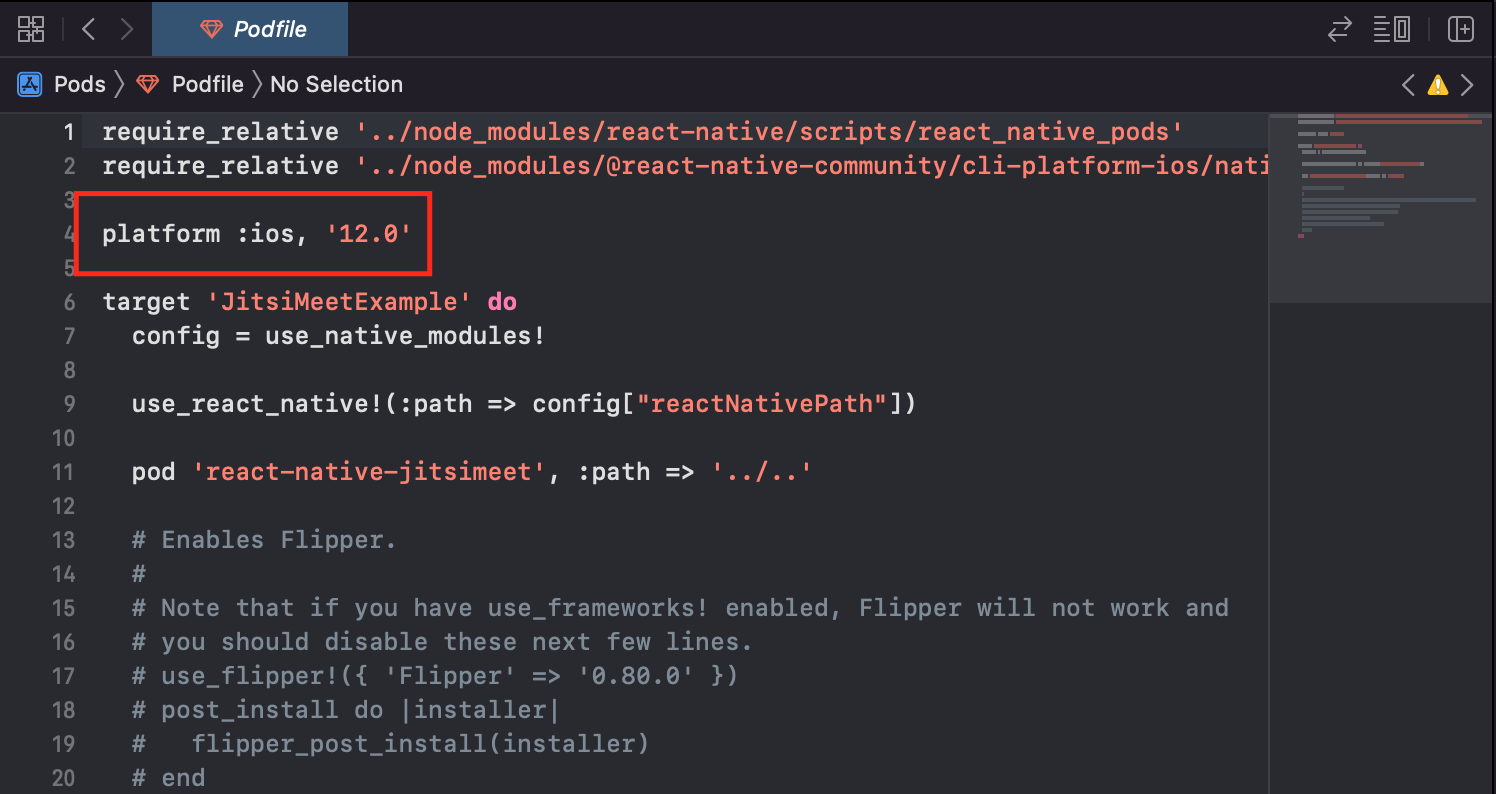
<string>Calendar Permission</string>4.) Modify your platform version in Podfile and Xcode to have platform version 12.0 or above.
5.) In Xcode, under Build settings set Enable Bitcode to No and Always Embed Swift Standard Libraries to Yes.
6.) In Xcode, under Signing & Capabilities add the capability Background Modes and check Voice over IP. Otherwise, it won't work well in background.
7.) Clean your project and run npx pod-install.
Android install
1.) In android/app/build.gradle, add/replace the following lines:
project.ext.react = [
    entryFile: "index.js",
    bundleAssetName: "app.bundle",
    ...
]
2.) In android/app/src/main/java/com/xxx/MainApplication.java add/replace the following methods:
  import androidx.annotation.Nullable; // <--- Add this line if not already existing
  ...
    @Override
    protected String getJSMainModuleName() {
      return "index";
    }

    @Override
    protected @Nullable String getBundleAssetName() {
      return "app.bundle";
    }
3.) In android/build.gradle, add the following code
allprojects {
    repositories {
        mavenLocal()
        jcenter()
        maven {
            // All of React Native (JS, Obj-C sources, Android binaries) is installed from npm
            url "$rootDir/../node_modules/react-native/android"
        }
        maven {
            url "https://maven.google.com"
        }
        maven { // <---- Add this block
            url "https://github.com/jitsi/jitsi-maven-repository/raw/master/releases"
        }
        maven { url "https://jitpack.io" }
    }
}
4.) In the <application> section of android/app/src/main/AndroidManifest.xml, add (ONLY required for mode 1. If you're using mode 2, skip this step)
<activity
    android:configChanges="keyboard|keyboardHidden|orientation|screenLayout|screenSize|smallestScreenSize"
    android:launchMode="singleTask"
    android:resizeableActivity="true"
    android:supportsPictureInPicture="true"
    android:windowSoftInputMode="adjustResize"
    android:name="com.reactnativejitsimeet.JitsiMeetActivityExtended">
</activity>
5.) And set your minSdkVersion to be at least 24.
buildscript {
    ext {
        buildToolsVersion = "29.0.3"
        minSdkVersion = 24 // <-- this line
        compileSdkVersion = 29
        targetSdkVersion = 29
        ndkVersion = "20.1.5948944"
    }
    ...
}
6.) Remove allow back up from Androidmanifest.xml
<manifest xmlns:android="http://schemas.android.com/apk/res/android"
  package="com.sdktest">

    <uses-permission android:name="android.permission.INTERNET" />

    <application
      android:name=".MainApplication"
      android:label="@string/app_name"
      android:icon="@mipmap/ic_launcher"
      android:roundIcon="@mipmap/ic_launcher_round"
      android:allowBackup="false" <-- this line
      android:theme="@style/AppTheme">
      <activity
        android:name=".MainActivity"
        android:label="@string/app_name"
        android:configChanges="keyboard|keyboardHidden|orientation|screenSize|uiMode"
        android:launchMode="singleTask"
        android:windowSoftInputMode="adjustResize">
        <intent-filter>
            <action android:name="android.intent.action.MAIN" />
            <category android:name="android.intent.category.LAUNCHER" />
        </intent-filter>
      </activity>
    </application>
</manifest>
Options
| key | Data type | Default | Description |
|---|---|---|---|
| room | string | required | Room name for Jitsi Meet |
| serverUrl | string | https://meet.jit.si | Valid server URL |
| token | string | "" | JWT token |
| userInfo | object | {} | Object that contains information about the participant starting the meeting. See UserInfo |
Feature Flags
For a full list of Feature Flags, see the Jitsi Docs.
For examples on how to set feature flags, see the usage example above.
UserInfo
| key | Data type | Default | Description |
|---|---|---|---|
| displayName | string | "" | Participant's name |
| string | "" | Participant's e-mail | |
| avatar | string | "" | Participant's avatar URL |
Screen Sharing
It is already enabled by default on Android.
On iOS it requires a few extra steps. Set the flag screenSharingEnabled to true and follow this tutorial Screen Sharing iOS to get it working.
Instructions to run the example app
1.) Clone this project
git clone https://github.com/bortolilucas/react-native-jitsimeet.git2.) Navigate to the project folder
cd react-native-jitsimeet3.) Install dependencies
yarn4.) Run app
yarn example ios

or

yarn example android
Troubleshooting
If your having problems with duplicate_classes errors, try exclude them from the react-native-jitsimeet project implementation with the following code:
implementation(project(':bortolilucas_react-native-jitsimeet')) {
  // Un-comment below if using hermes
  exclude group: 'com.facebook',module:'hermes'
  // Un-comment any packages below that you have added to your project to prevent `duplicate_classes` errors
  exclude group: 'com.facebook.react',module:'react-native-locale-detector'
  exclude group: 'com.facebook.react',module:'react-native-vector-icons'
  // exclude group: 'com.facebook.react',module:'react-native-community-async-storage'
  // exclude group: 'com.facebook.react',module:'react-native-community_netinfo'
  // exclude group: 'com.facebook.react',module:'react-native-svg'
  // exclude group: 'com.facebook.react',module:'react-native-fetch-blob'
  // exclude group: 'com.facebook.react',module:'react-native-webview'
  // exclude group: 'com.facebook.react',module:'react-native-linear-gradient'
  // exclude group: 'com.facebook.react',module:'react-native-sound'
}