React Native Share Extension
This is a helper module which brings react native as an engine to drive share extension for your app.
Installation
Installation should be very easy by just installing it from npm.
npm install react-native-share-extension --saveSetup
The setup requires a little bit more work. I will try to describe as detail as possible. I would love to use rnpm so I will welcome pull request.
iOS
- Click on your project's name
- Click on
+sign
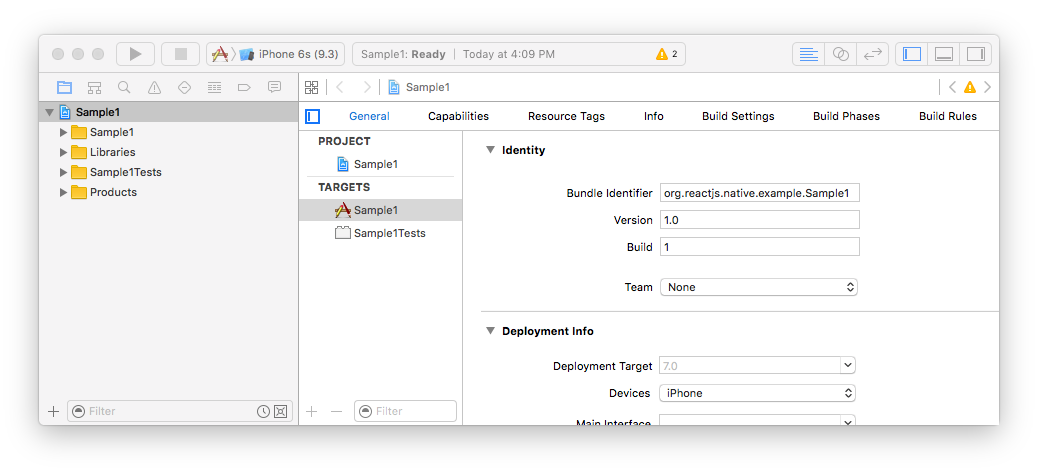
- Select
Share ExtensionunderiOS > Application Extension

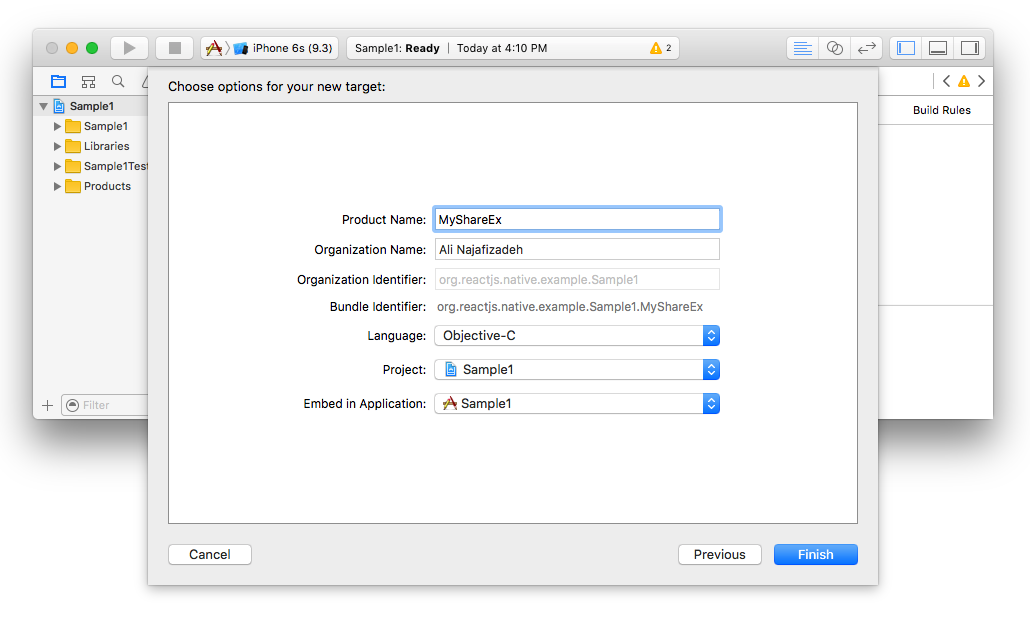
- Select a name for your new share extension, in my case I chose
MyShareEx
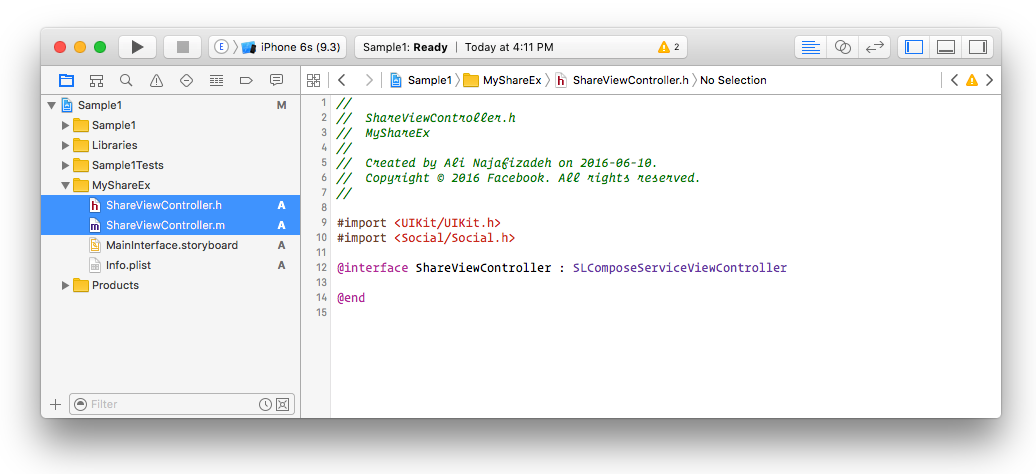
- Delete both
ShareViewController.handShareViewController.m. make sure to click on theMove to Trashbutton during deletion.
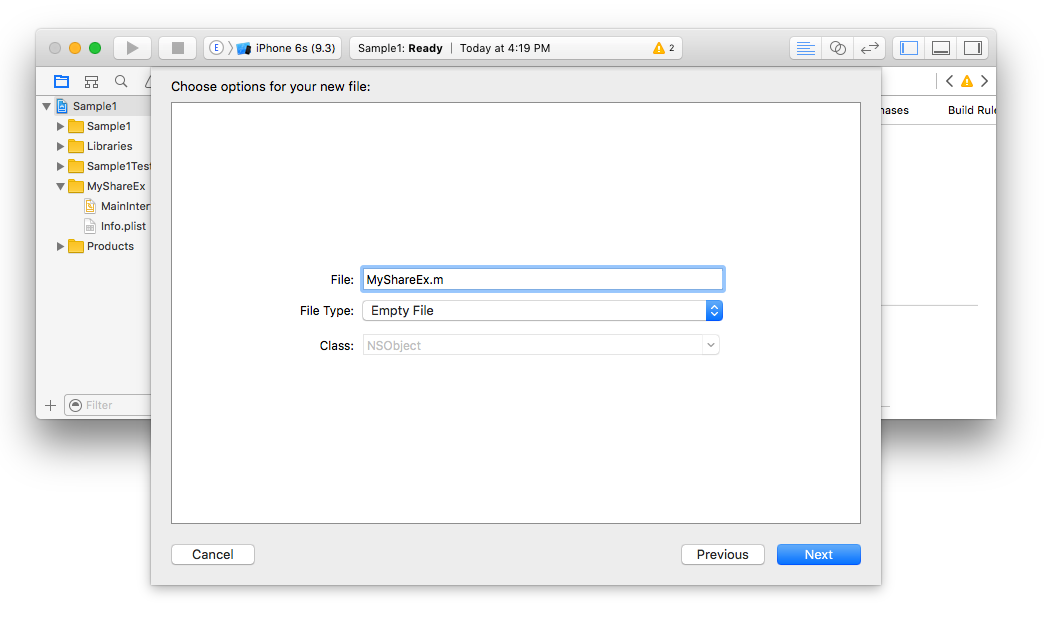
- Create a new file under your share extension group, in my case it was
MyShareEx
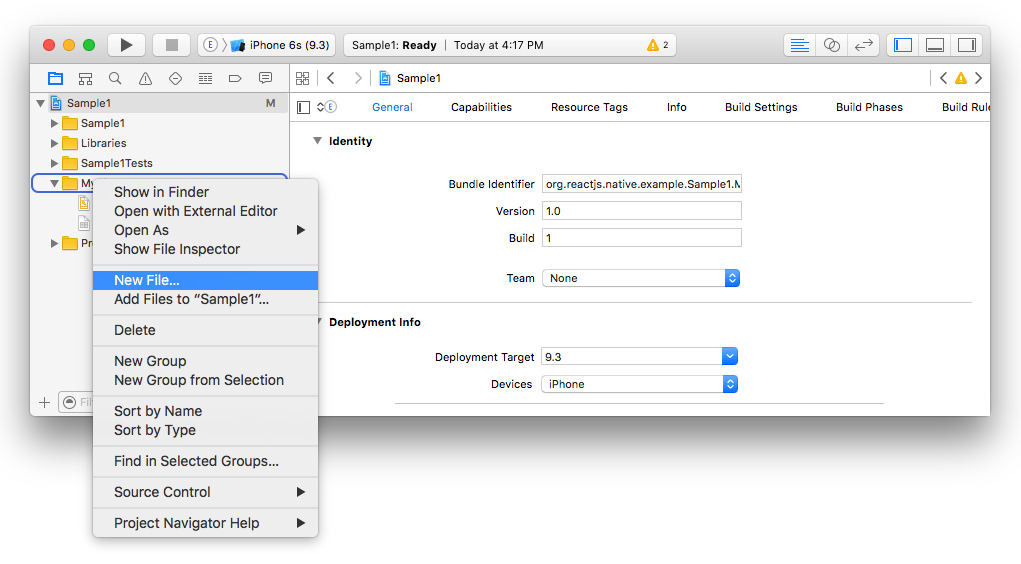
- Make sure that the type of that object is
Objective-C File, e.g. forMyShareExname itMyShareEx.m

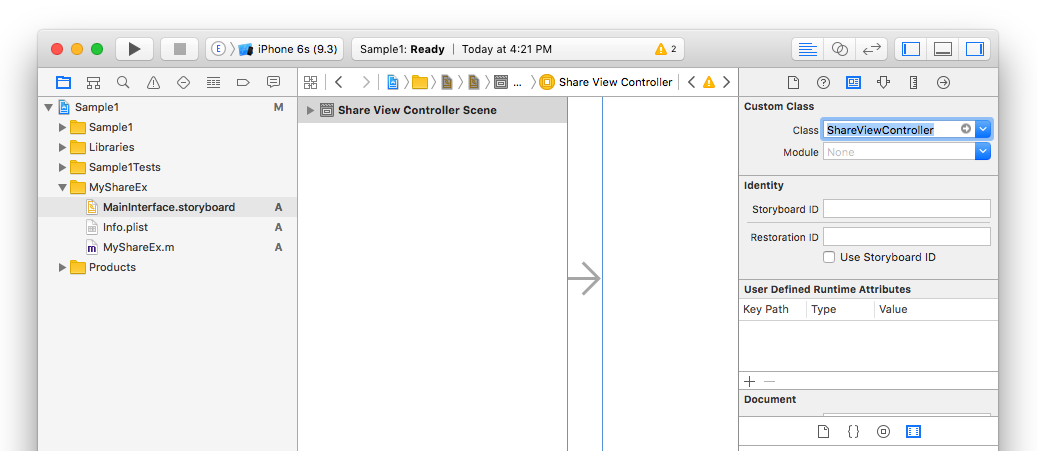
- Since we deleted
ShareViewController.m, we need to tell the storyboard of your share extension where the view needs to be loaded. So click onMainInterface.storyboardand replace the class field fromShareViewControllerto whatever you chose above (in my caseMyShareEx)
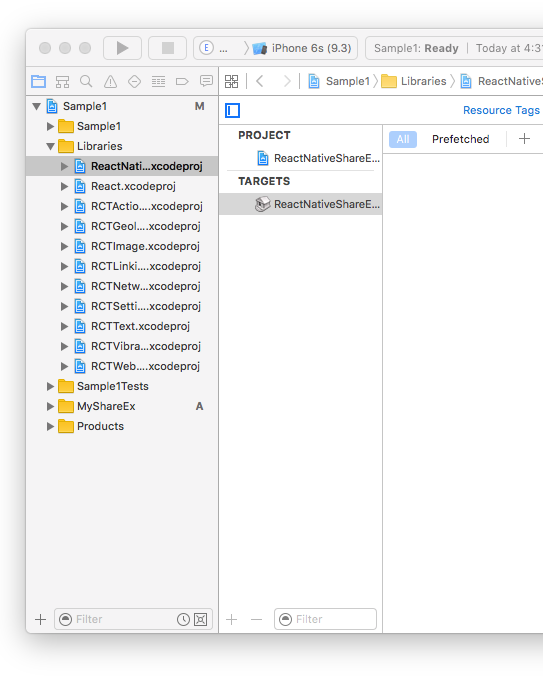
- Now it's time to add our library. Right click on the
Librariesgroup and selectAdd Files to "Sample1"...

- select
node_modules>react-native-share-extension>ios>ReactNativeShareExtension.xcodeproj
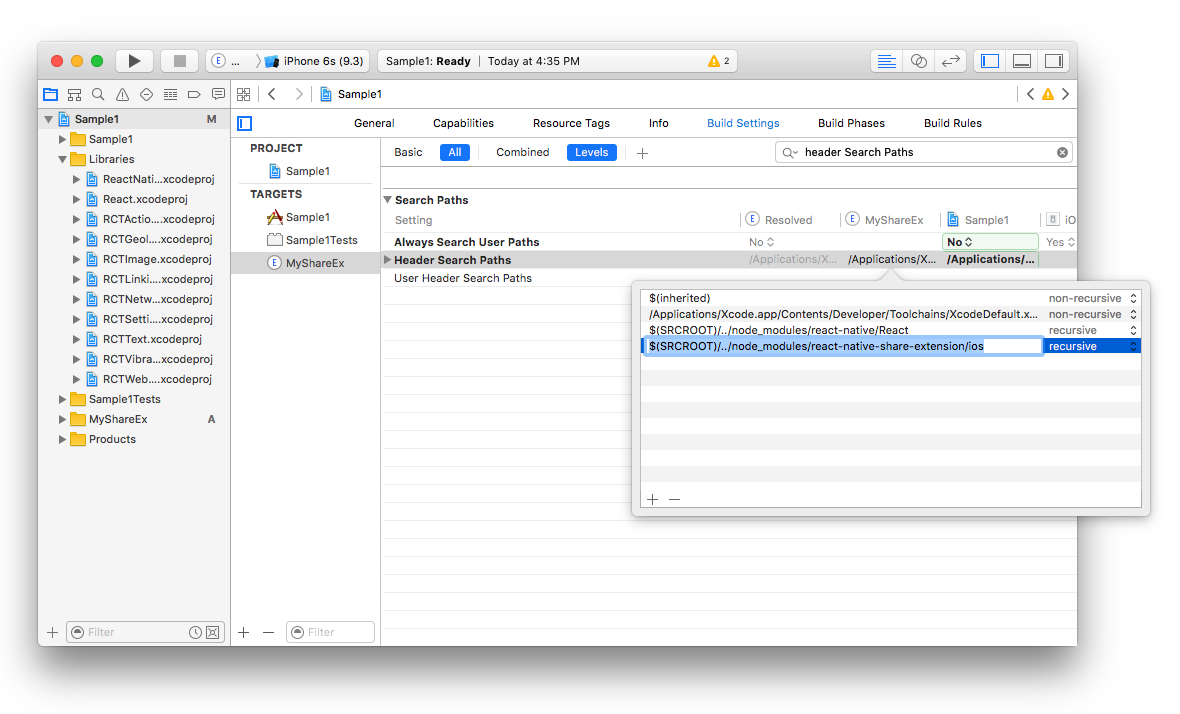
- Now we need to tell the share extension that we want to read new header files. Click on project name (in my case
Sample1), then click on your extension name (in my caseMyShareEx). After that click on Build Settings and search forHeader Search Paths
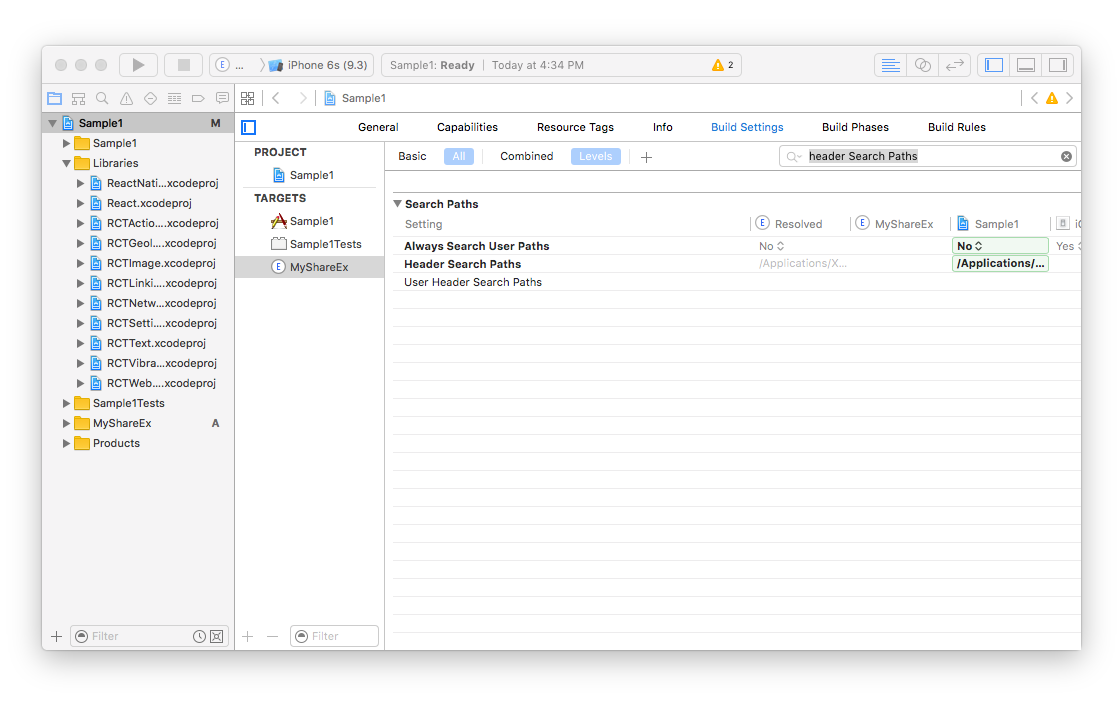
- Add the new path
$(SRCROOT)/../node_modules/react-native-share-extension/ioswithrecursiveselected
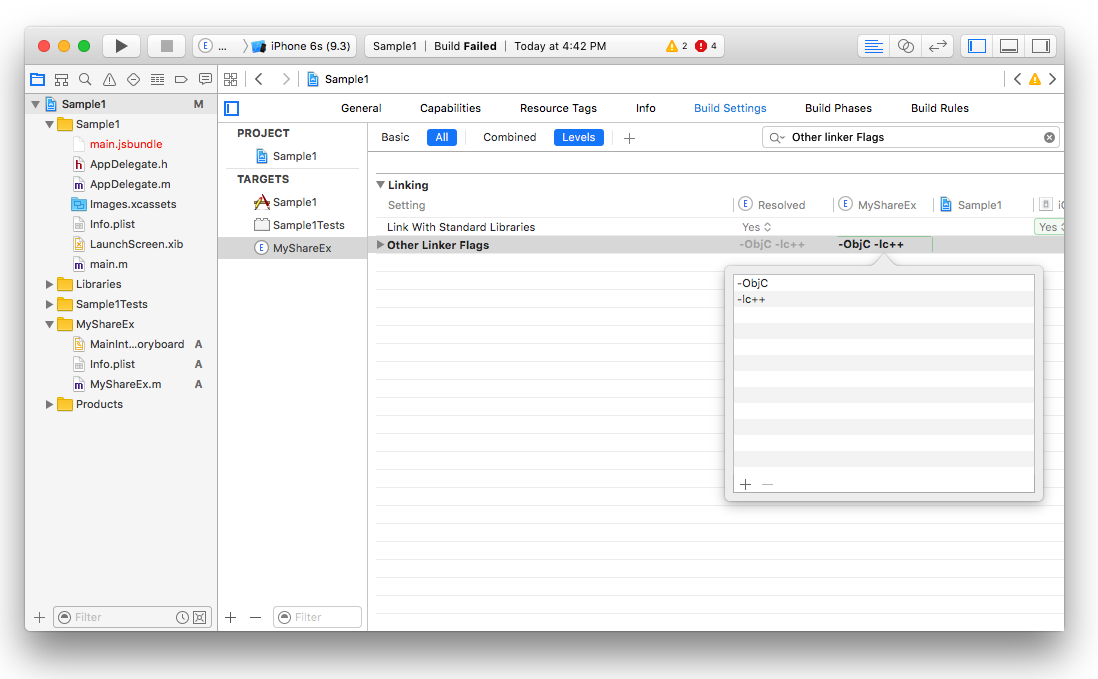
- We need to add some linker flags as well, so search for
Other Linker Flagsand add-ObjCand-lc++
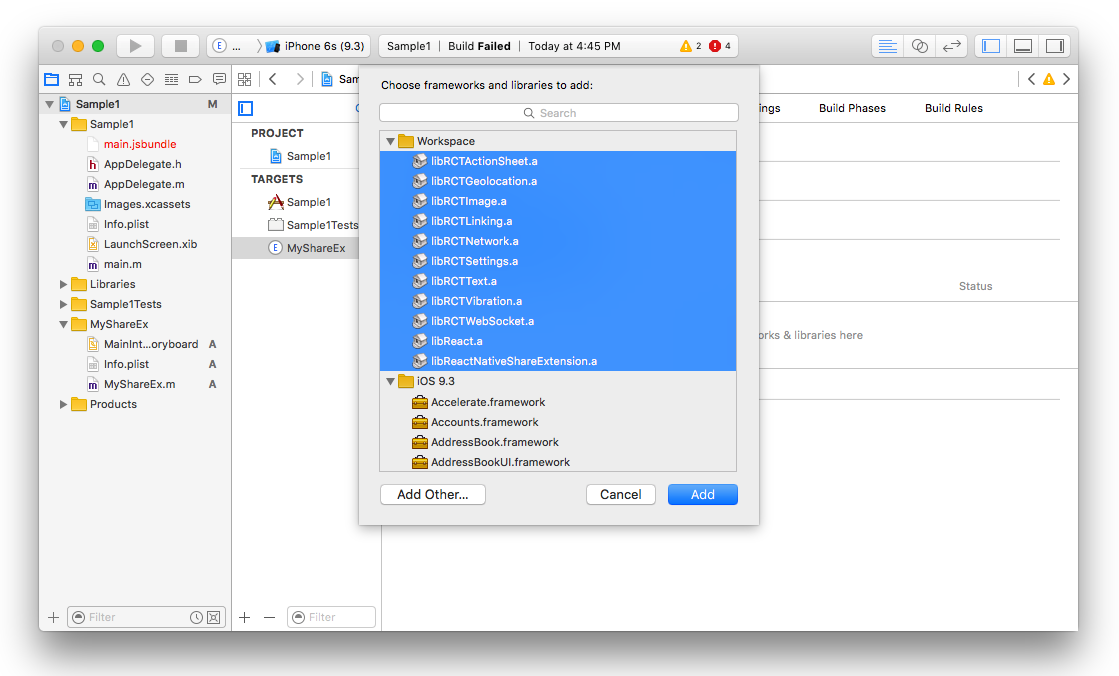
- We also need to add all the static libraries such as
ReactandReact Native Share Extension. Select theGeneraltab and underLinked frameworks and Librariesclick on+and add all of the selected static binaries there
- We need to modify the
Info.plistinside the extension (e.g.MyShareEx/Info.plist) to make sure that our share extension can connect to internet. This is useful if you need your share extension connects to your API server or react-native remote server dev. For doing that we need toApp Transport Security SettingstoInfo.plist

- Now go back to your extension file (in my case
MyShareEx.m) and paste the following code there being sure to substituteMyShareExin all three places for whatever you chose above
If your project entry is
index.jsinstead ofindex.ios.jsthen needs to replace@"index.ios"with@"index"
#import <Foundation/Foundation.h>
#import "ReactNativeShareExtension.h"
#import <React/RCTBundleURLProvider.h>
#import <React/RCTRootView.h>
#import <React/RCTLog.h>

@interface MyShareEx : ReactNativeShareExtension
@end

@implementation MyShareEx

RCT_EXPORT_MODULE();

- (UIView*) shareView {
  NSURL *jsCodeLocation;

  jsCodeLocation = [[RCTBundleURLProvider sharedSettings] jsBundleURLForBundleRoot:@"index.ios" fallbackResource:nil];

  RCTRootView *rootView = [[RCTRootView alloc] initWithBundleURL:jsCodeLocation
                                                      moduleName:@"MyShareEx"
                                               initialProperties:nil
                                                   launchOptions:nil];
  rootView.backgroundColor = nil;

  // Uncomment for console output in Xcode console for release mode on device:
  // RCTSetLogThreshold(RCTLogLevelInfo - 1);

  return rootView;
}

@end
Set the NSExtensionActivationRule key in your Info.plist
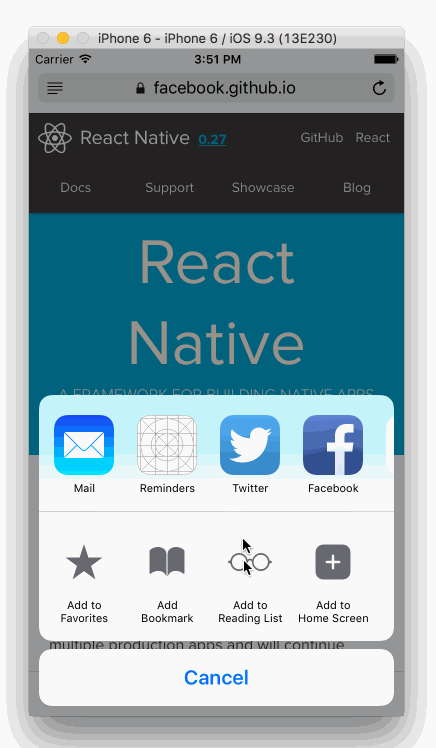
For the time being, this package only handles sharing of urls specifically from browsers. In order to tell the system to show your extension only when sharing a url, you must set the NSExtensionActivationRule key (under NSExtensionAttributes) in the share extension's Info.plist file as follows (this is also needed to pass Apple's reveiw):
<key>NSExtensionAttributes</key>
<dict>
  <key>NSExtensionActivationRule</key>
  <dict>
    <key>NSExtensionActivationSupportsWebURLWithMaxCount</key>
    <integer>1</integer>
  </dict>
</dict>

Note that while the above will prevent many apps from wrongly sharing using your extension, some apps (e.g., YouTube) will still allow sharing using your extension, which might cause your extension to crash. Check out this issue for details.
For reference about NSExtensionActivationRule checkout Apple's docs
- Try to build the project, it should now build successfully!
Android
- Edit
android/settings.gradleand add the following
include ':app', ':react-native-share-extension'

project(':react-native-share-extension').projectDir = new File(rootProject.projectDir, '../node_modules/react-native-share-extension/android')
- Edit
android/app/build.gradleand add the following line before the react section in dependencies
dependencies {
    ...
    compile project(':react-native-share-extension')
    compile "com.facebook.react:react-native:+"
}
-
Create a folder called
shareunder your java project and create two files. Call themShareActivity.javaandShareApplication.java....just like your main project. -
ShareActivity should look like this
// define your share project, if your main project is com.sample1, then com.sample1.share makes sense....
package com.sample1.share;


// import ReactActivity
import com.facebook.react.ReactActivity;


public class ShareActivity extends ReactActivity {
    @Override
    protected String getMainComponentName() {
      // this is the name AppRegistry will use to launch the Share View
        return "MyShareEx";
    }

}- ShareApplication should now look like this
// your package you defined in ShareActivity
package com.sample1.share;
// import build config
import com.sample1.BuildConfig;

import com.alinz.parkerdan.shareextension.SharePackage;

import android.app.Application;

import com.facebook.react.shell.MainReactPackage;
import com.facebook.react.ReactNativeHost;
import com.facebook.react.ReactApplication;
import com.facebook.react.ReactPackage;

import java.util.Arrays;
import java.util.List;


public class ShareApplication extends Application implements ReactApplication {
 private final ReactNativeHost mReactNativeHost = new ReactNativeHost(this) {
   @Override
   protected boolean getUseDeveloperSupport() {
     return BuildConfig.DEBUG;

   }

   @Override
   protected List<ReactPackage> getPackages() {
     return Arrays.<ReactPackage>asList(
         new MainReactPackage(),
         new SharePackage()
     );
   }
 };

 @Override
 public ReactNativeHost getReactNativeHost() {
     return mReactNativeHost;
 }
}- MainApplication should now look like this
// your package you defined in ShareActivity
package com.sample1;

import android.app.Application;
import android.util.Log;

import com.facebook.react.ReactApplication;
import com.facebook.react.ReactInstanceManager;
import com.facebook.react.ReactNativeHost;
import com.facebook.react.ReactPackage;
import com.facebook.react.shell.MainReactPackage;

import com.alinz.parkerdan.shareextension.SharePackage;

import java.util.Arrays;
import java.util.List;

public class MainApplication extends Application implements ReactApplication {

  private final ReactNativeHost mReactNativeHost = new ReactNativeHost(this) {
    @Override
    protected boolean getUseDeveloperSupport() {
      return BuildConfig.DEBUG;
    }

    @Override
    protected List<ReactPackage> getPackages() {
      return Arrays.<ReactPackage>asList(
          new MainReactPackage(),
          new SharePackage()
      );
    }
  };

  @Override
  public ReactNativeHost getReactNativeHost() {
      return mReactNativeHost;
  }
}- Edit
android/app/src/main/AndroidMainfest.xmland add the newactivityright afterdevSettingActivity.
<activity android:name="com.facebook.react.devsupport.DevSettingsActivity"/>

<activity
    android:noHistory="true"
    android:name=".share.ShareActivity"
    android:configChanges="orientation"
    android:label="@string/title_activity_share"
    android:screenOrientation="portrait"
    android:theme="@style/Theme.Share.Transparent" >
   <intent-filter>
     <action android:name="android.intent.action.SEND" />
     <category android:name="android.intent.category.DEFAULT" />
    //  for sharing links include
     <data android:mimeType="text/plain" />
    //  for sharing photos include
    <data android:mimeType="image/*" />
   </intent-filter>
</activity>
in this new activity I have used 2 variables @string/title_activity_share and @style/Theme.Share.Transparent, you can add those in res/values.
So in values/strings.xml
<resources>
    ...
    <string name="title_activity_share">MyShareEx</string>
</resources>
and in values/styles.xml
<resources>
    ...
    <style name="Share.Window" parent="android:Theme">
        <item name="android:windowEnterAnimation">@null</item>
        <item name="android:windowExitAnimation">@null</item>
    </style>

    <style name="Theme.Share.Transparent" parent="android:Theme">
        <item name="android:windowIsTranslucent">true</item>
        <item name="android:windowBackground">@android:color/transparent</item>
        <item name="android:windowContentOverlay">@null</item>
        <item name="android:windowNoTitle">true</item>
        <item name="android:windowIsFloating">true</item>
        <item name="android:backgroundDimEnabled">true</item>
        <item name="android:windowAnimationStyle">@style/Share.Window</item>
    </style>
</resources>- Now you should be able to compile the code without any errors!
If you need to add more packages to your share extension, do not override
getPackages, instead override thegetMorePackagesmethod underShareExActivity.
Share Component
So both share extension and main application are using the same code base, or same main.jsbundle file. So the trick to separate Share and Main App is registering 2 different Component entries with AppRegistry.registerComponent.
In both the iOS and Android share extensions we are telling react to load the extension component (in my case MyShareEx) from js.
So in index.ios.js and index.android.js we are writing the same code:
//index.android.js
import React from 'react'
import { AppRegistry } from 'react-native'

import App from './app.android'
import Share from './share.android'

AppRegistry.registerComponent('Sample1', () => App)
AppRegistry.registerComponent('MyShareEx', () => Share) // TODO: Replace MyShareEx with my extension name
//index.ios.js
import React from 'react'
import { AppRegistry } from 'react-native'
import App from './app.ios'
import Share from './share.ios'
AppRegistry.registerComponent('Sample1', () => App)
AppRegistry.registerComponent('MyShareEx', () => Share) // TODO: Replace MyShareEx with my extension nameSo the app.ios and app.android.js refers to main app and share.ios.js and share.android.js refers to share extension.
Share Extension APIs
-
data()is a function that returns a promise. Once the promise is resolved, you get two values,typeandvalue.
import ShareExtension from 'react-native-share-extension'
...

const { type, value } = await ShareExtension.data()
close()
Simply closes the share extension and returns the touch event back to application that triggered the share.
On iOS: Re-harvesting a shared image
If your share extension is being used to process shared images (be it to social media or processing the image for information), react-native-share-extension will provide a URL within value with the location of the image.
If you wish to pass this URL back down to Swift or Objective-C for whatever reason, you can use the following to convert the URL back into a UIImage:
func harvestImage(from imageURL: String) {
    if let imgData = FileManager.default.contents(atPath: imageURL) {
        if let img = UIImage(data: data){
        	// Process image..
        }
    }
}
or in Objective-C:
-(void)harvestImage:(NSString *)imageURL {
	NSFileManager *fileManager = [NSFileManager defaultManager];
	NSData *imgData = [fileManager contentsAtPath:imageURL];
	UIImage img = [UIImage imageWithData:imgData];
	// Process Image..
}
Test on Device without dev-server
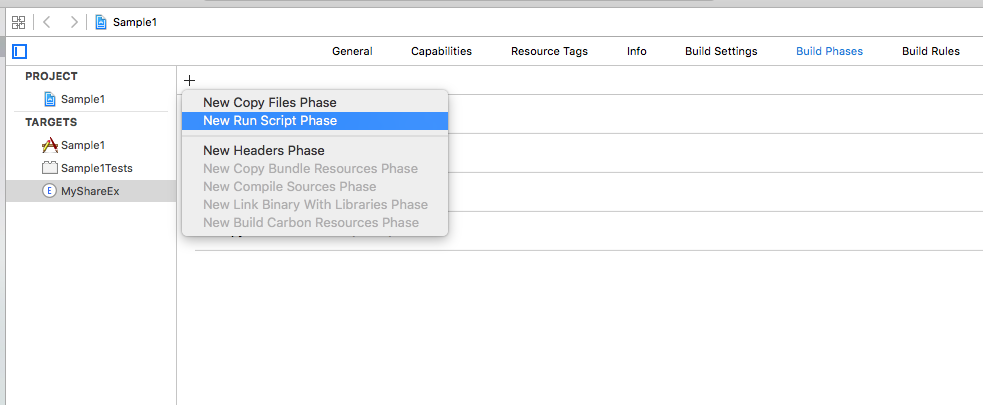
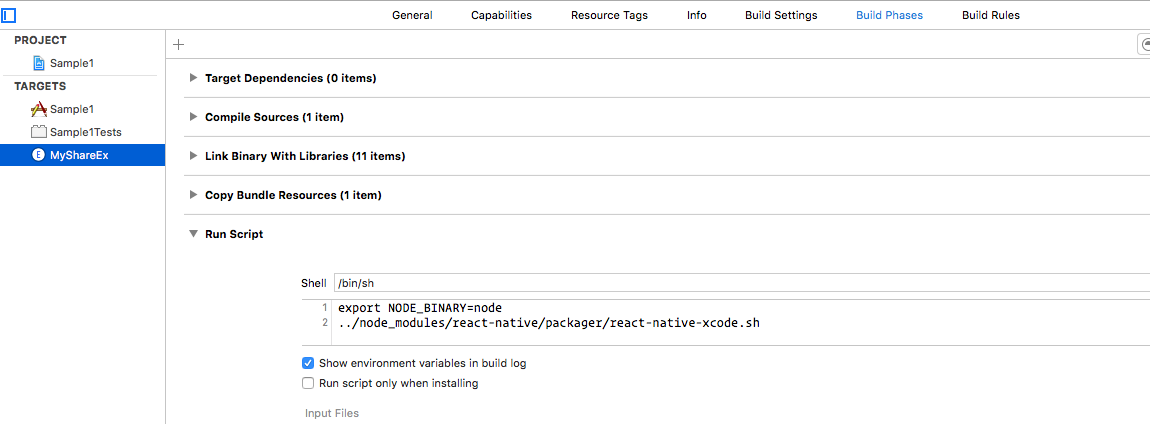
Because a share extension in ios is treated as a separate container, they do not have access to main app folder. A resolution for this is that you have to build the script twice and package it inside the share extension container. The easiest way of doing this is create a New Script Phase in Build Phases of your share extension and copy the following line
export NODE_BINARY=node
../node_modules/react-native/scripts/react-native-xcode.sh
App and app extension bundles
The app and app extension bundles can be shared or separated. Separating bundles allows for a minimal footprint for both app and app extension.
plist key legend
BundleEntryFilename - react-native index or shared index filename.
BundleSkipped - Skips bundling when true.
BundleCopied - Copies bundle instead of building when true. (Note: Should be set as true for share extension plist only when bundles are shared.)
BundleForced - Forces bundling when true.
Shared bundles
The app extension target builds pre-loaded bundle and is copied to the app target.
app plist values
BundleEntryFilename = 'index.js'
BundleSkipped = true
BundleCopied = true
app target's "Bundle React Native code and images" phase
export NODE_BINARY=node
../bin/react-native-xcode.sh
appShareExtension plist values
BundleEntryFilename = 'index.js'
BundleForced = true
appShareExtension target's "Bundle React Native code and images" phase
cd ../
npm run cp-native-assets
cd ios/
export NODE_BINARY=node
../bin/react-native-xcode.sh
Separated bundles
The app extension and app targets build their own unique bundles.
NSNotificationCenter will kill app extensions that are unable to free memory resources when receiving low memory warnings. Also, shared bundles introduce library/pod dependencies that aren't needed by both apps. Configuring separate bundles via Xcode requires customizing react-native-xcode.sh; a quick example customization can be found in the bin directory. Update the path to the packager in both the app and app extension target's "Bundle React Native code and images" Build Phases.
Build time can be halved while debugging by disabling the bundle for whichever target you aren't debugging (app or app ex).
app plist values
BundleEntryFilename = 'index.js'
app target's "Bundle React Native code and images" phase
export NODE_BINARY=node
#export ENTRY_FILENAME=index
../bin/react-native-xcode.sh
appShareExtension plist values
BundleEntryFilename = 'share.index.js'
BundleForced = true
appShareExtension target's "Bundle React Native code and images" phase
cd ../
npm run cp-native-assets
cd ios/
export NODE_BINARY=node
../bin/react-native-xcode.sh
Open container app
Steps needed to open the host application from the share extension.
- Allow your app to be opened via URL Scheme - Learn more
- In xcode, select share extension and go to Build Settings and set Require Only App-Extension-Safe API to
NO.
Then you can open your app from the share extension by calling openURL:
import ShareExtension from 'react-native-share-extension';

ShareExtension.openURL('sample://example/url');
Troubleshooting on iOS devices
Using the iOS Simulator and remote react-native debugger to develop the extension can hide issues that won't occur until testing on device. If you're experiencing issues running the extension on iOS devices, examine the Xcode console or device log for any obvious errors. If the Xcode console isn't receiving console output, ensure that the OS_ACTIVITY_MODE=disable environment var isn't enabled for the active scheme (see https://github.com/facebook/react-native/issues/10027). OS_ACTIVITY_MODE will hide device logging in the Xcode console, so its use is only advisable for iOS Simulator. For release mode, in order to view console output and see all output in the syslog, uncomment the RCTSetLogThreshold(RCTLogLevelInfo - 1); statement in your MyShareEx class.
- If you're using react-native latest, error boundaries might help with JS errors. Another option is to catch render exceptions or test for errors, then render that output with something like a Text component. As long as your share app initializes, you should be able to see yellowbox/redbox errors. If you're not seeing them, you likely have an initialization issue.
- Disable bundling on the main target when debugging the extension target, it's not needed when you're not working with the main app.
- Enable breaking on exceptions. This is helpful if there are any exceptions in the extension itself; perhaps most useful if you've customized the native module.
Final note
I have used react-native-modalbox module to handle the showing and hiding share extension which makes the experience more enjoyable for the user.
Cheers